
CHAPTER 8 Configuring Internet Security
In Chapter 7, “Keeping the Bad Guys at Bay,” you learned about some tweaks designed to thwart a would-be interloper with direct access to your Windows PC. Although it’s true that hands-on hackers aren’t rare, they’re not exactly commonplace, either. You’re many, many more times likely to fall prey to an intruder who has, at best, only indirect access to your computer. I speak, of course, of the Internet and the all-but-innumerable miscreants who haunt its dark alleys and dank passageways.
Land on the wrong website, and a malicious script might do something nasty to your PC; install the wrong program, and you might end up with spyware or a virus installed right along with it; type your email address in the wrong place and you might end up with even more spam than you’ve got already.
How’s a body to bypass these threats and still enjoy the online world? Fortunately, it’s not that hard. This chapter presents a few tweaks that can help. Besides those tips, you can also do a few more general things:
• Keep your PC patched—Your worst enemy when it comes to online safety is actually your operating system! The sheer number of Windows vulnerabilities is staggering, and the only chance you’ve got to prevent some cracker from taking advantage of just one of those holes to wreck your PC is to apply any and all security-related updates that Microsoft releases.
• Load up your machine with antimalware—Your Windows PC can never have enough protection. So although XP comes with a firewall, and Vista also comes with an antispyware program, don’t stop there. On your XP PC you need one or more antispyware programs running; on your Vista PC, adding a second antispyware program wouldn’t hurt; and on both XP and Vista you really need a top-of-the line antivirus program.
• Pay attention and use common sense—Lots of people run into trouble online, not because cyberspace is an inherently dangerous place, but because the vast majority of those people simply weren’t paying attention to what they were doing. If an offer sounds too good to be true, it almost certainly is. If a file attachment shows up unexpectedly, it probably contains something unexpected (and unwelcome). If Vista’s User Account Control dialog box shows up without you doing anything, it means that something else is doing something, and it’s a lead-pipe cinch that it’s up to no good.
Windows can’t do much to ensure your store of common sense is topped up, but it can help you with your PC’s update and anti-malware status. The Windows Security Center offers a quick peek at your security settings and shows you right away if anything’s amiss. To launch the Windows Security Center, use either of the following techniques:
• Windows Vista—Select Start, type wscui.cpl into the Search box, and then press Enter (or click wscui.cpl in the search results).
• Windows XP—Select Start, Run, type wscui.cpl into the Run dialog box, and then click OK.
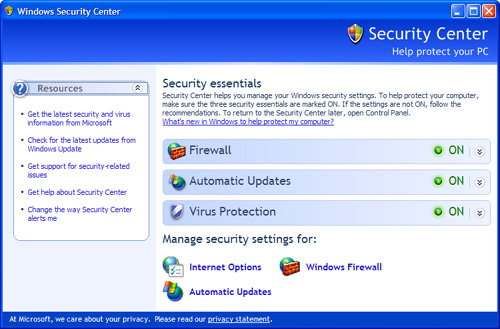
Figure 8.1 shows the ideal Security Center state for Windows Vista, and Figure 8.2 shows the XP equivalent.
FIGURE 8.1 The Windows Security Center in Vista when it’s running on all security cylinders.
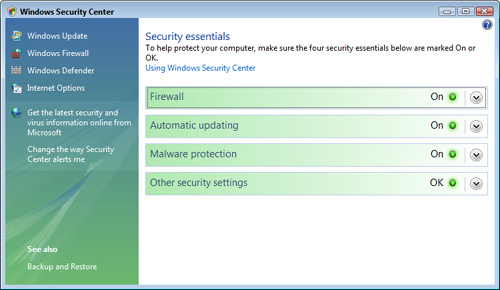
FIGURE 8.2 XP’s version of the ideal Windows Security Center state.
Make Sure Your Firewall Is Up to Snuff
![]()
If you access the Internet using a broadband—cable modem or DSL—service, chances are that you have an always-on connection, which means there’s a much greater chance that a malicious hacker could find your computer and have his way with it. You might think that with millions of people connected to the Internet at any given moment, there would be little chance of a “script kiddy” finding you in the herd. Unfortunately, one of the most common weapons in a black-hat hacker’s arsenal is a program that runs through millions of IP addresses automatically, looking for live connections. The fact that many cable systems and some DSL systems use IP addresses in a narrow range compounds the problem by making it easier to find always-on connections.
When a cracker finds your address, he has many avenues from which to access your computer. Specifically, your connection uses many different ports for sending and receiving data. For example, the File Transfer Protocol (FTP) uses ports 20 and 21, web data and commands typically use port 80, email uses ports 25 and 110, the domain name system (DNS) uses port 53, and so on. In all, there are dozens of these ports, and each one is an opening through which a clever cracker can gain access to your computer.
As if that weren’t enough, attackers can check your system for the installation of some kind of Trojan horse or virus. (Malicious email attachments sometimes install these programs on your machine.) If the hacker finds one, he can effectively take control of your machine (turning it into a zombie computer) and either wreck its contents or use your computer to attack other systems.
Again, if you think your computer is too obscure or worthless for someone else to bother with, think again. For a typical computer connected to the Internet all day long, hackers probe for vulnerable ports or installed Trojan horses at least a few times every day. If you want to see just how vulnerable your computer is, several good sites on the Web will test your security:
• Gibson Research (Shields Up)—grc.com/default.htm
• DSL Reports—www.dslreports.com/secureme_go
• HackerWhacker—www.hackerwhacker.com
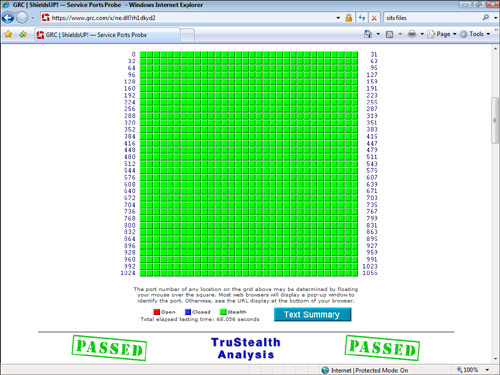
The good news is that Windows includes the Windows Firewall tool, which is a personal firewall that can lock down your ports and prevent unauthorized access to your machine. In effect, your computer becomes invisible to the Internet (although you can still surf the Web and work with email normally). Other firewall programs exist out there, but Windows Firewall does a good job. For example, Figure 8.3 shows the output of the Shields Up tool from Gibson Research after probing a typical Vista computer. As you can see Windows Firewall held its own.
FIGURE 8.3 This standard Windows Vista PC stood up to everything the Shields Up tool threw at it.
Create a Windows Firewall Exception
![]()
I just spent the past couple of pages telling you how important a firewall is for a secure computer, so it may seem more than a little strange that I’m now going to show you how to poke holes in that firewall. Actually, this kind of thing is fairly routine, at least behind the scenes, where programs such as Microsoft Office Outlook and iTunes often configure Windows Firewall to allow them to access the Internet. That’s fine, but why would you want to do something like this? There are many reasons, but they mostly boil down to needing some sort of data to get though the firewall. For example, if you want to perform administrative duties on a computer on your network, that computer’s firewall needs to be configured to allow the Remote Assistance service through, something I talk more about in Chapter 30, “Making Remote Connections.” Similarly, if you activate Vista’s built-in web server, you need to configure that PC to allow data through port 80. (I use this as an example later in this section.)
• See “Configure a Network Computer for Remote Administration,” p. 358.
These are examples of firewall exceptions, and there are actually three types of exceptions you can set up:
• Enable an existing exception—Windows maintains a list of programs and services that are often used as exceptions, and you can toggle these on and off.
• Add a program as a new exception—If the program you want to use isn’t in the list, you can add it yourself.
• Add a port as a new exception—You can also configure a port as an exception, and the firewall will allow data to pass back and forth through the port.
In each case, you can also limit the computers that can access your computer via the exception, which is called the scope of the exception. Again, you have three choices:
• Any Computer—This scope allows any computer on your network and on the Internet to use the exception. This is the way to go if you want people on the Internet to access your computer (your web server, for example), or if you want to access your computer from the Internet, as described in Chapter 30.
• See “Connect to Your Desktop via the Internet,” p. 354.
• My Network (Subnet) Only—This scope allows only the computers on your network to use the exception. Technically, it allows only those computers that are on the part of the network where they can see your computer. This means they’re on the same subnet as you. For most small networks, the subnet and the entire network are the same thing. This is a good choice if you want everyone on your network to use the data, but still keep your PC safe from Internet intruders.
• Custom List—This scope is a list of computer IP addresses, and it means that only those computers on the list can use the exception. Go this route if you want complete control over who uses the exception.
The next three sections show you how to create the three types of firewall exceptions. First, use one of these techniques to open up the Windows Firewall settings:
• Windows Vista—Select Start, type firewallsettings into the Search box, and then press Enter (or click Firewall Settings in the search results). When the User Account Control dialog box appears, enter your UAC credentials.
• Windows XP—Select Start, Run, type firewall.cfg into the Run dialog box, and then click OK.
Activating an Existing Exception
The Windows Firewall Settings dialog box maintains a list of programs, services, and sometimes ports that are currently enabled as exceptions, or that are commonly enabled but currently are not. This is the easiest way to set up an exception because, as the following steps show, all you have to do is activate a check box:
1. Launch the Windows Firewall Setting dialog box.
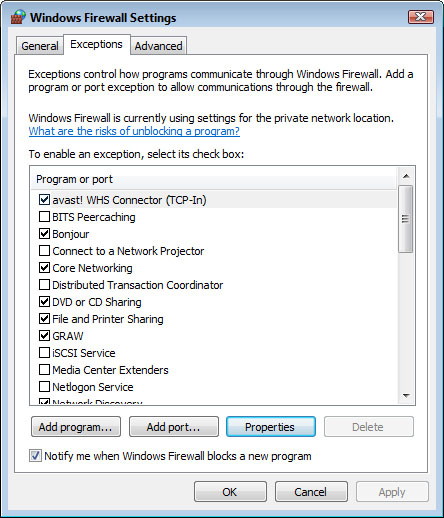
2. Click the Exceptions tab. Figure 8.4 shows the Exceptions tab in Vista’s Windows Firewall Settings dialog box.
FIGURE 8.4 The Exceptions tab lets you keep track of the Windows Firewall exceptions.
3. Activate the check box beside the exception you want to enable.
4. To change the scope, click the exception, click Properties (or Edit, in XP), click Change Scope, choose the scope option you want, and then click OK until you return to the Exceptions tab.
4. Click OK to put the exception into effect.
Adding a Program as a New Exception
If you don’t see the program you want to work with, you can add it by hand. Here’s how:
1. Launch the Windows Firewall Setting dialog box.
2. Click the Exceptions tab.
3. Click Add Program. The Add a Program dialog box appears, as shown in Figure 8.5.
FIGURE 8.5 Use the Add a Program dialog box to configure an application as a firewall exception.
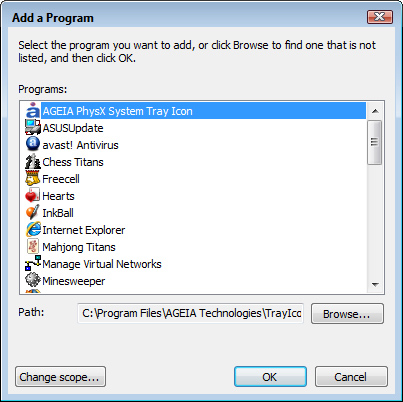
4. If you see your program in the list, click it; otherwise, click Browse, use the Browse dialog box to select the program’s executable file, and then click Open.
5. Click Change Scope to open the Change Scope dialog box.
6. Choose the scope option you want. If you choose the Custom List option, use the text box to type the IP addresses of the computers you want to allow for the exception, separated by commas. Click OK.
7. Click OK. Windows Firewall adds the program to the Exceptions tab and activates its check box.
8. Click OK to put the exception into effect.
Adding a Port as a New Exception
If you need to open a port on your computer, follow these steps:
1. Launch the Windows Firewall Setting dialog box.
2. Click the Exceptions tab.
3. Click Add Port. The Add a Port dialog box appears, as shown in Figure 8.6.
FIGURE 8.6 Use the Add a Port dialog box to configure a port as a firewall exception.
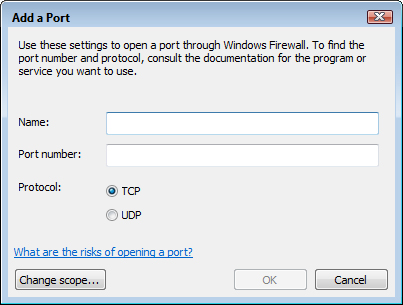
4. Use the Name text box to make up a name for this exception. This is the name that appears in the Exceptions tab, so make it reasonably descriptive. For example: Port 80 for Web Server.
5. Use the Port Number text box to type the port you want to set up as an exception.
6. Click the data protocol you want the exception to use: TCP or UDP. (If you’re not sure, choose TCP.)
7. Click Change Scope to open the Change Scope dialog box.
8. Choose the scope option you want. If you choose the Custom List option, use the text box to type the IP addresses of the computers you want to allow for the exception, separated by commas. Click OK.
9. Click OK. Windows Firewall adds the program to the Exceptions tab and activates its check box.
10. Click OK to put the exception into effect.
Example: Accessing Your Web Server Over the Network
You can configure your Windows Vista or Windows XP computer as a web server by using the Internet Information Services (IIS) server. I won’t go into the details about using this powerful server (the Vista version—IIS 7—is particularly nice), but I will show you how to ensure that other folks on your network can access the server after it’s running.
IIS 7 is a feature in the Home Premium, Business, Enterprise, and Ultimate versions of Vista, but it’s not installed by default on any of them. To install it, you need to work through the following steps:
1. Select Start, Control Panel to open the Control Panel window.
2. Click Programs to open the Program window.
3. Under Programs and Features, click the Turn Windows Features On or Off link. The User Account Control dialog box appears.
4. Enter your UAC credentials. Vista displays the Windows Features dialog box, which takes a few moments to populate.
5. Click to activate the check box beside Internet Information Services. Vista selects the most commonly used IIS features. If you want to install these default features, skip to step 7.
6. Open the Internet Information Services branch, and then activate the check boxes beside each component you want to work with. Here are some suggestions:
• Web Management Tools, IIS Management Service—Install this component to configure your web server from any other computer on your network.
• World Wide Web Services, Application Development Features—The components in this branch represent the IIS programming features. If you’re running IIS to build and test web applications, be sure to activate the check box for each development technology you require.
• World Wide Web Services, Security, Basic Authentication—Install this component if you want to restrict website access to users who have a valid Windows username and password.
7. Click OK. Vista installs IIS 7.
Although there’s not much to see, the default website is ready for action as soon as you install IIS. To access the website from the computer running IIS, you can enter any of the following addresses into your web browser:
http://127.0.0.1/
http://localhost/
http://IPAddress/ (replace IPAddress with the IP address of the computer)
http://ComputerName/ (replace ComputerName with name of the computer)
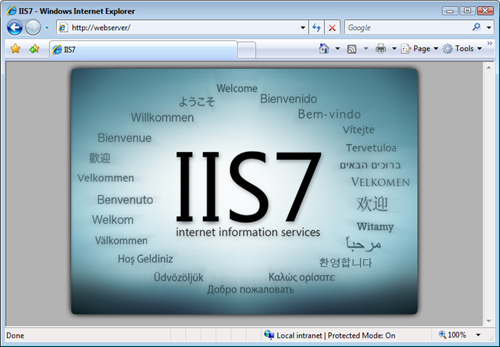
Figure 8.7 shows the home page of the default IIS website that appears.
FIGURE 8.7 The default IIS 7 website home page.

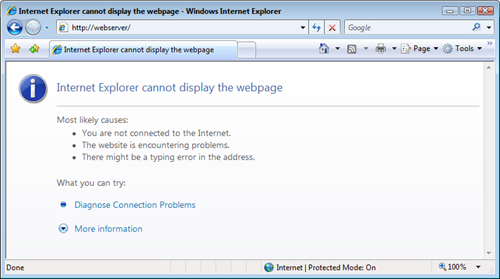
As things stand now, your new website will work properly only when you access it using a web browser on the Windows PC that’s running IIS. If you try to access the site on any other computer, you get the message shown in Figure 8.8.
FIGURE 8.8 Other computers on the network can’t access the web server yet.
The problem is that the web server’s firewall hasn’t been configured to allow data traffic through the World Wide Web Services used by IIS. For your website to work from any remote location on your network, you need to set up an exception for the World Wide Web Services in Windows Firewall. Here are the steps to follow:
1. Launch the Windows Firewall Setting dialog box.
2. Click the Exceptions tab.
3. Click to activate the check box beside the World Wide Web Services (HTTP) item.
4. Click OK to put the exception into effect.
With the Windows Firewall exception for the World Wide Web Services in place, you can now access the website from any remote computer on your network. You do this by launching your web browser and entering one of the following addresses:
http://IPAddress/ (replace IPAddress with the IP address of the IIS computer)
http://ComputerName/ (replace ComputerName with name of the IIS computer)
As you can see in Figure 8.9, the network computer can now access the web server.
FIGURE 8.9 With the exception in effect, other computers on the network can now access the web server.
Boost Email Security by Reading Messages in Plain Text
![]()
It used to be that all email messages were simple text affairs. Even when email clients started including features for formatting messages, few people used them because it was unlikely that the recipient would see your formatting efforts (and might not see your message at all, depending on how ornery their email program was toward formatted messages). Nowadays, however, formatted messages—often called rich text messages, but they’re really HTML messages—are pretty much the norm.
That’s fine, as long as the sender is judicious with the use of fonts, colors, backgrounds, and other formatting bric-a-brac. However, the use of HTML in messages has led to a couple of security risks:
• Malicious scripts—Because messages can include the equivalent of web page code, they can also include the equivalent of web page scripts. Those scripts run as soon as you open or even preview a message.
• Web bugs—A web bug is an image that resides on a remote server and is included in an HTML-formatted email message by referencing a URL on the remote server. When you open the message, the email program uses the URL to download the image for display within the message. That sounds harmless enough, but if the message is junk email, it’s likely that the URL will also contain either your email address or a code that points to your email address. When the remote server gets a request for this URL, it knows not only that you’ve opened the message, but also that your email address is legitimate.
Here are some solutions to consider:
• Use Restricted Sites security—If you crank up the security level in your email program, scripts won’t be allowed to run. Restricted Sites is the default security level in Windows Mail, Outlook Express, and Outlook 2003, but to be safe, select Tools, Options, click the Security tab, and then click the Restricted Sites Zone option. (Note that Restricted Sites security is baked in for Outlook 2007 and can’t be changed.)
• Don’t open or even preview suspect messages—To delete a suspect message without having it display in the preview pane, right-click the message and then click Delete.
• Block images from displaying—This is a great way to thwart your average web bug:
Windows Mail and Outlook Express—Select Tools, Options, click the Security tab, and then activate the Block Images and Other External Content in HTML E-mail check box.
Outlook 2007—Select Tools, Trust Center, click Automatic Download, and then activate the Don’t Download Pictures Automatically in HTML E-mail Messages or RSS Items check box.
Outlook 2003—Select Tools, Options, click the Security tab, click Change Automatic Download Settings, and then activate the Don’t Download Pictures or Other Content Automatically in HTML E-mail check box.
These are all useful solutions, to be sure, but an even easier way to keep yourself safe from malicious scripts and web bugs is to read all your messages in plain text. It’s safe, you don’t have to worry about deciphering someone’s ugly script font, and it’s easy to switch a message to the HTML view of you need to.
Use one of the following techniques to read all your email messages in plain text:
• Windows Mail and Outlook Express—Select Tools, Options, click the Read tab, and then activate the Read All Messages in Plain Text check box.
• Outlook 2007—Select Tools, Trust Center, click E-mail Security, and then activate the Read All Standard Messages in Plain Text check box.
• Outlook 2003—Select Tools, Options, click the Preferences tab, click E-mail Options, and then activate the Read All Standard Messages in Plain Text check box.
I use a macro to toggle Outlook between plain text and HTML. Here’s the one I use for Outlook 2007:
Sub ToggleReadMailInPlainText()
SendKeys “%tse%a{ENTER}”
End Sub
Here’s one for Outlook 2003:
Sub ToggleReadMailInPlainText()
SendKeys “%to%m%e{ENTER}{ESC}”
End Sub
In both programs, press Alt+F11 to open the Visual Basic Editor. In the project pane, open Project1, Microsoft Office Outlook, and then double-click ThisOutlookSession to open the module window. Type the macro into the module and then choose File, Save. You can create a toolbar button for the macro by returning to Outlook and selecting View, Toolbars, Customize.
Reduce Spam by Blocking Messages from Certain Countries or Languages

Unless you’ve done an unusually good job at keeping your email address secret, you probably receive at least a few spam emails every day, and it’s more likely that you receive a few dozen. Most experts agree that the problem is only going to get worse, so you need to do whatever you can to keep spam from inundating your inbox.
The best way to avoid spam is to avoid getting on a spammer’s list of addresses in the first place. That’s hard to do these days, but here are some steps you can take:
• Never use your actual email address in a newsgroup account. The most common method that spammers use to gather addresses is to harvest them from newsgroup posts. One common tactic you can use is to alter your email address by adding text that invalidates the address but is still obvious for other people to figure out:
[email protected]_this_to_email_me.com
• When you sign up for something online, use a fake address, if possible. If you need or want to receive email from the company and so must use your real address, make sure that you deactivate any options that ask if you want to receive promotional offers. Alternatively, enter the address from an easily disposable free web-based account (such as a Hotmail account) so that any spam you receive will go there instead of to your main address. If your free email account overflows with junk mail, remove it and create a new one. (You can also do this through your ISP if it allows you to create multiple email accounts.)
• Never open suspected spam messages. Doing so can sometimes notify the spammer that you’ve opened the message, thus confirming that your address is legit. For the same reason, you should never display a spam message in the preview pane.
• Never respond to spam, even to an address within the spam that claims to be a “removal” address. By responding to the spam, all you’re doing is proving that your address is legitimate, so you’ll just end up getting more spam.
TIP
If you create web pages, never put your email address on a page because spammers use crawlers that harvest addresses from web pages. If you must put an address on a page, hide it using some simple JavaScript code:
<script language="JavaScript" type="text/javascript">
<!--
var add1 = “webmaster”
var add2 = “@”
var add3 = “whatever.com”
document.write(add1 + ![]() add2 + add3)
add2 + add3)
//-->
</script>
If you do get spam despite these precautions, the good news is that Windows Mail, Outlook 2003, and Outlook 2007 all come with a Junk E-mail feature that can help you cope. (Outlook Express does not have a Junk E-mail feature, unfortunately.) Junk E-mail is a spam filter, which means that it examines each incoming message and applies sophisticated tests to determine whether the message is spam. If the tests determine that the message is probably spam, the program exiles the email to a separate Junk E-mail folder. It’s not perfect (no spam filter is), but with a bit of fine-tuning it can be a very useful weapon against spam.
What do I mean by fine-tuning? I mean using the program’s Junk E-mail options to adjust the settings to suit the way you work and the type of mail you receive. Use the following techniques to view the Junk E-mail options:
• Windows Mail—Select Tools, Junk E-mail Options.
• Outlook 2007 and Outlook 2003—Select Tools, Options, click the Preferences tab, and then click Junk E-mail.
Figure 8.10 shows the Windows Mail Junk E-mail Options dialog box.
FIGURE 8.10 The Junk E-mail Options dialog box displayed by Windows Mail.
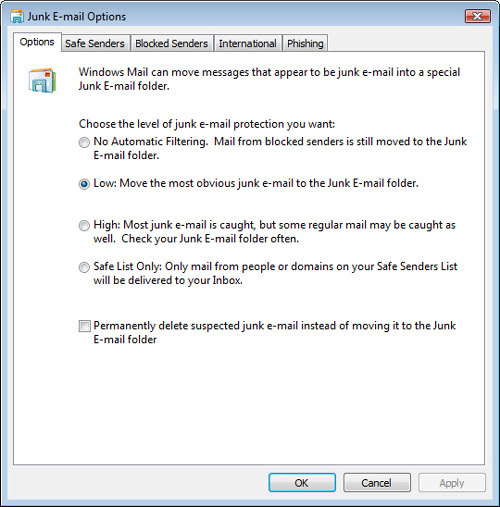
You can use three standard techniques to fine-tune your spam filter:
• Set the Junk E-mail protection level—Use the settings on the Options tab to set the protection level. A high protection level means that the program aggressively marks messages as spam. That may sound good, but filtering spam is a trade-off between protection and convenience. That is, the stronger the protection you use, the less convenient the filter becomes, and vice versa. This inverse relationship is the result of a filter phenomenon called a false positive—a legitimate message that the filter has pegged as spam and has moved to the Junk E-mail folder. The stronger the protection level, the more likely it is that false positives will occur, so the more time you must spend checking the Junk E-mail folder for legitimate messages that need to be rescued.
• Designate safe senders—If you use the Low or High junk email protection level, you can reduce the number of false positives by letting the mail programs know about the people or institutions that regularly send you mail. By designating these addresses as Safe Senders, you tell the program to leave their incoming messages in your Inbox automatically and never redirect them to the Junk E-mail folder. You can add individual email addresses of the form [email protected], or domain names of the form @somewhere.com. Use the settings in the Safe Senders tab to do this.
• Block people who send spam—If you notice that a particular address is the source of much spam or other annoying email, the easiest way to block the spam is to block all incoming messages from that address. You can do this using the Blocked Senders list, which watches for messages from a specific address and relegates them to the Junk E-mail folder. Use the settings in the Blocked Senders tab to do this.
These are all useful methods, but many people forget that Windows Mail and Outlook 2007 (not Outlook 2003, unfortunately) also offer two more useful features that enable you to handle spam with an international flavor:
• Spam that comes from a particular country or region—If you receive no legitimate messages from that country or region, you can treat all messages from that location as spam. Windows Mail and Outlook 2007 do this by using the top-level domain (TLD), which is the final suffix that appears in a domain name. There are two types: a generic top-level domain, such as com, edu, or net; and a country code top-level domain, such as ca (Canada) and fr (France). Windows Mail and Outlook 2007 use the latter to filter spam that comes from certain countries.
• Spam that comes in a foreign language—If you don’t understand a language, you can safely treat all messages that appear in that language as spam. The character set of a foreign language always appears using a special encoding unique to that language. (An encoding is a set of rules that establishes a relationship between the characters and their representations.) Windows Mail and Outlook 2007 use that encoding to filter spam in a specified language.
With the Junk E-mail Options dialog box open, use the following steps to configure these aspects of your spam filter:
1. Display the International tab.
2. To filter spam based on one or more countries, click the Blocked Top-Level Domain List button. You see the Blocked Top-Level Domain List dialog box, shown in Figure 8.11.
FIGURE 8.11 Use the Blocked Top-Level Domain List dialog box to select the country domains that you want to treat as spam.

3. Activate the check box beside each of the countries you want to filter.
4. Click OK.
5. To filter spam based on one or more languages, click the Blocked Encodings List button. You see the Blocked Encodings List dialog box, shown in Figure 8.12.
FIGURE 8.12 Use the Blocked Encodings List dialog box to select the languages that you want to treat as spam.
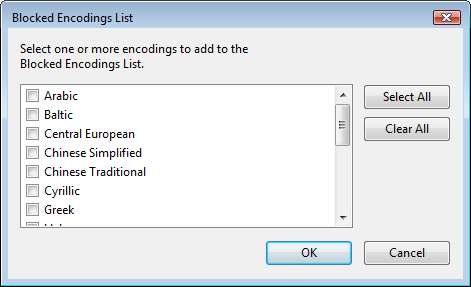
6. Activate the check box beside each of the languages you want to filter.
7. Click OK.
8. Click to put the new filter settings into effect.