
CHAPTER 21 Tweaking Photos
Our relationship with photography has gone from taking the occasional snapshot on vacation or at a party to practically documenting our lives. Why the switch? First, the advent of digital photography meant that the cost of taking a picture became negligible (assuming you didn’t print the photo), so why not snap away at will? Second, cameras became our constant companions when they reached the point where they could be shoehorned into a mobile phone. You have your phone with you at all times, so now you have a camera full-time, as well, so why not snap away at will?
You can debate the pros and cons of living a life through a camera lens, but let’s save that for the blogosphere. Here, our concern is handling the blizzard of digital photos that we all have to contend with these days. This chapter shows you a few tweaks that help you edit, manage, and share your digital photos.
Fix a Photo by Removing Red Eye

When you use a flash to take a picture of one or more people, in some cases the flash may reflect off the subjects’ retinas. The result is the common phenomenon of red eye, where each person’s pupils appear as red instead of black. (Some cameras come with a red eye reduction feature, which is usually a double flash: one to make the pupils contract before the shot and then another for the picture itself.)
If you have a photo where one or more people or animals have red eye because of the camera flash, you can use the Windows Vista Photo Gallery to improve the red eye and make your subjects look less crazed.
Here are the steps to follow:
1. Select Start, All Programs, Windows Photo Gallery to open the Windows Photo Gallery application.
2. Click the image that contains the red eye you want to remove.
3. Click Fix to open the Fix window.
4. Click the Zoom button and then use the slider to zoom in on the photo until you get a good look at the red eye. (If the red eye moves out of the view, click and drag the photo to pan the red eye into view.)
5. Click Fix Red Eye.
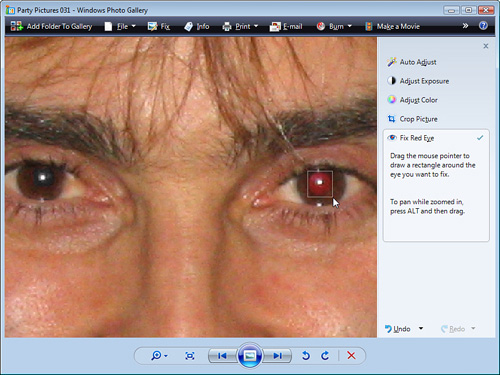
6. Click and drag your mouse to form a rectangle around the red eye, as shown in Figure 21.1. Windows Photo Gallery removes the red eye.
7. Repeat step 5 to fix any other examples of red eye in the photo.
8. Click Back to Gallery. Windows Photo Gallery applies the repairs.
FIGURE 21.1 You can use Windows Photo Gallery’s Fix Red Eye tool to remove red eye from a photo (as shown with the left eye in this image).
Crop a Photo to Get Rid of Unwanted Elements
Lots of digital photos are taken on the go, so often the framing of the subject leaves a bit to be desired. That is, the subject might be off to the side a bit, or the image might include surrounding elements that you don’t want or need to see. Fortunately these framing gaffes aren’t set in stone because you can use Vista’s Windows Photo Gallery application to essentially “reframe” the photo:
• You can adjust the photo so that it shows only the photo subject.
• You can adjust the photo to remove elements around the edges that you don’t want.
In both cases, you’re removing material from the outer parts of the photo, a process called cropping. Vista’s Windows Photo Gallery comes with a cropping tool, which you use to specify a rectangular area of a photo that you want to keep. Windows Photo Gallery discards everything outside of the rectangle.
Here’s how to crop a digital photo using Windows Photo Gallery:
1. Select Start, All Programs, Windows Photo Gallery to open the Windows Photo Gallery application.
2. Click the image you want to crop.
3. Click Fix to open the Fix window.
4. Click Crop Picture. Photo Gallery displays a cropping rectangle on the photo.
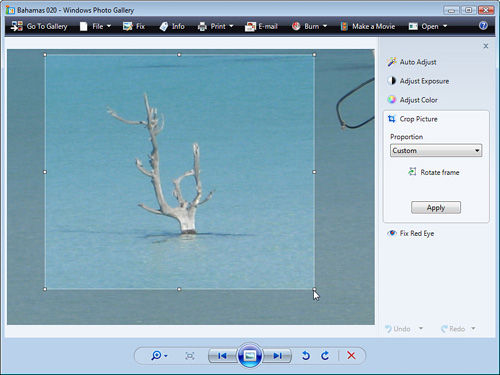
5. Click and drag a corner or side to define the area you want to keep, as shown in Figure 21.2. Remember that Photo Gallery keeps the area inside the rectangle.
FIGURE 21.2 You can use Windows Photo Gallery’s Crop Picture tool to crop out unwanted elements around the outside of a photo.
6. Click Apply. Photo Gallery crops the photo.
7. Click Back To Gallery.
Configure Custom Photo Import Names

When you need to import images from a device such as a digital camera, you can always connect the camera and then open the camera using the icon that appears in the Computer window. You can then move or copy the image from the camera to your PC using the standard cut (or copy) and paste techniques.
The only problem with that approach is that you end up with photos that use the existing filenames of the images. This is a problem because most cameras supply images with cryptic filenames, such as IMG_1083. These nondescriptive names can make it more difficult to find and work with images, particularly if you use the Details view in the Pictures folder.
To work around this problem, you can launch the import process from Windows Photo Gallery, which loads the Windows Picture and Video Import tool to perform the import. Crucially, this tool prompts you for an event tag—a word or short phrase—that describes the images you’re importing. Windows Photo Gallery then uses this tag when it names the destination folder and the photos. For example, if you import on August 23, 2009 and you specify Cottage Vacation as the event tag, your imported images will be stored in a folder named 2009-08-23 Cottage Vacation, and the photos will be named Cottage Vacation 001, Cottage Vacation 002, and so on.
Even better, Windows Photo Gallery lets you customize the folder name using any of the following variations:
• Date Imported + Tag (the default)
• Date Taken + Tag
• Date Taken Range + Tag
• Tag + Date Imported
• Tag + Date Taken
• Tag + Date Taken Range
• Tag
You can also opt to preserve the original photo filenames if you prefer to skip the tag step, and you can set up separate settings for cameras, scanners, and discs.
Follow these steps to configure custom photo import names:
1. In Windows Photo Gallery, select File, Options.
2. Select the Import tab, shown in Figure 21.3.
FIGURE 21.3 In the Windows Photo Gallery Options dialog box, use the Import tab to configure custom import folder and filenames.

3. In the Settings For list, choose the device you want to work with: Cameras, CDs and DVS, or Scanners.
4. If you want to import photos to a different folder, click Browse, use the Browse for Folder dialog box to choose the folder, and then click OK.
5. In the Folder Name list, choose the format you want to use for the destination folder name.
6. In the File Name list, choose the format you want to use for the imported file names.
7. If you don’t want specify a tag before the import, deactivate the Prompt for a Tag on Import check box.
8. Repeat steps 3–7 to configure import settings for other devices you use.
9. Click OK.
Stitch Multiple Photos into a Panorama
![]()
When you’re on vacation, it can be frustrating if you come upon a vista that just won’t fit in a single photo. It could be a massive mountain range or a peaceful beach landscape, but a single shot just doesn’t do it justice. The usual “solution” here is to take several consecutive photos at the same elevation and with the same settings, but each photo begins about where the previous one ends. That way, you can print the photos and mount them side by side, which at least gives you an approximation of the original grandeur.
This works, but it means you must print the photos, and the gap between each image is a bit distracting, particularly if you didn’t line up the shot perfectly and so there’s a bit of overlap between them.
You can overcome all of these problems by “stitching” the photos into a single digital photo called a panorama. No built-in Windows tool does this, but Microsoft has created an update to Windows Photo Gallery that does. It’s called Windows Live Photo Gallery, and you can install it on Vista Home Basic, Home Premium, and Ultimate PCs, as well as any PC running Windows XP Service Pack 2 or later. Go to http://get.live.com/, and then install Windows Live Photo Gallery.
After the program is installed, select Start, All Programs, Windows Live Photo Gallery to launch it. Now follow these steps to stitch your photos into a panorama:
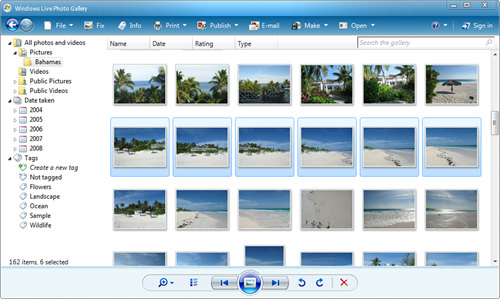
1. Select the photos you want to stitch together, as shown in Figure 21.4.
FIGURE 21.4 You can use Windows Live Photo Gallery to stitch multiple photos into a single panorama.
2. Select Make, Create Panoramic Photo. Windows Live Photo Gallery analyzes the images to see if they’re suitable for a panorama. If they are, the program stitches them together and then displays the Save Panoramic Stitch dialog box.
3. Use the File Name text box to name the stitched image.
4. Select a different location, if necessary.
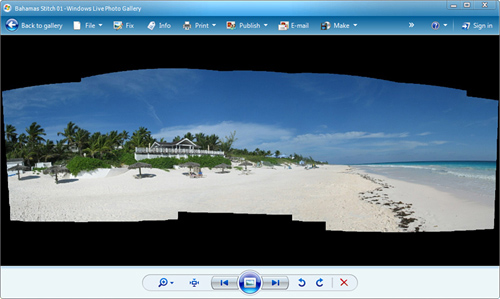
5. Click Save. Windows Live Photo Gallery displays the stitched panorama, as shown in Figure 21.5.
FIGURE 21.5 The six photos in Figure 21.4 stitched into a single panorama.
Publish Photos to Your Flickr Account
![]()
If you’ve got a Flickr (www.flickr.com) account for sharing your photos, you’ve probably experienced a common frustration: You use one program to import your photos, another to edit them, and then a third (your web browser or Flickr Uploadr) to send those photos to Flickr. Wouldn’t it be much easier to be able to import, edit, and upload photos from a single application?
Sure it would, and now you can. If you get Windows Live Photo Gallery (see the previous section), you can use it to not only import and edit photos, but you can also use it to upload photos directly to Flickr. Nice!
Here’s how it works:
1. In Windows Live Photo Gallery, select the photo or photos you want to upload.
2. Select Publish, More Services, Publish on Flickr. Windows Live Photo Gallery tells you that it requires your authorization to publish to Flickr.
3. Click Authorize. Your web browser appears and you see the Yahoo! sign-in page.
4. Type your Yahoo! ID and Password and click Sign In. The Authorize Windows Live Photo Gallery page appears.
5. Click OK, I’ll Allow It. Flickr configures your account to authorize Windows Live Photo Gallery.
6. Return to Windows Live Photo Gallery and click Next. You see the Publish on Flickr dialog box.
7. Use the Flickr Account list to select the Flickr account you want to use (if you have more than one).
8. Use the Photo Sets list to choose or create a Flickr photo set.
9. Use the Photo Size list to select the width of the photos.
10. Use the Permissions list to select who can see the photos.
11. Click Publish. Windows Live Photo Gallery uploads the photos to Flickr.
12. When the upload is complete, either click View Photos to access your Flickr account, or click Close.