
CHAPTER W6 Dual-Booting Windows with Other Operating Systems
Even if you think that your version of Windows is the greatest operating system ever, you have to admit that it probably doesn’t cover every computing base. If you’re running Vista, for example, you might have programs that run only under Windows XP; or you might like the stylishness and robustness of a Mac; or you might enjoy the freedom of a Linux distribution. Whatever the reason, you don’t need multiple computers to get the benefits of multiple operating systems. Instead, you can use just a single computer and run two operating systems on it. This is called dual-booting, and this chapter shows you a couple of ways to get it done.
Dual-Boot Vista and XP
![]()
Windows Vista is a great operating system, but it has certainly had its fair share of troubles. Service Pack 1 fixed a bunch of those woes, but there may still be times when you curse Vista’s very existence and long for the simpler days of Windows XP. Well, now you can return at least temporarily to those days by setting up your PC to dual-boot between Windows Vista and Windows XP.
Here are the steps to follow:
1. In Windows Vista, create a second partition that’s large enough to hold Windows XP (1.5GB minimum) and whatever applications you plan to install with XP. See Chapter 24, “Dealing with Disk Drives.”
• See “Divide Your Hard Drive into Two Partitions,” p. 273.
2. If your PC uses a Serial Advanced Technology Attachment (SATA) hard drive, you need to disable its Advanced Host Controller Interface (AHCI) because XP doesn’t work with AHCI. This requires two steps:
• In Vista, make sure the IDE hard disk driver is being loaded at startup. Select Start, type regedit, press Enter, and then enter your User Account Control credentials. Navigate to HKLMSystemCurrentControlSetServicespciide, double-click the Start setting, change its value to 0, and click OK.
• Restart your machine, access the system BIOS (usually by pressing Del during the POST), find the SATA configuration, and change it to IDE.
3. Insert your Windows XP CD, restart your computer, and then press a key when you see the Press any key to boot from CD prompt.
4. Follow the instructions provided by the XP Setup program to install XP normally.
5. XP Setup trashes Vista’s Master Boot Record (MBR), so you need to rebuild it. Insert your Windows Vista DVD, restart your computer, and then press a key when you see the Press any key to boot from CD prompt. When the initial setup screen appears, click Next, click Repair Your Computer, choose your Vista OS, and then click Next to see the System Recovery Options window. Click Startup Repair and then click Finish.
6. When you boot back into Vista, select Start, type command, right-click Command Prompt, click Run as Administrator, and then enter your User Account Control credentials.
7. At the command prompt, run the following command to modify the BCD store and add an entry for Windows XP to the startup boot menu (replace Description with a description of the XP partition; this is the text that appears in the boot menu):
bcdedit /create {legacy} /d “Description”
bcdedit /set {legacy} device boot
bcdedit /set {legacy} path
tldr
bcdedit /displayorder {legacy} /addlast
Dual-Boot Mac OS X and Windows on Your Mac
![]()
Dual-booting your Mac and Windows is a good idea for a bunch of reasons. You get maximum performance because Windows gets full use of all your Mac’s hardware resources, especially the Mac’s processor and RAM. You get maximum compatibility because Windows gets direct access to the Mac’s components, which means it should install the appropriate device drivers to work properly with those components. And, finally, you get the best price—free!—because your Mac’s dual-booting tool is Boot Camp, a program that comes with OS X 10.5 at no extra charge. (Of course, this solution is “free” only in the sense that I assume you already have a copy of Windows handy; if not, then of course you need to purchase Windows.) This section shows you how to install and run Boot Camp.
Creating a Partition for Windows
The first thing you need to do is create a second partition on your Mac’s hard disk. How big should you make that partition? The answer depends on four factors:
• Which version of Windows are you installing? Windows XP requires only a minimum of 1.5GB, whereas Windows Vista needs a hefty 15GB at a minimum.
• Will you be installing lots of Windows applications? The more applications you want to use in Windows, the more space you need, particularly if you’ll be installing behemoth programs such as Microsoft Office.
• Will you be working with a large amount of data in Windows? If you’ve got lots of huge video files and thousands of audio files and photos, you’re going to need lots of storage space to handle everything.
• How much free space is left on your Mac hard disk? Ideally, you want to leave your Mac with plenty of room to grow, so that may constrain the size of the Windows partition. For example, if your Mac hard disk has 50GB free, you probably don’t want your Windows partition to be any larger than about 25GB.
If you won’t be installing very many Windows applications and your data files aren’t massive, I suggest a 10GB partition for Windows XP and a 25GB partition for Windows Vista.
Okay, you’re finally ready to get the Boot Camp show on the road. Follow these steps to launch Boot Camp Assistant and create a new partition for the Windows installation:
1. If you’re using a Mac notebook, connect the Mac to a power supply.
2. Log in to your Mac with an administrator account.
3. In Finder, select Applications, Utilities (or press Shift+Cmd+U). The Utilities folder appears.
4. Double-click Boot Camp Assistant. Boot Camp Assistant runs and displays the Introduction window.
5. Click Continue. The Create a Partition for Windows screen appears, as shown in Figure W6.1.
FIGURE W6.1 Use the Create a Partition for Windows screen to set the size of the Windows partition.
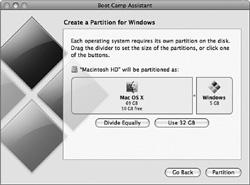
6. Click and drag the dot separating the two partitions until the Windows partition is the size you want. You can also click Divide Equally to make the two partitions the same size, or click Use 32GB to set the Windows partition size to 32GB.
7. Click Partition. Mac OS X partitions the hard disk (this may take a while, depending on the size of the disk).
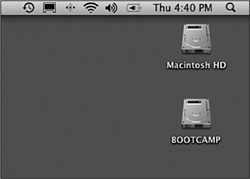
When the partitioning is complete, you see a new desktop icon named BOOTCAMP (see Figure W6.2), which represents the new partition.
FIGURE W6.2 When the Boot Camp Assistant has completed its partition labors, the new partition appears on the desktop as the BOOTCAMP icon.
Installing Windows
When Boot Camp Assistant finishes creating the Windows partition, it displays the Start Windows Installation screen. If you’re not ready to install Windows now, click Quit & Install Later. When you’re ready, follow these steps to get Boot Camp Assistant back on track:
1. Log in to your Mac with an administrator account.
2. In Finder, choose Applications, Utilities (or press Shift+Cmd+U). The Utilities folder appears.
3. Double-click Boot Camp Assistant. Boot Camp Assistant runs and displays the Introduction window.
4. Click Continue. The Select Task window appears.
5. Select the Start the Windows installer option.
6. Click Continue.
With the new partition ready to go, it’s time to install Windows to that partition. The exact procedure varies according to which version of Windows you’re using. The following are just the generic steps:
1. Insert your Windows disc into your Mac’s DVD drive. Wait until you see an icon for the disc appear on your Mac’s desktop.
2. In Boot Camp Assistant, click Start Installation. Your Mac reboots and the Windows installation program begins.
3. Follow the Windows installation screens as they appear. Here are some things to bear in mind:
• When the Windows setup program asks you where you want to install Windows, be sure to choose the BOOTCAMP partition.
Windows Vista—Choose Disk 0 Partition 3 BOOTCAMP.
Windows XP—Choose C: Partition 3 <BOOTCAMP>.
• When the Windows XP setup program asks you to select a file system, be sure to choose one of the format options, such as Format the Partition Using the FAT File System.
• The Windows Setup program automatically reboots your Mac a few times during the installation, and each time you’ll see a screen that says Press any key to boot from CD or DVD. Don’t press any key when you see this message, or you start the installation process all over again.
• Specify your username, password, time zone, and any other preferences that the setup program asks for.
4. When the Windows installation is complete, insert your Leopard installation disc or Mac OS X Disc 1. Windows prompts you to run setup.exe.
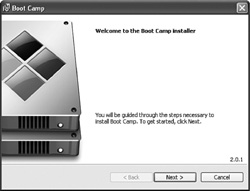
5. Run the setup.exe program. If you’re running Windows Vista, you need to provide User Account Control credentials to continue. The Boot Camp application appears, as shown in Figure W6.3.
FIGURE W6.3 Insert your Mac OS X DVD to run Boot Camp in Windows.
6. Click Next. The License Agreement dialog box appears.
7. Select the I Accept the Terms in the License Agreement option, and then click Next.
8. Make sure the Apple Software Update for Windows check box is selected, and then click Install. Boot Camp installs Apple Software Update for Windows.
9. Click Finish. Boot Camp lets you know that you need to restart the computer to put the changes into effect.
10. Click Yes to restart your Mac.
Switching Between Mac OS X and Windows
In an ideal world, you switch between Mac OS X and Windows by restarting the Mac and then booting into whichever operating system you want to use. Unfortunately, right after you install Windows via Boot Camp you find that you’re living in a Windows world. That’s because Windows somewhat rudely sets itself up as the default startup volume! This means that every time you restart your Mac, it always boots you directly into Windows. Boo!
Not to worry, there are a couple of ways that you can work around this problem.
First, you can follow these steps to exit Windows and boot directly to Mac OS X:
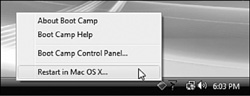
1. Click the Boot Camp icon that appears in the Windows notification area.
2. Click Restart in Mac OS X, as shown in Figure W6.4. Boot Camp asks you to confirm.
FIGURE W6.4 To get back to the friendly confines of Mac OS X, click the Boot Camp icon and then click Restart in Mac OS X.
3. Click OK. Boot Camp shuts down Windows and then boots into Mac OS X.
If your Mac is off and you want to boot into Mac OS X, it seems awfully inefficient to have to boot into Windows first. Fortunately, you don’t have to do this. Instead, you can invoke the Startup Manager, and you can then choose whether you want to boot to Mac OS X or Windows.
Here are the steps you need to follow to switch between Mac OS X and Windows using the Startup Manager:
1. Start your Mac.
2. Hold down the Option key until you see the Startup Manager. All you see are two hard disk icons: one for Macintosh HD and one for Windows.
3. Double-click the Macintosh HD icon. Alternatively, if you want to boot into Windows, double-click the Windows icon.
Dual-Boot Vista and Ubuntu Linux

Windows and Linux are polar opposites: one is buttoned down, corporate, and user friendly, the other is free, bohemian, and geek friendly. The two operating systems may be worlds apart, but that doesn’t mean they can’t coexist on the same PC. Here are the steps to follow to install Ubuntu Linux on the same machine as Windows Vista:
1. In Windows Vista, create a second partition that’s large enough to hold Ubuntu (at least 10GB) and whatever applications you plan to install. See Chapter 24, “Dealing with Disk Drives.”
• See “Divide Your Hard Drive Into Two Partitions,” p. 273.
2. Download the latest Ubuntu build from www.ubuntu.com and burn the .iso file to a CD.
3. Insert the Ubuntu CD and restart your computer. The Ubuntu Live CD should boot automatically.
4. Choose a language for the installation and then select Install Ubuntu.
5. Follow the Install program’s prompts to select your language, location, and keyboard layout.
6. When you get to the Prepare Disk Space dialog box, select the Guided—Use the Largest Continuous Free Space option, and then click Forward.
7. Specify your name, username, password, and computer name, click Forward, and then click Forward again.
8. When you get to the Ready to Install dialog box, click Advanced to open the Advanced Options dialog box.
9. Make sure that the Install Boot Loader check box is activated, and use the list to select the hard disk. (You should see three entries: one for the entire hard drive, one for Windows Vista, and a third unnamed partition; that first partition is the one you want.) Click OK.
10. Click Install.
11. When the installation is complete, remove the Ubuntu Live CD and press Enter to reboot your PC.
When your machine reboots, you see the Grub boot loader menu, which will look something like this:
Ubuntu 8.04.1, kernel 2.6.24-19-generic
Ubuntu 8.04.1, kernel 2.6.24-19-generic (recovery mode)
Ubuntu 8.04.1, memtest86+
Other operating systems:
Windows Vista/Longhorn (loader)
If you do nothing, the system will boot into Ubuntu in 10 seconds. If you want to boot into Vista instead, select the Windows Vista/Longhorn (loader) option and press Enter.