By now you should have a good understanding of what CiviCRM and constituent relationship management tools can do for your organization. You also should have taken the time to plan your implementation, including thinking through your existing data sources and mapping out how they will translate to CiviCRM. Don't underestimate the importance of the planning process—while you may be anxious to install CiviCRM and begin working with it, your project will be better positioned for success if you invest more of your time in preliminary planning.
In this chapter, we will:
- Install CiviCRM
- Walk through the initial configuration of the system
- Discuss advanced configuration options you need to be aware of, including access control permissions under Drupal
- Review the upgrade process
- Outline recommended maintenance procedures
- Plan a backup strategy
Since CiviCRM may be implemented in either the Joomla! or Drupal content management systems (CMS), there will be aspects of this chapter that are specific to each environment. We have sought to clearly indicate where the guidance is environment-specific. As you work through this chapter, be sure to take note of the context which relates to your implementation.
Aspects of this chapter may be more technical as we provide basic troubleshooting steps and address hosting environment considerations; don't be scared off by the technical discussion. For most implementations, the installation and configuration process is quick and painless. It's also worth noting that the installation, configuration, and upgrading of CiviCRM are the most technical aspects involved in using CiviCRM. If needed, you can outsource some or all of this work to professional services such as those listed at http://civicrm.org/professional and http://civicrm.org/moreprofessionals.
At this point, we have a handle on what CiviCRM does, we've mapped out our system and planned our implementation; now let's get things up and running!
Tip
The following instructions assume you have a working installation of Joomla! or Drupal. If you have not yet set up your CMS environment, you should do so before continuing with this section.
Begin by visiting the CiviCRM website http://civicrm.org/download, or going directly to http://sourceforge.net/projects/civicrm/files/ to select a version of CiviCRM to install. We recommend always using a stable version for production sites. For Joomla! installations and the browser/FTP Drupal method of installing, you need to download the installation package onto your local machine, and then upload it to your server. The advanced command line installation method discussed for Drupal allows you to skip this step by retrieving the package directly to your server.
Be sure to always visit the download site when implementing a new installation of CiviCRM, as the project releases minor revisions on a regular basis and you want to make sure you are working with the most up-to-date (and bug-free) codebase.
There are three installation packages available for CiviCRM, depending on your environment:
- Drupal
- Joomla!
- Joomla!-alt
Note
Versions 2.0-3.1 of CiviCRM made available a standalone version of CiviCRM which could be run outside of a CMS or be potentially integrated into another CMS. Support for the standalone version was dropped in v3.2. If you are using a content management system other than Joomla!/Drupal or have other reasons for investigating a standalone implementation, consider contacting the core development team to determine the latest status of standalone support. Many implementers who are not using Joomla!/Drupal environments have found it easier to create a Joomla!/Drupal "shell" site for hosting CiviCRM, and then integrate the various frontend pages and forms into their primary website.
The Joomla!-alt package differs from the standard Joomla! package in that it does not include embedded compressed files. If you were to examine the standard Joomla! installation package, you would find that it contains a series of installation files and a large .zip package. In contrast, unpacking the -alt version shows all the application files (that is, there is no sub-package inside the main package).
So which one should you use? The standard package was structured this way to improve handling in the Joomla! extension installer; generally speaking, you will want to use that package. If you have any difficulties with installation, try using the alternate package. Specifically, if you receive an error message indicating that PHP is missing the .zip functionality, you will need to use the -alt version.
In addition to the three versions listed above, you will also see a language package file (-l10n) and MD5 hash files (MD5SUMS) that can be used to verify the package integrity.
CiviCRM has strong multi-language support. The language package contains translation files for all the languages supported in the current version of CiviCRM.
Note that some of these translations are not complete and should be reviewed and tested thoroughly before implementing in a live environment. Generally, the strings in public user-facing pages are translated first, with administration strings and less frequently-used functionality lagging.
In some cases you may find you can combine existing language resource files for different regions to extend their coverage. For example, separate translation efforts for Canadian French and French in France were combined into a new Canadian French file that used Canadian terms when there were translations available in both language files. This allowed "State/Province" to be rendered as a "Province" rather than a "Département".
For more details on CiviCRM's translation and localization efforts, visit:
- Localization Guide: http://wiki.civicrm.org/confluence/display/CRMDOC/CiviCRM+Localisation
- Online Translation Tool (Transifex): http://translations.civicrm.org
- Localization Forum: http://forum.civicrm.org/index.php/board,10.0.html
At the time of writing this book, CiviCRM has translations (which may only be partial) for the following languages:
Afrikaans, Albanian, Bulgarian, Catalan, Chinese (China - simplified), Chinese (Taiwan - traditional), Czech, Danish, Dutch, English (Australia), English (United Kingdom) Estonian, Finnish, French, French (Canadian), German, Greek, Hebrew, Hindi, Hungarian, Indonesian, Italian, Japanese, Khmer, Norwegian, Polish, Portuguese, Portuguese (Brazilian), Romanian, Russian, Slovak, Slovenian, Spanish (Castilian), Spanish (Mexican), Swedish, Telugu, Thai, Turkish, and Vietnamese.
There are additional translation teams for Arabic, Bosnian, Catalan, English (Canadian), Norwegian Bokmål, Persian, Tamil, and Ukrainian. This usually means that a translation was produced for that language in an earlier version, which may provide some useful materials for a new translation. If multi-language support is something you are interested in, consider participating in translations using the preceding tools.
Tip
Before proceeding with installation, ensure your hosting environment meets the minimum requirements as outlined in the previous chapter. Though you may have success installing CiviCRM in an environment that does not meet those base technical requirements, you are likely to find that certain functions do not work correctly if those requirements are not met.
CiviCRM is installed using Joomla!'s extension tool, Install/Uninstall, available from the Extensions menu in your Joomla! website's administrative interface. However, unlike most Joomla! extensions, you will not be able to install the software using the Upload Package File option. Why is that? This is simply because CiviCRM is a very large piece of software—over twice the size of Joomla! itself, and most hosting environments are not configured to accommodate the resources required to upload the package and run the installation script in a single process (as with the Browse and Install option). Consequently, we must use alternative tools available through Joomla!.
Tip
Please follow the installation instructions carefully as they differ from the installation process for many other Joomla! extensions.
Proceed with the following steps to install CiviCRM in Joomla!:
- Upload the installation package to your website using FTP software. We recommend that you upload the package to
/YOUR_JOOMLA_ROOT/tmp/. This folder is created by Joomla! and is the most appropriate place to store installation packages. - Unpack the installation package. You may do this using the command line or a web-based file browser hosted on your server (such as cPanel File Manager). There are various extensions available for Joomla! that let you work with the filesystem from within Joomla!, which may also be helpful. If you have difficulty unpacking the installation package online, you may need to unpack it on your local computer and use FTP software to upload the unpacked set of files to the
/YOUR_JOOMLA_ROOT/tmp/directory. After uploading and unpacking, you should see a/com_civicrm/folder inside the/YOUR_JOOMLA_ROOT/tmp/directory. - Browse to Extensions | Install/Uninstall in the Joomla! administrative interface. Using the Install from Directory option, enter the full file location of the unpacked
/com_civicrm/directory. In most cases, Joomla! will pre-fill that field with the proper location of the/YOUR_JOOMLA_ROOT/tmp/directory and you will only need to add com_civicrm.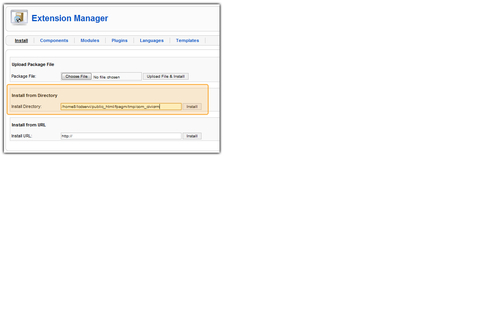
- After clicking on Install, you should be directed to a screen confirming a successful installation. Click on the link provided to enter CiviCRM and confirm that it is installed and working.
If you experience problems installing CiviCRM, review the Installation troubleshooting section for a general review of possible server and environment-related issues. With Joomla! installation, the most common problem arises from unfamiliarity with the Install from Directory method we just described. Most Joomla! users are used to the more common Browse and Install method of installing extensions.
The two critical things to remember are as follows:
- The CiviCRM installation package must be unpacked on the server. You should be referencing a folder location—not the
.zipfile you downloaded from www.civicrm.org. - The folder location must be the full filesystem path—not the path relative to your web directory. For example, it may look something like
/home/user/public_html/tmp/com_civicrm/. If you received the following error message: Please enter a package directory, it is because you are not referencing the correct path to the unpacked installation files.
If you continue to experience problems during installation, visit the CiviCRM forum dedicated to Joomla! installation: http://forum.civicrm.org/index.php/board,7.0.html.
CiviCRM uses an automated installer to configure the software for use in Drupal. The following directions address the process of setting up an implementation of CiviCRM within your existing Drupal installation.
Drupal supports using a single codebase to operate multiple websites (see http://drupal.org/getting-started/6/install/multi-site). Site-specific data is stored in site-specific directories under /path_to_docroot/sites/, with each site's domain name typically used as the name of its subdirectory. This site-specific information includes the database name, unique to each site, and other connection information stored in the /path_to_docroot/sites/yoursite.org/settings.php file. CiviCRM supports this multi-site shared codebase and separate databases approach transparently during the installation process. Make sure to create a separate CiviCRM database for each site before starting the installation process.
Although this multi-site approach is still very popular, there are some countervailing trends in favor of single site installs. There are dependency, complexity, and timing issues when attempting to upgrade multiple sites sharing a codebase in a single directory simultaneously. More importantly, Drush (http://drupal.org/project/drush) and Aegir (http://groups.drupal.org/hostmaster2) have made it increasingly easier to manage a single codebase for multiple single site installs using multiple copies of the same code files.
The CiviCRM installation procedures in the following sections work if your Drupal site is either a single site or a multiple site configuration, as we just described. Different procedures are required if you want to use advanced techniques for sharing database tables between different Drupal sites in order to provide a single sign-on capability (visit http://thedrupalblog.com/setting-multi-site-drupal-6-installation-shared-databases-and-single-sign) or for sharing a database across several CiviCRM sites in order to share contacts and/or administrators between sites (visit http://wiki.civicrm.org/confluence/display/CRMDOC/Multi+Site+Installation).
Depending on your skill and comfort level, you can choose to install CiviCRM in one of the following two ways. The first one uses a browser and a client application for FTP. The second one uses SSH, a secure command line shell, and may be faster and more convenient for those with basic Linux skills.
Before you begin the installation process, take note of the database settings for your Drupal installation. If you do not know the values, you can find them at /path_to_docroot/sites/default/settings.php (the default location).
Locate the $db_url variable:
$db_url = 'mysqli://dbuser:dbpassword@localhost/drupal_dbname';
Here:
- Database server:
localhost - Drupal database name:
drupal_dbname - Database user name:
dbuser - Database user password:
dbpassword
Tip
Older sites may still be using the mysql driver, rather than mysqli:
$db_url = 'mysql://dbuser:dbpassword@localhost/drupal';
If this includes your site, you should definitely consider upgrading to mysqli. First introduced to support MySQL 4.1 features, mysqli is now very stable and well-supported in PHP 5.x, and provides performance improvements over the mysql driver. Changing the driver specification from mysql to mysqli in the $db_url is all that is required for Drupal to gain these benefits.
You may now begin the installation process. Follow these steps:
- If you haven't done so already, download the latest stable CiviCRM installation tarball for Drupal to your local machine from http://sourceforge.net/projects/civicrm/files/ (using the Download Now! button is the best way to ensure you get the right tarball).
- Upload the CiviCRM installation package from your local machine to the
/path_to_docroot/sites/all/modules/directory in your Drupal installation. Installing CiviCRM and other modules under this directory will keep the files separate from core Drupal modules and facilitate any future Drupal core upgrades. (If you don't want CiviCRM to be available to other sites running off this codebase, you can create amodulessubdirectory under yoursitesdirectory at/path_to_docroot/sites/defaultor/path_to_docroot/sites/yourdomain.organd install it there instead.) If necessary, adjust the permissions for the/path_to_docroot/sites/directory to provide write access to the account that is running the web server process (and return it to the original permissions when complete). This can normally be done using your FTP or SFTP client applications, or by using the following command:$ cd /path_to_docroot/sites/ ; chmod -R 666 ./*
- Unpack the installation package. You should now have the following directory in your site:
/path_to_docroot/sites/all/modules/civicrm/with other subdirectories contained within it. - Create a separate MySQL database for CiviCRM using an appropriate tool like phpMyAdmin or your hosting panel. The installer will create a new database for CiviCRM automatically if you enter a database name in the next step that doesn't already exist on your database server and the database user you enter has permission to create databases. We don't recommend granting that privilege to database accounts that don't need it, such as the ones used by your Drupal site.
Note
It is considered a good practice to keep Drupal and CiviCRM in separate databases for backup and upgrade purposes. Consider using a naming convention where the domain name is used for the database username, and
_druand_civare appended to it to indicate the Drupal and CiviCRM databases. For a staging site for the same domain, you could name the databasesdomainname_staging_druanddomainname_staging_civ. The advantage of doing this is that privileges can easily be set at once for all of these databases when creating the database user.Note that if you plan to use the Drupal Views module to display CiviCRM data within your Drupal pages, and if you are going to use separate database users for Drupal and CiviCRM, you need to ensure that your Drupal database user has
SELECTpermissions for your CiviCRM database. Using the same database user for both Drupal and CiviCRM as described meets this requirement. - The next step will be to run the installer, which will confirm that you've downloaded the correct version of CiviCRM, and ensure that your server meets the software requirements. The installer creates the necessary tables in your database and configures the
civicrm.settings.phpfile with the required variables. To run the installer, log into Drupal as a user with administrator permissions and point your browser to the following URL:http://yourdomain.org/sites/all/modules/civicrm/install/index.php. - This opens the CiviCRM installation tool. Complete the form with the database details you noted down earlier for the Drupal database and the ones you created for your CiviCRM database, and then click to re-check the configuration and requirements. If there are any system settings that do not meet the requirements, you will be given a notification and a chance to resolve the issues. Return to this page and re-check until you have all the issues resolved. You may also choose to install sample data (which provides a good head start to understanding the system) and select an alternate language (if you've obtained and uploaded the translation files to the CiviCRM directory).
- Click on the Check Requirements and Install CiviCRM button to proceed with the installation. If the installation script completes successfully, you will receive a green bar and a notification of success. During the installation, CiviCRM configured standard permissions for anonymous and authenticated users to access CiviCRM tools and forms. You will want to review these settings to confirm that they suit your website's needs. We will discuss Drupal roles and permissions as they relate to CiviCRM later in this book.
Note
Note that during the installation, Drupal creates a files directory underneath the /path_to_docroot/sites/ subdirectory for your site and makes it writeable. CiviCRM will create folders for temporary files under this directory by default, for example, /path_to_docroot/sites/yoursite.org/files/civicrm.
The installation script should enable the CiviCRM module automatically and display a link in your menu for CiviCRM. Click on the CiviCRM menu item to enter and confirm a successful installation.
If you don't see the CiviCRM link on your primary menu when logged in as an administrator, browse to Administer | Site building | Modules to confirm that the CiviCRM module is enabled. If the module is enabled and you still can't see the CiviCRM link, visit the CiviCRM forum dedicated to installing it under Drupal in order to troubleshoot it further: http://forum.civicrm.org/index.php/board,6.0.html.
Drush (Drupal shell) is a Linux shell utility which can be used to perform actions on your Drupal installation, including multi-site management. During 2010, efforts were made to provide CiviCRM support through Drush. Before using it, you must install Drush and the CiviCRM support file (detailed below). Using Drush requires PHP 5.2+. The Drush CiviCRM commands as of CiviCRM version 3.2 are as follows:
|
Command |
Description |
|---|---|
|
|
Clear the entire CiviCRM database and smarty caches. |
|
|
Install a new instance of CiviCRM. |
|
|
Rest interface for accessing CiviCRM APIs. It can return |
|
|
Restore the CiviCRM codebase and database back from the specified backup directory. |
|
|
Open an SQL command-line interface using CiviCRM's credentials. |
|
|
Print CiviCRM database connection details. |
|
|
A string for connecting to the CiviCRM DB. |
|
|
Export the CiviCRM DB as SQL using |
|
|
Execute a query against the CiviCRM database. |
|
|
Update |
|
|
Replace CiviCRM codebase with the new specified |
|
|
Execute the |
In order to install Drush if you haven't already, proceed as follows:
- Download the current version of Drush to your home directory on your server.
- The simplest way for beginners is to download to your local machine by clicking on the download link for the recommended release at http://drupal.org/project/drush, and then uploading to your home directory on your server using SCP, SFTP, or FTP.
- An easier way for more advanced users is to note the URL for the download by hovering over the download link for the recommended release at http://drupal.org/project/drush, and then use that URL in the following SSH command:
$ cd ~; wget http://ftp.drupal.org/files/projects/drush-6.x-3.3.tar.gz - Untar the file:
$ tar -xzf drush-6.x-3.3.tar.gz - Rename the
drushdirectory:$ mv drush .drush - Make the
drushfile in the extracteddrushdirectory executable:$ chmod u+x ~/.drush/drush - Ensure that the directory is in your path.
- Examine the output of the following command to ensure that
/usr/local/binor some other usable directory is in your$PATH:$ set - Create a symbolic link pointing to the
drushexecutable from somewhere in your path, such as/usr/local/bin:$ ln -s ~/.drush/drush /usr/local/bin/drush - Check if Drush is working:
- Move to the document root of your site:
$ cd /path_to_docroot/ - Execute Drush:
$ drush -l http://mysite.org help
- Move to the document root of your site:
Now, install Drush support for CiviCRM as follows:
- Find the latest version of the Drush /CiviCRM
includefile in CiviCRM's subversion repository: in your browser, navigate to http://svn.civicrm.org/tools/branches/ and note the most recent version, such as v3.2. - In your command shell, execute the following command after replacing v3.2 in the command with the most recent version that you just noted:
$ cd ~/.drush/includes
$ wget http://svn.civicrm.org/tools/branches/v3.2/drupal/drush/civicrm.drush.inc
Now that Drush is installed with CiviCRM support, it is easy to install CiviCRM.
- If it doesn't already exist, create a directory for your Drupal modules either at
/path_to_docroot/sites/all/modules(recommended) or in the directory for this site (for example,/path_to_docroot/sites/yourdomain.org/modules)to prevent CiviCRM from being available to other sites running off this codebase:$ mkdir -p /path_to_docroot/sites/all/modules - Locate the tarball to be installed by navigating in your browser to http://sourceforge.net/projects/civicrm/files/ and choosing the correct version to use in the following command in place of
3.2.0(note that the version number appears twice in the URL):$ wget -O /path_to_docroot/sites/all/modules/civicrm.tar.gz http://sourceforge.net/projects/civicrm/files/civicrm-stable/3.2.0/civicrm-3.2.0-drupal.tar.gz/download - Now, install CiviCRM with Drush using the following command, substituting appropriate values for
yourDbUser, localhost, yourCivicrmDbName, and3.2.0:$ drush civicrm-install --dbuser=yourDbUser --dbpass=yourDbPassword --dbhost=localhost --dbname=yourCivicrmDbName --tarfile=sites/all/modules/civicrm-3.2.0-drupal.tar.gz --destination=sites/all/modules - In a browser, log in into your site as a Drupal administrator.
- Browse to Administer | Site building | Modules to confirm that the CiviCRM module is enabled.
- You should now have a link in your menu for CiviCRM. Click on the CiviCRM menu item to enter and confirm a successful installation.
If you don't see the CiviCRM link on your primary menu when the CiviCRM module is enabled, visit the CiviCRM forum dedicated to installing it under Drupal: http://forum.civicrm.org/index.php/board,6.0.html.
A majority of installation problems are the result of a failure to meet the hosting server requirements, insufficient resources in your hosting environment, or misunderstanding of the installation steps detailed above. Let's review each of these.
As noted earlier, CiviCRM does have specific requirements for the hosting environment, which includes the versions of Apache/MySQL/PHP used, InnoDB support for MySQL, and certain PHP extensions required for various functions. In some cases, CiviCRM will render an error along with guidance when you attempt to install the software without meeting the base requirements. However, at times you may be able to install CiviCRM without the presence of descriptive errors and may not notice issues until later. Be sure to review and confirm compliance with the server requirements prior to installation.
If you are unsure what versions of Apache/MySQL/PHP your hosting environment is running, create a file named phpinfo.php in your document root directory containing only<?php phpinfo(); ?>. Ensure that it is readable by your web server, and then navigate to http://yoursite.org/phpinfo.php. In Joomla!, this information can be reviewed through the Help | System Info | PHP Information page without the need for a separate phpinfo file. After creating a phpinfo.php file and reviewing your system details, delete the file from your web server as it presents a certain security risk by exposing system details.
The second common cause for installation problems is inadequate hosting resources. CiviCRM is a fairly resource-intensive application and your ability to install and work within the system will be directly related to the resources available on your web host. For this reason, we strongly recommend running your CiviCRM installation on a virtual private server or dedicated hosting. While it may be possible to run CiviCRM on a shared hosting environment, it will be more susceptible to resource-related problems.
Insufficient resources often result in the dreaded white screen of death. If you have carefully followed the installation steps outlined above, and after completing the installation have received a white screen, it's likely you lacked sufficient resources to complete the installation script.
Tip
Insufficient memory may manifest in a number of other ways during operation as well, such as explicit errors about insufficient memory and occasionally odd PHP error messages while doing memory-intensive operations. Unless you have tuned your Apache or other web server settings after increasing your PHP memory settings, insufficient CPU resources often manifest as insufficient memory. If Apache has been tuned to ensure that it does not spawn too many processes, insufficient CPU resources will result in users seeing timeouts on their page requests. Insufficient disk space manifests first as a slowdown in server responsiveness before the users start seeing errors about temporary files not being saved correctly.
The solution? Really the best solution is to look at moving your site to a new hosting environment better suited to CiviCRM. While it may be possible to install CiviCRM through a manual process, resource issues during installation are a good indication that you will experience other resource-related problems when actually working within CiviCRM.
Tip
The CiviCRM website maintains a community-contributed list of hosting providers and comments about how CiviCRM runs in their environment. If you've not yet chosen a hosting solution, review this page to help with your selection process: http://wiki.civicrm.org/confluence/display/CRM/Hosting+provider+information. Note that this list is contributed and maintained by the community, and does not imply endorsement by the core development team.
Sometimes the insufficient resources are due to PHP settings and not the actual resources available on the hosting space. We recommend the following minimum settings which can be altered through your .htaccess or php.ini file, depending on your server configuration. Please refer to your hosting documentation for details on the preferred method for altering these settings, and to confirm that they will permit such modifications. Also note that these recommendations represent a standard minimum level—the size of your database, number of concurrent users, and other load factors may require higher values. Resource-intensive activities such as large data imports may also require higher values for temporary periods of time.
.htaccess:
php_value memory_limit 96M
php_value register_globals off
php_value max_execution_time 600
php.ini:
memory_limit = 96M
register_globals = off
max_execution_time = 600
The third common problem is simply a misunderstanding of the installation process. Take time to review the installation steps outlined above for your respective CMS environment and ensure you have completed each step accurately. Search the online forums if your installation problems persist.