If you are a member-based organization, whether a professional or trade association, a society, or a charitable not-for-profit using membership structures to encourage recurring support, your members are your lifeblood. They are your primary constituents and much of your organizational identity and vision is likely to revolve around serving their needs. Having an integrated system to solicit, retain, and manage your members is essential to your organization's success. As such, you will want to take advantage of CiviCRM's membership management tools.
In this chapter, we will:
- Review the initial setup and configuration of membership structures in CiviCRM
- Understand how the daily management tools work
- Solicit new members and retain existing members with online forms
- Search and build reports to track members
- Put membership in context and review other tools that will prove useful
As with other areas of CiviCRM, you will begin by configuring several system options related to membership. It is important to take some time to think through the mechanics of how your organization works in order to ensure that the system is configured properly.
There are two membership tools that must be configured through the interface and a cron job that you may want to set up, depending on how you are using the tools. Access these options through Administer | CiviMember.
Membership types equate to the different categories of membership your organization maintains. Each type will have an amount and dues period associated with it. So, if your membership structure has sublevels or you allow alternate payment periods, you may need to define a type for each sublevel or payment arrangement.
For example, consider an "Affiliate Membership" category that is broken down into three sublevels—small, medium, and large, in which the volume of annual sales generated by the member company determines its membership sublevel. To achieve this, you would create three membership types—Affiliate (small), Affiliate (medium), Affiliate (large), or some similar naming convention.
After naming the type and entering an optional description, you search and identify the organization to which the membership is attached. This means that at the very least, your database must contain one organization record representing your organization, to which these membership types will be attached.
This membership-defining structure, as attached to an organization record, helps support more complex systems where you may have memberships with both the state organization and regional districts, or some other sub-entity. Memberships are also a good way to implement paid subscriptions (such as a monthly magazine). Organizations that have both memberships and paid subscription products can attach the membership types to different organizational entities (such as departments) for management and reporting purposes.
Proceed with the form; enter in the membership amount and contribution type to which the payments should be assigned. If your membership type is free, simply enter 0 in the amount field.
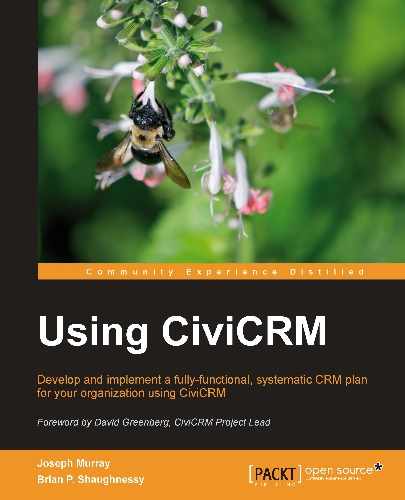
Next, you determine the membership period. The period is the length of the membership from starting point to ending point. CiviCRM supports two models—fixed and rolling periods. Rolling membership types begin on the signup date and extend for the configured length of the membership. Fixed periods, as the name suggests, have a fixed starting point, for example, January 1.
Fixed memberships with duration in months always start on the beginning of the calendar month a person signs up. For example, if a person signs up for a fixed period membership of six months on July 7, their membership begins on July 1 and ends on December 31. If you have selected a fixed period of one or more years, you must select the start date for the period and the rollover date. The rollover date is the point after which a new membership record will cover both the current and coming year. Consider the following example.
Note
FPAGM configures three membership types in the system Regular and Affiliate each have a fixed membership period for one year starting on January 1, while Supporting members have a one-year rolling membership. For the two fixed period membership types, they set a rollover date of November 1. This means that any new memberships created between November 1 and December 31 will be valid from the time created until December of the following year. This feature recognizes that it would not be appropriate to assess a full year's membership dues for only two months of benefit.
One of the most powerful features of CiviCRM's membership tools is the ability to configure membership inheritance through relationships. If a relationship is selected in the membership type configuration, any contact record with that relationship to the "primary" member is automatically granted a membership.
A common use of this feature is to automatically consider employees of organizations as members. To do this, select Employer of in the relationship type field. When an organization becomes a member, a corresponding membership record will be generated for each employee of the organization. The related or inherited records will not be editable; only the primary owner of the membership will have an editable record.
Tip
Identifying which side of the relationship you should select can be tricky. For instance, in the preceding example, should you select Employer of or Employee of as the relationship type? For help selecting the right relationship type and to see some examples of how the inheritance works, click on the help icon by this field.
Other relationships that are commonly used for membership inheritance are Household Member is, Parent of, and Spouse of.
Note
FPAGM's Regular and Affiliate membership types are both organization-based (the membership is owned by organizations, such as food pantries and businesses supplying to the pantries). The Association will configure both to have Employer of inheritance. By doing this, the organization can develop saved searches for current members for use in mailing and broadcast e-mails.
At any given point in time, you will view your members as having a certain status. For example, when they first join, you may view them as new members. If the current date falls within their membership period, they are current members. At some point, if they choose not to renew, they will be considered expired or past members.
CiviCRM provides a mechanism for defining the rules by which you determine the status of members and which can be configured to periodically calculate the status of members based on those rules. Navigate to Administer | CiviMember | Membership Status Rules to review and modify them.
Before we look at the rules themselves, let's understand a few important concepts and review the intended purpose of the default rules.
The first concept to grasp is the importance of the status rule order. As CiviCRM processes membership records against these rules, it will assign the first matching rule based on the order displayed. This is important, as some membership records may match multiple rules.
For example, in most status configurations a New member would also match the Current member rule. Since the New status rule is listed first (in the default configuration), this is the status that will be assigned.
CiviCRM ships with seven pre-configured rules. Let's briefly review their intended use:
- New members: These are members who have just joined the organization. Perhaps you want to recognize them by sending them special communications or recognize their "newness" with a flag on their conference nametag. Whatever your use, this status will help you quickly identify new members.
- Current members: These are members for whom the current date falls within their membership period start and end dates.
- Grace: This status provides a way to give members some flexibility if they have not renewed their memberships prior to their end date. Let's be honest—most members wait until after their end date to renew their membership. You don't necessarily want to cut them off right away; so you configure a grace period in which their member benefits continue, but they are not considered a Current member. This can also be helpful for your membership director or membership committee. You can use the Grace status to quickly generate a list of members who have not yet renewed for the current year, and start reaching out to encourage renewal.
- Expired: Once a member is past the end date and past the grace period allowance, their membership expires. The Expired status tells you that they let their membership lapse without renewing.
- Pending: The Pending status is a special use case when allowing membership signups with the "pay later" option. The "pay later" option can be enabled for member signup pages as an alternative to collecting real-time credit card payments. In effect, it is a promise to pay by check, cash, or whatever other options you provide to members. When a membership record is generated through pay later, both the membership and contribution record is flagged as Pending. Once the payment is received, you will record it in the contribution record and mark it as Complete. After saving the completed contribution record, its corresponding pending membership will be updated to the New or Current status.
- Cancelled: The first four status types are all date-based rules. Depending on the current date and configured rules, the membership record will be assigned the first matching status. The fifth one (Pending) is a payment-based rule. In contrast, the Cancelled status is generally only handled on a manual basis. For example, a person may join your advocacy organization and at a later point find that they disagree with certain positions taken by the organization, prompting them to contact you and cancel their membership. There is no date or payment-based calculation triggering the cancelation; you simply change their status to Cancelled in the membership record.
- Deceased: The last default status type, Deceased, may be manually applied to the record or will be triggered by the contact's "deceased" field.
Most organizations will find the basic functionality afforded by these default rules to be sufficient for their needs (though they will certainly want to review them and may find a need to tweak the rules configuration, such as adjusting the duration of their grace period). If the default rules do not meet your needs, you may add, edit, remove, or reorder the rules as needed. For example, you may construct a multi-tiered grace period structure before members expire—grace (one month), limited (two months), last chance (three months), in which you gradually restrict the user from certain member benefits and communicate with them in different ways.
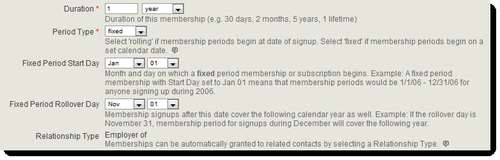
While creating a new rule or editing an existing one, you have several configuration options available. These options can be easily misunderstood or misconfigured, so let's take a moment to review them:
Each status rule will define a trigger (Start Event) that indicates when the rule is activated, and an optional ending point (End Event). Each of these may be offset by an adjustment value. Both events are measured from one of three dates—join date (the initial date the individual joined the organization), start date (the date when the membership period began), and the end date (the date the membership period will end or has ended).
It can be a little confusing to think through how the start/end events, associated with the join/start/end date, translate to your desired status. One way to think through this is to build a simple timeline representing each status:
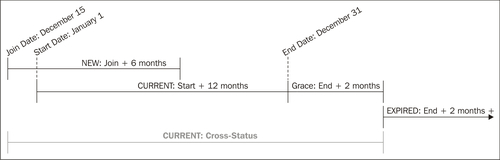
Let's take a closer look at how our timeline grid in the preceding diagram impacts the grace status settings. As you recall, the grace status is intended to represent the period after the membership end date, but before we regard the record as expired.
- Start Event: End Date, no adjustment
- End Event: End Date, 2 months
What does this mean? Starting with the membership's end date, the record will be flagged as grace status for two months. After that period, it will be changed to the expired status, or whatever other rule then applies.
Tip
Be sure to designate one status as the default one. It will be assigned to a membership record in the absence of another matching rule.
In addition to setting the start and end events, you may consider marking a status as "administrator only" in the Administrator Only? flag. Flagging it thus means the status will never be assigned through rule matching. It can only be assigned if an administrator overrides the calculated membership status and assigns it. You may, for example, create an On hold status, which administrators use to flag members who must submit credentials or other paperwork before being considered Current members.
The Current Membership? flag indicates which status types should be counted as current members in the dashboard grid displaying membership totals.
After setting up your rules, you may want to run some test records, changing the join, start, and end dates to match the various statuses you expect will be assigned.
Note
Be sure to set up the cron job, as outlined in the Configuring cron jobs section, to trigger automated membership status updates. When run nightly, or on a periodic basis, it will review all membership records against the status rules and change them as necessary. If you do not set up the cron, your membership statuses will only be updated when a membership record is created or manually updated.
By now, you should have your membership types set up, and be planning to create membership join and renewal forms to encourage new and existing members to work directly with the system through your website. Also, you will need to generate your periodic member renewal invoices to retain existing members.
Wouldn't it be great if CiviCRM could know when a membership record is nearing its end date and send the member a reminder e-mail, encouraging them to renew? Well, the good news is that CiviCRM provides just that type of capability! You may have noticed a section entitled Renewal Reminders at the bottom of the membership type configuration page. We use that to set up reminder e-mail options. Note that this feature is membership type-specific—you can choose not to enable renewal reminders for certain membership types or to configure different e-mail templates for use with different types.
There are two very important steps that must take place in order to use this feature—you must create your message template(s) and you must set up the cron job script (detailed in the Configuring cron jobs section). Assuming you are configuring these options for the first time, you may see a yellow message box informing you that no message templates currently exist and directing you to the appropriate page to set those up. You can access them through the menu by visiting Administer | Configure | Message Templates.
The message template, as the name suggests, will have the body text for the reminder e-mail to members and may also contain tokens—placeholders for contact record data. The Message Templates page has two tabs User-driven Messages and System Workflow Messages. The latter is used for e-mails sent by the system in conjunction with core functions, such as receipt e-mails for contributions. Our concern at this time is User-driven Messages.
Create a new message and provide an appropriate title, subject line, and body text. Remember that your message should be generic enough to apply to all members within the membership type(s) it will be sent to.
Tip
Be direct. Renewal messages are sent to constituents who already have demonstrated a level of interest and commitment to your organization. While you want to make the case for continuing their membership, you are primarily reminding them to renew. Keep the message direct and succinct.
Notice that above and to the right of the body text area is a link to insert tokens. A token is a placeholder representing a field in the system. When the e-mail is processed, the token will be replaced with the value for the field for each recipient. Using tokens allows you to customize the e-mail for each constituent, such as addressing each e-mail to "Dear First name".
Once you've finished creating your renewal reminder e-mail template(s), return to Administer | CiviMember | Membership Types, select a membership type for which you want to enable renewal reminders, and scroll to the bottom of the form. You now have the option of selecting the desired reminder e-mail template and indicating when you would like it sent (measured in days prior to the membership period end date).
Note
You must set up the cron job, as detailed in the following section, to complete the configuration of the renewal reminder tool.
The e-mail template you've drafted is not limited for use in the automated reminder function alone. You may choose to send additional copies of that e-mail to individual members or to groups of members using CiviMail. The template functions as any other e-mail template and will be available throughout the system.
In the sections just covered, we reviewed two functions that require automated functionality—an action taken on the system that is not triggered by a user, but by a regular, time-based schedule. To accomplish this, we must set up a cron job.
As the name suggests, a cron job is a time-based action (chronological job) performed by the server. It basically consists of a reference to a script and the frequency with which it should be run. For a full discussion of cron scripts included with CiviCRM, refer to Chapter 3.
Our immediate concern is the UpdateMembershipRecord.php script located in the civicrm/bin/ subdirectory. This script is initially found as UpdateMembershipRecord.php.txt in your installation files. You must rename it to remove the .txt extension before setting up the cron. This is also done to remind you to review the contents of the file, as there is a variable within the script that must be manually configured. Open the file in your preferred text editor and locate the text [email protected]. As the text suggests, this must be changed to your desired FROM e-mail address, which will be used when the renewal reminder messages are sent.
Note
As of version 3.3, this file is no longer shipped with the .txt extension and the FROM address does not need to be configured directly in the file, as it now uses the default FROM address configured in the system.
Before setting up the cron, let's review the two purposes of this script discussed previously. The script first cycles through all membership records, comparing the existing status against the membership status rules, and updating the status appropriately. Secondly, the script checks the membership type and end date to see if a renewal reminder e-mail has been configured and should be sent out. If so, it sends the renewal e-mail and resets the reminder date.
Given the nature of this script, it is sufficient to configure the cron job to run once a day. Depending on the size of your membership, the script may require a significant amount of server resources to complete. Consequently, it is best to schedule it during a normal downtime in site traffic, such as in the middle of the night.
Depending on your server setup, you may be able to configure the cron job through a control panel interface, by connecting to the server through ssh to use the command line crontab command, or by placing a script in the /etc/cron.daily/ directory that will invoke the UpdateMembershipRecord.php script. Refer to your hosting service documentation for details on your options.
When referencing the location of the UpdateMembershipRecord.php script in the wget or a similar command in your cron job, you must append three URL variables that serve as an authentication mechanism. This helps to prevent unauthorized users from running the script.
?name=<username>&pass=<password>&key=<sitekey>
For a full discussion of these variables, refer to the Setting up cron jobs section in Chapter 3.
When setting up your cron, be sure to test the script with the configured variables in a web browser to confirm that it is working correctly. You should also enable cron logging or configure e-mail-based logging to ensure that the cron runs correctly.
Once successfully running, you will see your membership records updated as their status shifts from one type to another.