After successfully installing CiviCRM, your next step will be an initial configuration of the system. We say "an initial configuration" because you will find yourself returning to configure different elements of the system throughout your implementation process. However, there are basic configurations that should be done at the outset.
All of your system configuration will be done through the Administer menu item. The first submenu item, Administration Console, provides a full listing of all configuration options. In addition, the software has a Configuration Checklist that is helpful in walking through the initial settings. The checklist was provided as a link after your successful installation, and can also be found in the Configuration section of the Administration Console.
Before you walk through the configuration checklist, you should enable the components you want to use at Administer | Configure | Global Settings | Enable CiviCRM Components.
CiviCRM is fairly modularized. By that, we mean you can turn on and off the main functionality sections (what CiviCRM calls components) in the system. This is particularly helpful for keeping a simplified, streamlined interface that only presents tools you are actually using. For example, if your organization doesn't host any events, then you will not need the CiviEvent component and can disable it using this page. All of the menu entries for disabled components will disappear from the interface.
You can return and re-enable a component at any point in time. During this initial configuration, decide which components you know you are going to use and configure, and make sure they are enabled.
Note that CiviContribute is less "independent" than the other components. CiviEvent, CiviMember, and CiviPledge all make use of the CiviContribute functionality. For example, if someone registers for an event with fees, the payment transaction is logged in CiviContribute while the registration is logged in CiviEvent. If you plan to collect any type of payment in your site (events, donations, or membership fees), be sure to enable CiviContribute.
Let's proceed by clicking on Administer | Configure | Configuration Checklist. The list is organized into sections, which we will review in the order presented as we configure your system. After visiting a link it will turn green in order to help you track your progress. In each section, make use of the inline help or links to online help for details about the settings and options. Our review will cover the primary settings you must be aware of.
Site Configuration includes two sections: Localization and Domain Information.
Localization handles your language, currency, default import, and internationalization settings.
In the countries and state/province sections within Localization, you choose which countries and their corresponding states/provinces are available for addresses in your system. In most cases you will select the same set of values for each field. If you have a site with multiple countries enabled, be sure to include the countries field in any forms (profiles) you create and place it before the state/province field. The state/province field will generate a list of available values based on the user's selection of a country, which means that you want to encourage people to select the country value first. Failure to do this will result in a very long list of states/provinces for all the enabled countries which will be cumbersome to work with.
CiviCRM has substantial multi-language capabilities, including the ability to have multiple languages supported within the same site (allowing the user to select their preferred translation). You must install an appropriate language file while installing CiviCRM if you want to use a language other than US English as your default. Refer to the discussion in the Installing CiviCRM section for details about the CiviCRM translation server.
Note that if you choose to make your site multi-lingual (where more than one language is available to users), it will require sufficient database user permissions and will make modifications to your database that cannot be undone. If you are unsure if you want to use this capability, consider testing the functionality on one of the CiviCRM demo sites before implementing on your own site.
Domain Information is used to configure the name of your organization, the FROM Email Address, mailing address, and other contact details. The settings here are important as they will be used as the default FROM address for system-generated and CiviMail e-mails sent from CiviCRM. Note that the e-mail address used needs to be a valid user on your hosting server in order for CiviCRM to send e-mails properly (this requirement will depend on your hosting environment configuration).
If you are planning to use CiviMail for broadcast e-mail capabilities from your site, be sure to complete the domain address fields so that it can be included in bulk e-mails. This is a good practice for any legitimate broadcast e-mailer, and is required by anti-spam legislation in some jurisdictions (for example, the American CAN-SPAM Act), and CiviMail itself.
The next configuration section, Viewing and Editing Contacts, handles settings related to contacts, including the contact record page, search settings, contact types, and address settings. We will walk through each of these areas.
Site Preferences controls what content areas are visible in different parts of the system. For example, if you are not planning to use tags as a categorization tool, you should remove it from your views. Don't need to have immediate access to the changelog (which records a running list of when edits to a contact record was made, with the name of the user and timestamp)? Remove it from your views.
The preferences are broken into four areas:
- Viewing Contacts: Controls the tabs that appear across the top of the contact record.
- Editing Contacts: Controls elements that will appear in the contact edit view (accessed from the contact summary tab).
- Contact Search: This advanced search tool groups fields by their type. You expand a group panel in order to access its respective fields. Use the options here to disable panels you don't want to be displayed.
- Contact Dashboard: CiviCRM has a special page, which can be exposed to logged-in website users called the Contact Dashboard. The dashboard summarizes the user-related records, including their membership history, event registration history, donation history, and pledge history. In addition, users may see related contacts that they are permissioned to edit.
As you initially configure this section, you may be uncertain what options to select. Remember that you can always return at a later time to modify your settings. You will find whether you need or don't need certain elements listed here as you progress through the site implementation and begin working in the system.
The final option on this page lets you set your preferred WYSIWYG editor. The editor toolbar will appear on any HTML text area in your site. We recommend using the same one your CMS uses, if possible. For Joomla! users, future versions of CiviCRM will provide support for integrating the system default and user-specified WYWSIWYG editor (beginning in v3.3).
Address Settings provides similar functionality, allowing you to choose what is available for mailing label generation and the contact's address block.
Common changes to this page include removing {contact.supplemental_address_2} from the mailing label (most organizations operate with two line addresses), and hiding the Addt'l Address 2, Latitude and Longitude values. Generally, you will rely on the geocoding function to populate these values without the need for user involvement.
If you are interested in producing reports that are sorted by address, such as, walk lists for foot canvassing, then you should turn on Street Address Parsing. This enables a functionality that attempts to automatically parse the street number, street name, and unit number from the street addresses entered into the system. As of version 3.3, American, Canadian English, and Canadian French street addresses are supported.
The last setting on this page handles address standardization. CiviCRM will integrate with the USPS web tools API to validate the address entered. Note that the tool only checks if the address is valid; it does not determine if the contact name is on record at that address. Before completing this section and enabling the tool, you must apply to the USPS and receive an ID and URL. This can be done at: http://www.usps.com/webtools/address.htm.
The next configuration item in our checklist is Mapping and Geocoding. CiviCRM supports automated geocoding of addresses through Google and Yahoo!. First, visit your preferred service and obtain a key. Then, select the provider and enter your key on this page. CiviCRM will geocode the addresses as they are created or edited. When viewing a single contact record or search result list you can view a map of the address or multiple addresses (if you are looking at search results), while taking advantage of other functionality provided by Google/Yahoo!, such as plotting directions to the location.
Keys can be obtained from:
Moving on, the Search Settings controls which fields are searchable using the simple search tool, and how the search functions operate and display results. The options include:
- Automatic Wildcard: This enables the users to enter partial text and have search results return any matches in which that text appears, assuming wildcards before and after the search string. Larger databases may want to disable this option as it will slow the search performance and return a larger resultset.
- Include Email: This will search both contact names and e-mail addresses for the search text.
- Include Nickname: This will search contact names and nicknames for the search text. If you are a heavy user of nicknames, this is a very valuable feature. If not, you might consider disabling it as it slows down the search processing if you have a large number of contacts.
- Include Alphabetical Pager and Include Order By Clause: These are useful features that facilitate navigation through search results. However, they both can impact performance on large databases. If you are experiencing poor response times while searching, consider turning one or both of these off.
- Default Contact Search Profile: After conducting a search, the result list table displays the contact name, address, phone, and e-mail. If you would like to set an alternative set of fields to be displayed by default, you must first build a profile (a collection of fields) and then select it from the Default Contact Search Profile option.
- Smart group cache timeout: This controls how frequently the contact records in a smart group are cleared from the cache. A smart group is a saved search; caching improves performance when one is pulling the list of records from the search. By default, the cache is cleared every time a contact record is added or edited. This ensures that any changes to records are reflected in the dynamic search results. Recreating the cache each time it is cleared takes time, especially if you have a large number of contacts in smart groups. If you don't need up-to-the-second accuracy on smart groups, you can improve page load times on contact saves by increasing this value (five minutes is recommended).
- Autocomplete Contact Search: At the top left of the horizontal navigation bar is a quick search field. As you type in the field, the system will display possible matches for the value typed. The possible match display will always include the contact name, but may also include e-mail, phone, and address fields. Use the Autocomplete Contact Search option to select what fields should be included. Adding options can be helpful as you can distinguish between contacts with the same name based on their e-mail, or any other value. Don't select too many options, however, as it will clutter the result drop-down and make it difficult to read the list.
- Miscellaneous: The next configuration page in our checklist, Miscellaneous, contains various options for system operations.
- Dashboard cache timeout: The dashboard is the CiviCRM home page displayed when you first enter the system. You may configure the dashboard to display reports, or "dashlets," providing a helpful summary of system data on a single page. Since the dashlet reports may pull from just about any data in the system depending on how you've configured it, it may take some time for the page to load. System caching improves this by taking a static snapshot of the report data, and only reloading from live data on a periodic basis. You can control how frequently the cache is emptied with the Dashboard cache timeout option.
- Contact Trash & Undelete: This is a useful option for organizations that need to have stricter control over the deletion of contact records, including their contribution information. It can be disabled to simplify workflows and improve performance. When enabled, contacts deleted through the contact record, search result tasks, or as a result of a merge, will be "trash" marked as deleted but retained in the database. You may later use advanced search to find these contacts and delete permanently or restore them.
- Version Check & Statistics Reporting: This helps you, as an implementer, to keep track of the latest release of CiviCRM. If your installed version is older than the current stable release, CiviCRM will place a notification at the top of administration pages to alert you. If this option is turned on, basic statistics will be sent back to CiviCRM so the core development team has a basic sense of what version people are using, what environment it's being hosted on, and the size of databases. These statistics do not contain any data from your site—they only include aggregate statistics of your data and system environment information. Wherever possible, leave this turned on, as it is very helpful for the core team to understand how the community is using the software; often it will inform the direction of future development.
- Maximum Attachments: When generating e-mails or creating activities, users are allowed to attach files. Set the Maximum Attachments here to prevent too many from being attached at a time.
- reCAPTCHA: Lastly, you may enable anti-spam tools for your online forms using reCAPTCHA. reCAPTCHA helps ensure the form is completed by a human and not a computer. It presents words or an alphanumeric string in a graphical form, usually with some kind of warping or other visual obstruction that is hard for computers to decipher. If you plan to have publicly available forms on your site allowing users to enter data you should consider implementing this.
First, sign up at http://recaptcha.net/ to obtain a public and private key. Then return to this page to complete the form. Once configured, you enable reCAPTCHA on a form-by-form basis in the Advanced Settings panel of your profile's Settings page. We will discuss this further when we cover profile forms and the process of exposing data to your website.
- Contact Types: The last configuration page in this section is for Contact Types. CiviCRM has three primary contact types— Organization, Individual, and Household. Contact types are used to distinguish the types of contact records you maintain. Each type will have some unique data fields, in addition to fields common to all. For example, the first name and last name fields are appropriate for individual records, but not for organization records, such as a business. In contrast, address fields are common to all.
Beyond the three primary contact types, you may create additional subtypes to categorize your records. You may also rename the existing primary types using this configuration tool. There are a few important things to remember when thinking through contact subtypes:
- There are several benefits to using subtypes to organize your records, but chief among them is the ability to create custom fields assigned to one or more subtypes. Consider a school that is using CiviCRM to track both parents and teachers. These are both individual contact types, but the data collected for each would be very different. The school may want to know the skill sets for parents who wish to volunteer, or track if either parent is an alumnus of the school; teacher records, on the other hand, would track information about their educational experience, history of classes taught, and employment-relevant human resource data. Creating subtypes allows you to segment the data you are collecting.
- Subtypes are patterned after one of the three primary contact types. When creating your subtypes, first think through which of the three main types the subtype should be based on.
- A contact record may currently only be assigned one contact type. Consequently, be sure that your subtypes are mutually exclusive. In other words, don't create subtypes such that a new contact could potentially fit into more than one subtype or there could be ambiguity about the best place for the contact to fit. There are many other ways to categorize your contacts; subtypes should only be used for high-level categorization where there is a fundamental difference between the nature of the contacts.
For a more complete review of contact subtypes and additional guidance on how to think through your system structure, refer to Chapter 4.
Having addressed core configuration and contact-related settings, we now turn our attention to e-mails generated from the system. CiviCRM may be configured to automatically generate e-mails for end user actions, such as registering for an event or making a donation. Additionally, administrators can send e-mails to one or more contacts using activities or CiviMail, the mass e-mail distribution tool. Though you are not required to use e-mail sending capabilities in order to use CiviCRM, you will miss out on a significant functionality if you choose not to.
First, set up your Outbound Email configuration at Administer | Configure | Global Settings | Outbound Email (SMTP/Sendmail), and then choose mail(), sendmail, or SMTP-based mailing mechanisms. SMTP may provide more complete bounce headers for return mail processing, though the default mail() option is generally sufficient. Your hosting provider may also have a preference, or may only support certain options. Regardless of which option you choose and configure, be sure to use the built-in testing function and confirm receipt of the e-mail. This quickly and easily ensures that the outbound e-mail is working.
Note
If you plan to use CiviCRM for large broadcast e-mails, be aware of the responsibilities involved in maintaining a good sender reputation with ISPs and organizations that maintain whitelists/blacklists. Also be aware of the potential server load caused by large mailings. You may want to consider a third-party SMTP provider if you plan to use CiviMail on a large scale.
Once you have tested outbound e-mail, configure the settings at Administer | Configure | From Email Addresses. When sending e-mails from CiviCRM, the logged in user's e-mail will be the default FROM address. However, you may configure additional addresses available to the system and select them while sending an e-mail.
For example, your organization might have service-based generic e-mails, such as [email protected], [email protected], and [email protected]. Depending on your hosting setup, the FROM e-mail addresses used may need to exist in your mail server as mailboxes or forwards.
The CiviMail component provides important functionality for processing the inbound e-mails. These e-mails are received and processed by the system for three purposes:
- Bounce handling of invalid e-mails and temporarily undeliverable e-mails. Without this functionality, you increase the risk that ISPs will, at some point, label your server a spammer. Prevention is the best medicine, as it can be difficult to track whether you have been blacklisted or to respond quickly and effectively if you have been. This isn't merely a reputation problem: when your e-mail is not being delivered, it can significantly impact donations, membership signups and renewals, and event attendance.
- Secondly, return mail processing provides support for e-mail-based unsubscribes, opt-outs, and resubscribes.
- Finally, CiviCRM supports the ability to receive e-mails and log them as Activity records associated with contacts in the From, To, and CC lines. As you generate e-mails from your web-based or desktop e-mail client, you can automatically attach a copy of the e-mail to existing or new contact records using this functionality.
Unfortunately, configuring the return e-mail channel can be tricky, and may be one of the more technically challenging aspects of installing and configuring CiviCRM. It is much easier now than it was a few years ago, but is still an area where you may want to obtain professional support to ensure proper functioning.
Alternatively, CiviSMTP (http://civismtp.uas.coop/drupal/node/3) is a paid service that takes care of most of the technical challenges involved in setting up and running CiviMail. The service is provided by the Urban Alliance for Sustainability. While the cost is low, there are some constraints on the staff support available to users. Besides the obvious negative factor of having to pay regular fees for the service, there is a small degradation in performance that may sometimes result from having this service located external to your site's server (and potentially geographically remote to your server). That being said, this is a relatively easy-to-set-up-and-operate service that should be an attractive option for a large number of CiviCRM installations. Note that it is not an official service offered by the CiviCRM project, but is owned and operated by a third-party provider. There are many other third-party SMTP service providers that can also be integrated into CiviMail.
Before walking through configuration of the return channel processor, let's review the broader subject of maintaining a good mailing reputation.
Any broadcast e-mails sent by your system will be monitored by various spam detection systems operating on the Internet. While you do not have direct control over those systems, you do have the ability and responsibility to construct and manage your broadcast e-mail systems in such a way so as to minimize the likelihood that you will be flagged as a spammer. This process of reputation management involves domain record configuration, including sender details in your e-mails, providing unsubscribe and opt-out tools, and processing bounced e-mails so that you are not repeatedly mailing to bad e-mail addresses, and so on. Each of these things will help contribute toward lower spam scores and ensure you are able to continue reaching your constituents effectively through broadcast e-mails. In this section we will take a look at DNS (domain record) related considerations.
The first step is to set up an SPF record in the DNS for your domain, and ensure that it is correctly configured whenever you move servers. The Sender Policy Framework (SPF) identifies to the world the hosts that are specifically allowed to send e-mail from your domain, those not allowed, and others about which nothing can be said. Your CiviCRM server and domain's outbound mail server (if different), should both be identified in the SPF as "allowed to send (pass)". The more specific and limited your SPF record is, the more effective it will be in contributing toward reducing CiviMail deliverability issues. Unfortunately, users who travel with laptops through various IPs while sending e-mails may make it difficult to lock down the sender policy framework tightly.
A second useful approach to improving your server's reputation is to set up a reverse DNS. In the Sending Email section, you should have configured and successfully tested your outbound e-mail settings. In order to determine if everything is really working correctly, use CiviCRM to send an e-mail to an account you can access that is not on your server, for example a Gmail or a Hotmail account. Then, examine the e-mail header for a couple of things. In Gmail and Google Apps, you can do this by:
- Opening the message.
- Clicking on the other actions dropdown beside Reply or Reply to all.
- Selecting Show original.
Look for a Received-SPF header record. It should indicate either neutral or pass. You may also find other records such as Authentication-Results: spf=neutral.
If you are having trouble with SPF, the issue can sometimes be traced to the identity that is provided by or about your server when it sends e-mails. Check through the Received: From header records until you get to your originating server, and perhaps beyond it, to your domain on a localhost. Raise any issues or questions you have with the tech support at your ISP.
Reverse DNS is the process of translating IP addresses to hostnames, the opposite of the forward DNS process, which takes the commonly used domain name and translates it to an IP address. Setting up a reverse DNS record (if not done so already) can help improve your e-mail reputation as the sending IP is validated as a legitimate sender for your domain. If your server has multiple domains sharing a single IP, it may be worthwhile to spend the small amount of money necessary to purchase a dedicated IP (useful for SSL certificates for CiviContribute, as well) so that you can set up the reverse DNS for your domain. A shared IP environment may result in your domain being scored poorly if it resides in the same bank of IPs as spammers or other accounts that are not as careful with their e-mail reputation management.
The third approach to improving your server's reputation is to monitor DNS blacklists and to request organizations that maintain these lists to remove your server from the list, if it is present. You may find yourself listed for a variety of reasons, legitimate or not, including: you haven't been processing bounces properly, recipients of your e-mail may make mistakes in their complaints, or other sites have affected your reputation. It is important to respond to blacklisting promptly as it typically propagates from one service to another.
To process the inbound e-mails, you must have an e-mail account to receive the inbound e-mails and configure a cron job to periodically process the e-mails received (addressed later in this chapter).
Although not required, you will typically want the e-mail account used for bounce processing to be dedicated for this purpose. You also would not typically want it to be a publicized account that constituents would send e-mails to. It should be created and configured solely for the purpose of bounce mail handling.
CiviMail uses Variable Envelop Return Path (VERP) processing as the method for tracking bounces. The method adds a unique sender address to every outbound message. When a bounce is returned, this unique sender address is used to determine which message, e-mail address, and contact record generated the bounce. Bounces are classified by type (whenever possible) and processed based on the rules configured in the system. Different bounce types will trigger a temporary or permanent hold placed on the e-mail, or record the delivery attempt for future processing, should there be additional bounces on the address.
The preferred setup for VERP is called sub-addressing, which uses a local part format. If your invisible bounce processing e-mail address is [email protected], then the VERP address appends a unique value after the separator but before the domain, such as [email protected]. While this is the preferred method, some ISPs deliberately prevent sub-addressing on their servers because of its prevalent use in broadcast mailing.
In order to test if you can use this approach, try sending an e-mail to the account you have set up, appending +test or test to the account before the @ symbol ([email protected]). If you receive the message successfully, then you've confirmed support for local part handling and are ready to set up the account for inbound message processing.
If sub-addressing/local part handling is not supported or you prefer not to use that method, you may still be able to process bounced e-mails using a catch-all e-mail account. A catch-all account is configured to receive all the e-mails not addressed to the other mail accounts set up on your domain—it "catches" any e-mails not "caught" by the other mail accounts. In general, catch-all accounts are less desirable as they will typically "catch" quite a bit of spam e-mails, which may be processed along with legitimate bounces. To determine if your hosting environment supports a catch-all account, log in to the system that administers your e-mail accounts and look for the option to designate an e-mail as the catch-all, or contact the hosting support to determine system capabilities. If your system supports catch-all addresses but not sub-addressing, you'll have a slightly higher load on your server, but the system should function fine.
Many CiviCRM installations run on virtual private servers. In most cases, the administrators of VPSs have the authority to configure their e-mail systems to their own needs and preferences. If you don't have the technical skills yourself, it's worth putting in a support request to have things set up the way you want.
The final way to support VERP if your e-mail system can't support either sub-addressing or catch-all addressing is to use a third-party account such as Gmail. The processing time and resource load to support processing remote e-mail stores is higher, and there may be a slight hit to your reputation if the sender domain is different from the FROM e-mail domain; but this is still a viable and effective solution. Note that depending on the system used, you may need to configure filters so that bounced e-mails are not flagged and filed as spam. For example, Gmail accounts should have a filter created that redirects anything flagged as spam back into the inbox so it can be processed by CiviCRM.
Configure CiviMail with the bounce processing account you have set up as follows:
- Click on Administer | CiviMail | Mail Accounts.
- Click on the Edit link on the default account row.
- Alter the Name as desired and leave Return-Path empty.
- Enter the Server, Username, Password, and Email Domain for the account.
- You should be able to configure a web or a desktop e-mail client to retrieve the mail with these settings.
- If the account supports sub-addressing, enter the e-mail address "name+" in the "Localpart" field (include the plus sign, such as "civimail+").
- If possible, configure the system to use IMAP in the Protocol field (preferred over POP3 or other options).
- Again, use your e-mail client to test whether the account is working properly before expecting CiviMail to talk to it.
- If possible, set up SSL to improve the security. A locally issued certificate should be fine.
Once the account is configured, manually check if the mail processor script is working by entering the following URL in your browser address bar, where the values in ?name=<username>&pass=<password>&key=<sitekey> are the ones explained in the Setting up Cron Jobs section below. For example:
You should receive a message in the browser window stating that the account was successfully accessed and whether any e-mails were processed. Continue testing by creating a contact record in CiviCRM with an intentionally incorrect e-mail address. Add the e-mail to a mailing list group, send a test e-mail through CiviMail, and then run the script again. This time, you should see a message that one e-mail was processed and if you review the contact record, you should see the e-mail placed on hold.
After you have confirmed that bounce processing is functioning properly, don't forget to configure a cron job as detailed later in the chapter to automate the regular processing functions.
Note that the configuration guidance outlined above covers the standard setup options for bounce processing. Other configuration options are available, such as return-path headers and alternate protocol options, which may be used if your server setup is non-standard. For more details on how these options may be used, review the online documentation or search for guidance in the forums.
It's likely that one of the reasons you've decided to implement CiviCRM is to benefit from the ability to process payments through your website, and have it immediately recorded in your contact management system. Whether you are collecting donations, campaign contributions, sponsorship commitments, pledges, membership fees, or event registration fees, all of those transactions will flow through CiviContribute.
However, before you can collect and process payments through CiviCRM, you must configure a payment processor. Your payment processor, also referred to as the payment gateway, is a service you purchase to allow credit card processing either directly through your site or through redirection to the processor's site. The processor receives the credit card, authorizes the payment, and transfers the funds to your bank (either manually or automatically, depending on the service).
Choosing what service(s) you will use can be challenging as there are many options available. You will want to make sure that whatever service you choose has a corresponding CiviCRM payment processor plugin available; otherwise, you may need to develop a new plugin to integrate with your selected service.
At the time of writing this book, the following plugins were available:
A few additional processors, including Chase Paymentech and Quickbooks, have been created or partially created, but for one reason or another, they are not fully integrated or packaged with the core software.
Not all payment processors are created equal. Some are only available in limited regions or have limitations on what currencies can be used. The structure and model for what fees are charged will also differ significantly. If you are planning to use recurring contributions, be sure to investigate if the processor will allow such functionality and ensure that it has been built into the CiviCRM plugin.
Note
For an updated list of supported processors with details about the functionality they provide, visit http://wiki.civicrm.org/confluence/display/CRMDOC/CiviContribute+Payment+Processor+Configuration. Note that not all processor plugins are officially supported by the CiviCRM project. Some have been contributed by the community and rely on community support for ongoing updates.
There are two basic types of payment processors, namely those that allow you to collect and process credit cards directly from your site (integrated), and those that will direct you to the processor's site to handle the transaction (redirection). There are pros and cons to both:
- Those that allow credit card collection directly from your site provide a more attractive and branded solution. The user never leaves your site and the transaction process flows seamlessly from the collection form, to a confirmation page, and a final thank you/receipt page. However, the fees charged by the processing service are typically higher and you must have a dedicated IP with SSL installed in order to sufficiently secure the transaction.
- Those that direct you to the processing site (such as PayPal Standard and Google Checkout) do not require SSL (as the security is handled by the processing site), and can typically be implemented very quickly and may charge lower total fees. However, the redirection to the processing site means that visitors must leave your website to complete the transaction. That may discourage or confuse people from finalizing the payment.
Note
CiviCRM will not work with a shared SSL (commonly offered on many shared hosting environments). You must have the SSL installed on your domain in order for CiviCRM to work correctly. If you implement SSL on your site, be sure to visit: Administer | Configure | Global Settings | Resource URLs and enable the Force Secure URLs (SSL) option. This will redirect the contribution pages and the CiviCRM administration pages to SSL.
If you are new to online payments and are unsure how much your constituents will respond to the new functionality, consider starting with the off-site solution where you are directed to the processor's site to complete the transaction. At some point, you may reach a threshold where the additional cost for handling the transaction directly through your site is justified.
Tip
SSL certificates are domain-form-specific. A certificate purchased for www.yoursite.com will not validate for yoursite.com, as the root form of your domain and the www form are not considered the same. In addition, CiviCRM references some resources through the site URL, and may not function consistently if the root and www form are used interchangeably. The easiest way to address this is by adding Apache directives to an .htaccess file in your public website directory. For example, if you wish to redirect from the root form to the www form, add the following (with your domain name):
RewriteEngine On # Redirect root domain to www. form RewriteCond %{HTTP_HOST} ^yoursite.com$ [NC] RewriteRule ^(.*)$ http://www.yoursite.com/$1 [R=301,L]
Then, make sure all references to resources in your CiviCRM configuration use the www form of the domain. In addition to ensuring proper function of CiviCRM and your SSL certificate, this will help create consistent domain branding of your website.
Once you've decided what payment processor to use and have gone through the necessary application process with the company you are using, you may set up the account in CiviCRM. From the configuration checklist, select Payment Processors.
The fields you must complete will depend on which processor you use. In almost all cases, CiviCRM will let you configure the credentials for your live processor and a sandbox (test) account. The sandbox credentials will be used when you use the test drive option in contribution pages. See your payment processor for details about creating a sandbox account.
Tip
If you do not yet have a payment processor account but would like to begin setting up and testing contribution pages or other payment handling forms, use the Dummy Payment Processor option. You may then configure your forms and enable contribution handling (including events and membership forms). No transaction is triggered when a dummy processor is used—it should only be created for temporary testing purposes.
CiviCRM supports configuration of multiple processors. At the time you create a contribution page or event registration page you will be asked to select your desired processor to be used by this form.
After configuring your payment processor, be sure to test it by generating a live contribution record. Don't rely on the sandbox/testing tools alone; always run a live transaction with a real credit card to test the system before exposing live donation/pledge/event/membership forms that will process payments to the public.
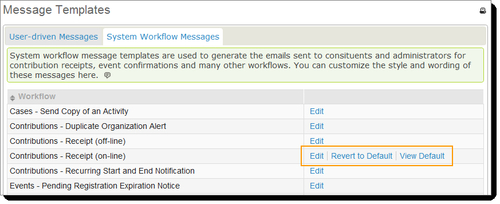
After completing the setup of your payment processor, return to the configuration checklist and visit the System Workflow Templates page. As people visit the CiviCRM forms on your site and you, as an administrator, work with contact records, there are various e-mails generated by the system and sent to your contacts. Each of these e-mails can be customized through this page.
If you edit any of these e-mails and save the changes, you will have the option of viewing or reverting to the original version.
The templates contain tokens that are placeholders for contact and record-specific field values. For example, if you want the e-mail to be addressed to "Dear First Name," you would insert the First Name token. When editing the template text, you may use the Insert Tokens button to insert basic contact fields.
Take care when editing templates. Most of these contain a number of conditional clauses (if/else statements) in order to ensure that the resulting e-mail is customized to the specific transaction. After making edits, make sure you test it with various options to confirm that it is functioning properly.
Note
CiviCRM uses the Smarty template engine (http://www.smarty.net) to render pages, including workflow e-mails. You may insert basic logic and make use of other Smarty functions when creating your e-mail template.
At this point you've completed the most essential steps in your initial site configuration. The Configuration Checklist includes additional sections that we will briefly review here and cover in more detail later while walking through the full implementation of their respective functions. These additional sections are Organize your contacts, Customize Data, Forms and Screens, and Components.
As you begin importing and entering contacts, you will begin looking for ways to organize and categorize them. There are many ways to do this in CiviCRM, but the two primary methods are with tags and groups. Tags are a hierarchal categorization tree you create in order to classify contacts, or a running list of freeform text (tagset). Groups are collections of records that may be dynamically created (Smart Groups, the equivalent of a saved search) or manually collected (for example, an opt-in mailing list). We discuss configuration and implementation of these in Chapter 4.
CiviCRM's core data fields cover all the basic contact and communication fields you would expect. Inevitably, you will have additional pieces of data specific to your organization that you want to record in the database. CiviCRM's Custom Data tool allows you to attach additional fields to almost any existing type of record. For example, you can add fields to a contact record, contribution record, event registration, relationship type, and so on. We will look at creating custom fields in Chapter 5.
In many, but not in every case, the data fields you've created will be included in online forms and exposed to your site visitors. We use Profiles to select core and custom fields for inclusion in specific forms. We will begin to look at constructing and using profiles in Chapter 6.
As noted earlier in this chapter, CiviCRM components represent the major functional areas of the software. Your first configuration step was to enable/disable the components you plan to use. This last block in the Configuration Checklist lets you access settings and options specific to each component. As we explore each of these functionality areas throughout this book, we will examine the configuration options specific to each.
Although we have completed a review of the configuration checklist, there are several additional settings we want to explore. You may choose to configure these areas now, or simply make note of them and return to modify them later in your implementation process as the need arises.
As you work with CiviCRM, you'll quickly find that there are numerous option lists providing selection choices for fields. These include location types, phone types, individual prefixes and suffixes, activity types, and many more. A full list of configurable options is found on the Administration Console, and a partial list of the most frequently modified options is available in Administer | Option Lists, as shown in the following screenshot:
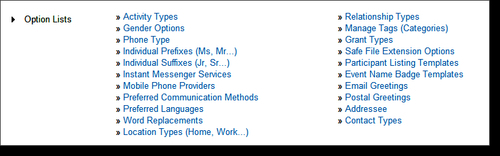
The available settings for each of the options will be specific to the option type. In most cases it will be self-explanatory; and most are documented with inline help text. If the option contains both a name and a label field, the name field is used for the unique option value, and the label field is what will display in the option list.
If your Joomla! or Drupal website has been in operation for some time, you likely have an existing list of website user accounts. These user accounts will not immediately have corresponding CiviCRM contact records unless the user has logged into the site and visited a CiviCRM page. As part of your initial system configuration, it is best to synchronize those CMS users with CiviCRM. Access this option by visiting Administer | Manage | Synchronize Users to Contacts.
Triggering this tool will create a linked contact record for each CMS user in your website. It should only be necessary to initiate this synchronization once. Thereafter, new CMS users will be linked to CiviCRM as they are created or visit a CiviCRM resource.
Note
There are various ways this will occur depending on whether you are using Joomla! or Drupal, and based on what account creation tools you have implemented. We will review some of the available options later in this book.
Let's take a moment and understand exactly how CiviCRM contacts relate to CMS users.
Your website (CMS) users are individuals having the permission to log in to the site using a username and password. CiviCRM contacts are records residing in your constituent database. CiviCRM creates a link between the CMS user and its corresponding CiviCRM contact record. When the user logs in to your site, you can then expose the data fields specific to that contact. For example, you could enable your logged in contacts to edit their address and phone details.
While every CMS user should have a corresponding CiviCRM contact record, the reverse is generally not true. You will typically maintain the contact records for individuals (and certainly organizations and households) that do not have a corresponding user account.
As you configure and plan your site, begin thinking through who exactly should have access to the site; what data fields might you expose to your website users for editing and updating, and what workflow you prefer for creating and granting permissions to new users.
Drupal has an effective fine-grained permissioning system built in to its core that can be extended in numerous ways through specific modules. CiviCRM extends the Drupal access control system to allow control over specific functions within CiviCRM. We will assume a basic understanding of the Drupal access control system throughout this section (visit http://drupal.org/node/22275.
Note
CiviCRM does not currently support access control permissioning with Joomla! v1.5, primarily due to the access group/level limitations of the CMS. With the release of Joomla! v1.6, which includes a robust permissioning system, the CiviCRM v4.0 release will include full access control integration. The list of Drupal permissions found below will be identical to those available in the Joomla 1.6 compatible release.
Access is provided to users based on their roles and can be added or removed as a person takes on, or gives up responsibilities for accessing and administering functionality and content in CiviCRM.
Drupal sites always have two built-in roles: anonymous user (anyone who is not signed in, including those who do not have user accounts), and authenticated user (anyone who is currently signed in). Additional roles are typically created for system administrators and for groups of people who need to be allowed to do some things that others are not permitted to do, for example, moderating comments or other user-generated content.
We don't recommend creating an overly complex set of roles for CiviCRM. Ideally, you will set up permissions so that people are always allowed to do what they need to do, and aren't allowed to do things that are dangerous to the system, its data, or the organization's reputation for preserving the privacy of the personal data it holds. Often you can get by with a single role called CiviCRM administrator, and perhaps another one allowing users to view and edit financial information.
Here are the permissions that can be selectively enabled or disabled by role in Drupal at Administer | User management | Permissions:
- access CiviCRM
- access CiviContribute
- access CiviEvent
- access CiviMail
- access CiviMail subscribe/unsubscribe pages
- access CiviMember
- access CiviPledge
- access CiviReport
- access Contact Dashboard
- access Report Criteria
- access all custom data
- access deleted contacts
- access uploaded files
- add contacts
- administer CiviCRM
- administer Reports
- administer Tagsets
- administer dedupe rules
- administer reserved tags
- delete activities
- delete contacts
- delete in CiviContribute
- delete in CiviEvent
- delete in CiviMail
- delete in CiviMember
- delete in CiviPledge
- edit all contacts
- edit all events
- edit contributions
- edit event participants
- edit groups
- edit memberships
- edit pledges
- import contacts
- make online contributions
- merge duplicate contacts
- profile create
- profile edit
- profile listings
- profile listings and forms
- profile view
- register for events
- translate CiviCRM
- view all activities
- view all contacts
- view event info
- view event participants
As you can see, these permissions fall into different sorts of groups:
- Accessing components of CiviCRM (for example, accessing CiviMember)
- Performing certain operations on certain types of objects (for example, adding contacts)
- Accessing administrative interfaces (for example, administering dedupe rules)
- Accessing non-administrative functions (for example, making online contributions and registering for events)
Drupal permissioning is cumulative—if a user is assigned three roles, the combined permissions from all three roles will determine what the user can do in the system. Because permissioning explicitly allows the specified access, if any of the three roles have been granted permission it will impact the users's access.
Three Drupal modules are included in CiviCRM that allow information about contacts in CiviCRM to be used in ways that interact usefully with the Drupal access control system.
This module allows all the users in a particular Drupal role to be placed in a CiviCRM group, and vice versa. This allows CiviCRM to put contacts into groups and have that result in additional access privileges in Drupal. Signups on CiviCRM profile forms can be automatically added to groups, which could then be used to enable access to parts of your website. Smart groups can also be created for all donors, or other criteria like geography, to provide differential access to parts of your site.
In order to enable CiviGroup Roles Sync, follow these steps:
- In Drupal, click on Administer | Site building | Modules.
- Click to enable the CiviGroup Roles Sync module in the CiviCRM modules fieldset.
- Click on the Save Configuration button.
In order to configure CiviGroup Roles Sync, follow these steps:
- Create one or more non-default Drupal roles as follows:
- In Drupal, click on Administer | User management | Roles.
- Enter a name for the new role, and then click on the Add role button.
- Assign one or more users to the new role, for example:
- In Drupal, click on User management | Users.
- Click on edit beside a username.
- Under Roles, enable the checkbox beside the new role.
- Click on Save.
- Create one or more CiviCRM roles as follows:
- In CiviCRM, click on Administer | Manage | Access Control.
- Click on Manage ACL Roles.
- Click on Add Acl Role.
- Enter a name for the role in the Label field. You can also optionally enter a Description, increase or lower the Weight of the role to make it appear lower or higher on lists with respect to other roles, or uncheck the Enabled? field to disable the role.
- Click on Save.
- Create a group of users to assign to CiviCRM roles if necessary under Contacts | Manage Groups.
- Assign users in an access control group to each CiviCRM role:
- Click on Administer | Manage | Access Control.
- Click on Assign Users to assign users to CiviCRM ACL Roles.
- Click on Add Role Assignment.
- Select an ACL Role and a group of users in Assigned To.
- Optionally uncheck Enabled? in order to disable the assignment.
- Click on Save.
- In Drupal, click on Administer | Site configuration | CiviGroup Roles Sync.
- Click on Add Association Rule.
- Select a CiviCRM group and a Drupal role from the selection lists.
- Click on the Add association rule.
This module provides two-way synchronization between specific membership types with specific membership status and Drupal roles. For example, this allows you to provide all the current members with access to a site, and have that automatically removed if they don't pay their membership renewal fee.
In order to enable the CiviMember Roles Sync module, follow these steps:
- In Drupal, click Administer | Site building | Modules.
- Click to enable CiviMember Roles Sync module in the CiviCRM modules fieldset.
- Click on the Save Configuration button.
In order to configure CiviMember Roles Sync, follow these steps:
- Create one or more non-default Drupal roles as follows:
- In Drupal, click Administer | User management | Roles.
- Enter a Name for a new role, and then click on the Add role button.
- Assign one or more users to the new role, for example:
- In Drupal, click on User management | Users.
- Click edit beside a Username.
- Under Roles, enable the checkbox beside the new role.
- Click on Save.
- Create and configure CiviCRM membership types and statuses at Administer | CiviMember | Membership Types and Administer | CiviMember | Membership Status Rules (see Chapter 8, Growing Your Membership and Interacting with Members for more details).
- In Drupal, click on Administer | Site Configuration | CiviMember Roles Sync.
- Click on the Add Association Rule tab.
- Select a CiviMember membership type and select a Drupal role in order to implement that every contact with a current status for that membership type has that Drupal role assigned to it.
- Click to enable the appropriate statuses for both Current Status and Expired Status. If you are using the default CiviCRM membership status rules, you'll probably want to enable New, Current, and Grace for Current Status, and Expired, Pending, Cancelled, and Deceased for Expired Status. When the membership type for a contact is changed, these lists will be checked to determine if the selected Drupal role should be assigned to or unassigned from the contact's Drupal account.
- Click on Add association rule.
This module can ensure that changes in the contacts in CiviCRM groups are reflected in associated Drupal organic groups. However, as the organic groups module does not provide an appropriate way to notify CiviCRM of changes in membership of organic groups, we find this module to be of limited usefulness.
In addition to the permissions that CiviCRM exposes to the Drupal access control permissioning system we saw above, CiviCRM has its own access control capabilities that provide finer-grained control. In general, you can control more types of operations through CiviCRM's interface. Also, you can specify subsets of data to receive permissions; for example, you can restrict editing fields on a group contact by a group of users.
Tip
The limitations of Joomla! 1.5 preclude CiviCRM from providing its own access control when installed under Joomla! CiviCRM v4.0, with support for Joomla 1.6, will provide these capabilities.
To simplify configuring your access control system in both Drupal and CiviCRM, you may want to consider using the CiviGroup Roles Sync module. The same users can then be in the same CiviCRM roles, as in the Drupal roles used for Drupal access control. Giving the same names to CiviCRM and Drupal roles is a very good practice when you are adopting this approach.
A Drupal permission that can be assigned to a role tends to combine two concepts—an operation and a set of data. For example, "access comments" includes the operation of "access" and "comments" as the data to be operated on. Permissions in CiviCRM access control formalize and split these notions apart. As a result, they include three elements as follows, instead of Drupal's two:
- CiviCRM role
- Operations (View, Edit, Create, Delete, Search, All)
- Data
Though this makes it a bit more cumbersome to specify permissions, it provides a very flexible structure for controlling access.
In the discussion on CiviGroup Roles Sync and CiviMember Roles Sync in the preceding section, we reviewed how to create CiviCRM access control roles (at Administer | Manage | Access Control, Manage Roles) and how to assign users to those roles (at Administer | Manage | Access Control, Assign Users to CiviCRM ACL Roles). Now it is time to put it all together and create the CiviCRM access control lists:
- Click on Administer | Manage | Access Control.
- Click on Manage ACLs.
- Click on Add ACL.
- Select a Type of Data:
- A group of contacts: When selected, you can select the Group from the drop-down list of groups that have access control as their Group Type in Settings, or leave the value at - select - to create an ACL for a Role and Operation that applies to all contacts.
- A profile: This is useful to lock down the use of certain profiles to certain purposes. You can select the profile or leave the value at - select - to create an ACL that applies to all profiles.
Note
Make sure that all the users that are expected to complete online contributions, event registrations, or other similar functions like newsletter subscription signups have the Create operation permission for all profiles on those forms.
- A set of custom data fields: When selected, you can select the Custom Data group of fields or have the permission apply to all the custom fields.
Note
As of version 3.2, there is a known limitation of CiviCRM: the View operation on custom data fields also permits editing, and the Edit operation also permits viewing.
- Events: This is useful to restrict users from viewing the event information page, or from registering (using the Edit operation) for events.
- Select an Operation, a Role, and provide a Description.
- If desired, uncheck Enabled? to disable the ACL.
- Click Save.
ACL permissioning can be tricky as you must make sure that the roles assigned to users don't conflict with each other. If you are using CiviCRM's internal granular permissioning, you must also be careful that you don't conflict with the Drupal/CiviCRM permissions assigned to the user via the Drupal role. For example, a user with access all custom data permission in Drupal would override a specific custom data set permission defined in CiviCRM.
As a general rule, take the time to do sufficient testing for any roles you've created, be it in Drupal or CiviCRM. Especially if you have sensitive information, you must be sure to restrict access to it.
When you first log in to your CMS and visit CiviCRM, you land at the Dashboard page. This page can be configured to display reports from your system in two columns. It is configured directly from this page using the Configure Your Dashboard button.
Clicking displays a visual representation of two columns and a list of available reports. Simply drag and drop from the available reports block to one of the two columns and click on Done to save your settings.
The available reports, or dashlets, come from the main reports list (Reports menu). You must configure a report to be available as a dashlet before it will appear in the Dashboard configuration page.
Throughout our review of CiviCRM, we have referenced the default location of tools and options in the horizontal navigation bar. However, you may add, move, remove, or rename the menu options in your site. For example, if your organization is a heavy user of activities (used to track communications with constituents) you may want to move the Activity Search and New Activity menu items to the main header.
You modify the navigation menu by going to Administer | Customize | Navigation Menu. The menu is displayed as an expandable tree. Click on the New Menu Item button to create a new option, right-click on an existing option to modify it, and drag and drop items to move them to a new location.
While creating or editing an option, you enter the URL for the page. Pages found within the site can be referenced using relative URLs. However, you also have the flexibility to create menu options to non-CiviCRM locations and links outside of your site using a full URL (including http://). Drupal sites will use the Permission selection tool to determine which users may see and access the menu item.
After making modifications to the menu, a notification block will appear at the top of the page. Click on the Click here link to reload the menu and review your changes.
A cron job is a time-based trigger configured on your hosting server. You set up cron jobs to automatically run scripts on a periodic basis. CiviCRM ships with several optional scripts that can be run through a cron, providing automated batch record processing for various functions.
Most hosting services will provide a control panel tool where you can schedule the cron jobs using a graphical interface. You may also set up cron jobs by using the crontab command over SSH. Different flavors of Linux also have locations you can place scripts in, in order to have them executed periodically. For example, the files in /etc/cron.daily, /etc/cron.hourly, /etc/cron.montly, and /etc/cron.weekly are executed at appropriate periods on Debian servers. We will focus on reviewing the scripts available with CiviCRM and how best to configure them. You should contact your hosting provider or seek other resources if you need guidance with creating cron jobs on your server.
Before you can run any of the CiviCRM cron scripts, you must configure a key value in your civicrm.settings.php file and create a user account permissioned to run administrative tasks on your site (in Joomla!, this must simply be a public backend user; in Drupal, the user should be permissioned to perform CiviCRM administrative tasks). The combination of a site key value and username/password help ensure that your cron jobs can only be run by a valid source. The key value should be a 16-32 character alphanumeric string. You may generate one using online services such as http://www.thebitmill.com/tools/password.html. Note that your key value should not contain any reserved special characters, including& = + $ ? % , / : { } | ' #.
The civicrm.settings.php file will generally be located in the following directory, depending on your CMS:
- Joomla!:
/path_to_docroot/administrator/components/com_civicrm/ - Drupal: Either
/path_to_docroot/sites/default/or/path_to_docroot/sites/yourdomain.org/
Locate (or create) the site key definition line and add your configured key:
define( 'CIVICRM_SITE_KEY', 'your_key_value' );
Each cron job you configure will have the following string appended to it:
?name=<username>&pass=<password>&key=<sitekey>
For Joomla!, the cron scripts are located in /path_to_docroot/administrator/components/com_civicrm/civicrm/bin/, and in Drupal, they will generally be located in /path_to_docroot/sites/all/modules/civicrm/bin/. Let's review each of the scripts that can be run through a cron job:
ParticipantProcessor.php:This is used by CiviEvent if you enable waitlisting or require an approval for event registration. Waitlisting is a function available for events that have an attendance cap. Once the registration for the event has filled up, users will be given the option of being added to the waitlist, and if the available space increases or existing registrants cancel, you can allow waitlisted people to register. The script handles participant status updates. On waitlist statuses are moved to Pending from waitlist when space becomes available for the event. If you configure an expiration period for an event, Pending statuses will be changed to Expired. In each case, the script will send an e-mail notification to registrants alerting them of the status change. This cron should be implemented only if you plan to use waitlisting or require approval for event registration. The frequency will depend on the level of demand you have for events, and how quickly you want to give waitlisted participants an opportunity to register. In general, it will be sufficient to run this script once a day. Note that in order to use the waitlisting and approval features, you must enable the relevant participant statuses found in Administer | CiviEvent | Participant Statuses.civimail.cronjob.php:This is used by CiviMail to process scheduled (queued) broadcast e-mails. You must implement this cron if you are using CiviMail. It is generally sufficient to set the frequency to every 15 minutes or half hour. Also note that you may need to review the Mailer Setting options to throttle the number of e-mails sent per batch (Administer | Administration Console | CiviMail | Mailer Settings). Using the cron frequency and batch limit, you can safely regulate how many e-mails are sent per hour (which may be limited by your hosting provider).UpdateMembershipRecord.php:This is used by CiviMember to update membership statuses based on the status rules defined in your system and initiate renewal reminder e-mails. This is a very important script if you are a CiviMember user. Member status rules define when a membership record is considered new, current, in-grace period, or expired (or any other statuses you define). This script must be run in order to process the records against those rules and update them when they pass from one status to the next. It is sufficient to run this once a day, preferably during low traffic times (such as the middle of the night), as it can be a resource-demanding script depending on the size of your database. If you are using the renewal reminder e-mail feature (where a reminder e-mail is sent out to current members a fixed number of days prior to the membership end date), you must create an e-mail template for use by the membership type. This will be discussed in more detail later in this book.UpdatePledgeRecord.php:This is used by CiviPledge to process pledge reminders and update pledge statuses. When a user pledges donations to your organization, they determine the total value of their pledge and the frequency of their giving. If configured, this script will send pledge reminder e-mails as the date for their next donation draws near. It will also update the status of pledge commitments. It is sufficient to run this script once a day.UpdateAddress.php:CiviCRM's geocoding functionality generates a latitude and longitude value for addresses when they are created or edited. If you have existing addresses that are not geocoded, or have recently imported new address records, use this script to batch-generate geocode values. You can run this script as and when needed from a browser (after an address import, for example). If you are importing records on a regular basis, it may be useful to configure the script as a cron job on a periodic (for example, weekly) basis, or more frequently as your needs require. Note that both Google and Yahoo have placed limits on how many addresses may be geocoded via API per day. You may need to run this script over several days to complete full geocoding of your data when initially imported to the system.UpdateGreeting.php:Each contact record has greeting values which can be used for e-mails, mailings, and other forms of address, such as exports for merge letters. When records are created through the administrative interface, the default greeting values are constructed (for example, Dear Mr. Smith). If you change the default greeting, or have recently imported contacts with no existing greeting values, run this script to update the value for all contacts in your database. It is generally not necessary to run this script through a cron job unless you are importing new contact records on a regular basis. There are several variables that must be appended to the script in order to control what records and fields are impacted (for example, the script running on a Drupal installation may look likehttp://<drupal_root>/sites/all/modules/civicrm/bin/UpdateGreeting.php?ct=Individual>=addressee&name=<username>&pass=<password>&key=<sitekey>):&ct=Individual/Organization/Household(select one, required): Determines which contact type will be updated.>=email_greeting/postal_greeting/addressee(select one, required): Determines which greeting value will be updated.&id=N:Selects the option value for the greeting or addressee format. This is optional, and would only be used if you want to populate the field with a greeting format different from the configured default one.&force=1:Updates all the records using the default greeting format, even if a value already exists.&force=2:Updates only those records that have a greeting ID set, but the value of which has not been constructed. This is useful for contact record imports that may have had the default ID assigned, but need to have the greeting text constructed.
EmailProcessor.php:Use this script to configure one or more e-mail boxes (POP3/IMAP) to be polled on a regular basis for bounce processing and e-mail activity processing. The e-mail account configured as the default will be used for bounce processing as described earlier in this chapter, and will also include processing e-mail-based user actions such as unsubscribe/resubscribe/optout. Bounced e-mails will follow rules configured in the system to put the e-mail account on hold, giving you the opportunity to review and correct the e-mail through the system. E-mail activity processing will poll the inbox and attach e-mails as an activity record to existing contact records (if the e-mail is found in the system) or have new contact records created (if the e-mail is not in the system). This is a powerful way to automate communication tracking. For example, you might create a special e-mail account that your staff can optionally CC while sending e-mails to constituents, thus attaching a record of the communication with the contact.To identify accounts that should be polled for e-mails to attach as activities, append
&emailtoactivity=1to the cron job. The frequency of this cron job will depend on how often you send broadcast e-mails, and how quickly you expect to see e-mails display as activities. In most cases, running it on an hourly basis is sufficient. This script is expected to undergo some revisions in future versions to facilitate management of multiple e-mail accounts for the two distinct purposes. Please check the online documentation for the latest updates on script usage.CiviReportMail.php:CiviCRM reports can be configured to be e-mailed on a periodic basis. For example, you may want a contribution report with the last week's summary of payments e-mailed to your staff bookkeeper every Monday morning, or your Membership Committee Chair may want a membership overview report on a monthly basis. Use this cron job to initiate mailings and configure the frequency in which they should be sent. This cron job works differently from others—you will configure a cron job for each report instance. The parameters are passed in the cron URL (in addition to the user, password, and key values):.../bin/CiviReportMail.php?sendmail=true&instanceId=3&reset=1. To determine the report'sinstanceId, visit the report and note the value after/instance/in the URL.
Note that some of the scripts require certain values be configured in the code before they can be run. Those that require configuration are saved as .txt files. You will see the section that must be configured clearly delineated with commented code. After modifying the file, remove the .txt extension so they are recognized as .php files, and then configure your cron. For example, the UpdateMembershipRecord.php file requires that you determine the FROM e-mail address used for sending out renewal reminders.
Note
As of v3.3, this script uses the default FROM e-mail address defined in the system and consequently does not require you to manually configure the address.
Scripts can be run via cron using curl or wget. Check with your hosting provider for their preferred method and any specific requirements for configuring the cron. The following examples may be helpful:
- Drupal: curl
> http://<drupal_root>/sites/all/modules/civicrm/bin/UpdateMembershipRecord.php?name=<username>&pass=<password>&key=<sitekey> - Joomla!: curl
http://<joomla_root>/administrator/components/com_civicrm/civicrm/bin/UpdateMembershipRecord.php?name=<username>&pass=<password>&key=<sitekey> - Drupal: wget
http://<drupal_root>/sites/all/modules/civicrm/bin/UpdateMembershipRecord.php?name=<username>&pass=<password>&key=<sitekey> - Joomla!: wget
http://<joomla_root>/administrator/components/com_civicrm/civicrm/bin/UpdateMembershipRecord.php?name=<username>&pass=<password>&key=<sitekey>
Tip
The wget method creates logfiles by default on your server every time the cron is run. For scripts such as civimail.cronjob.php, which may be run very frequently, this will quickly result in huge amounts of files (albeit small in size) saved to your server. Once you've confirmed that the cron job is running correctly, use the -O- 'URL' > /dev/null switch (for example, wget -O - 'http://...' > /dev/null) to disable logging.
Note that all of the scripts can be run through the browser. If you are running into problems configuring the cron jobs, first confirm that the URLs, with username, password, and key values, are functioning correctly by entering them into your browser address bar. CiviCRM will render errors if any of those parameters are incorrect. Once you are confident that you have the correct URL, continue with the cron job configuration.
Tip
The cron job setup we just described is processed through the web server using wget/curl. This is generally the easier way to configure the cron, as it does not require command line/SSH access, and is generally more widely supported. However, running the cron through the web server creates overhead to your site load and is more susceptible to PHP timeouts if you have a large database. Several cron job scripts support processing through the shell in addition to the web server option we have just covered. If you are comfortable working in the shell, have a large database, or experience performance decline as a result of running the cronjobs, you should configure the crons to run through the shell interface. For a full discussion of how to handle this, refer to the following documentation: http://en.flossmanuals.net/CiviCRM/SystemConfiguration.
This part of the configuration process is admittedly more technical than most other areas. However, if you take the time to understand the concepts and seek assistance where necessary to wade through the technical pieces, you will find the resulting functionality very rewarding.
As with anything else, be sure to test it thoroughly. Cron jobs can generate logs that are sent to an e-mail address, which is a great way to ensure that they are functioning properly. You should also schedule periodic system reviews in order to confirm that your crons are running as expected.