At this point, you should have a good idea where you want to go with the case management tools and be ready to begin the configuration process. As alluded to earlier, CiviCRM's case configuration is more involved (and a bit more complicated) than other components. This is because each case type is highly customized to the types of activities, workflows, and roles involved in the resolution process. That customization, and the flexibility CiviCRM provides, adds a level of complication.
Your first step will be to define a case type and construct a corresponding configuration file specific to that type. Each case type will have its own configuration file, distinct from all others.
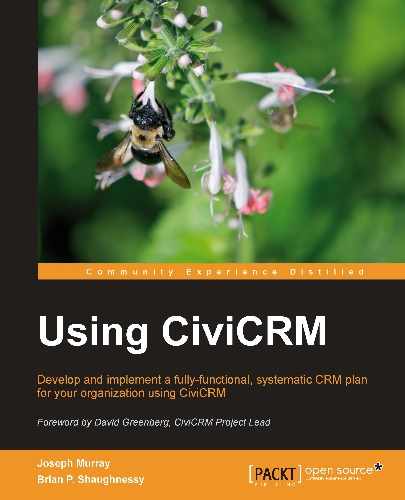
Define your case type by going to Administer | CiviCase | Case Types.
Take careful note of the Label you are giving to the case type. You will need to match it exactly while constructing the configuration file.
Note
FPAGM periodically applies for grants to assist with capital purchases, training programs, or direct support for food pantries in the area. The Association decides to formalize the application and grant tracking process internally by using CiviCRM's case management tools. While they could have re-labeled the CiviGrant tool to reflect the grant application requirements (instead of its normal grant-dissemination orientation), their workflow needs and multi-step processes were better handled through CiviCase.
They begin by constructing a Grant Application case type that collects all communication and other activity records surrounding the grant process.
You may have noticed two other menu options when you navigated to the Administer | CiviCase menu: Case Statuses and Redaction Rules. Your case record will always have a status assigned to it. By default, CiviCRM ships with three statuses preconfigured: Ongoing (that is, open), Urgent, and Resolved (that is, closed). If you require additional statuses for your workflows, you can create them here.
A redaction is a correction or alteration to data. Redaction rules will match and replace text in a way similar to the system-wide word replacement tool at Administer | Option Lists | Word Replacements. The differences are that these redactions will only happen within the context of cases and the match definition may be constructed using regular expressions.
Why would you use Redaction Rules? Some organizations may use case management in situations that require sensitivity to privacy concerns. Redaction Rules provide a way to alter or obfuscate data when you publish reports or send e-mails from the case record. The data is preserved in the system, but your sensitive data is not displayed in the generated report.
At this point, you can begin to construct your configuration file. CiviCRM ships with a few sample configuration files which are very helpful when first constructing it on your own. You should use them as a basis and edit them to suit your specific needs. They can be found at /civicrm/CRM/Case/xml/configuration.sample.
Your "live" configuration files must reside in /civicrm/CRM/Case/xml/configuration/. This folder does not exist in your initial installation of CiviCRM. You must either rename the preceding sample folder or create a new configuration folder.
Tip
As of CiviCRM 3.2.2, case configuration files may reside in your custom template override directory (see Chapter 3, Installation, Configuration, and Maintenance for details about configuring override directories). We strongly recommend that you place them in the override folder to avoid having them lost or overwritten when you next upgrade the CiviCRM codebase.
The configuration files are xml-formatted. They are structured very logically and are generally readable, but care should be taken as you work through the configuration steps as slight misspellings will cause errors when you try to create your cases.
You can create or edit the xml files in your preferred text editor. Using one that is xml-smart, that is, providing text coloring and collapsible fields, will help make the file more readable. We will assume you are using one of the sample xml files that ships with CiviCRM as we continue the configuration process.
Note
If you are not familiar with the general structure of xml files, you may want to do some reading online to gain a better understanding (such as http://www.w3schools.com/xml/). In general, the structure is fairly intuitive. It consists of hierarchal fields and groups of fields that are defined by opening and closing tags. Each tag is contained in greater-than/less-than brackets, for example,<tag>, and is closed by the same tag with the addition of a backslash, for example,</tag>. A tag may contain many subsets of tags to create the field hierarchy. Consistent tabbing or spacing is used to help visually distinguish each level.
The first thing to note is the naming convention for the file. The name of the configuration file must match the label for your case type defined earlier, with all spaces removed and each word capitalized, for example:
- Membership Application Process:
MembershipApplicationProcess.xml - Grant Application:
GrantApplication.xml - Onsite Analysis and Consultation Service:
OnsiteAnalysisAndConsultationService.xml
Note with the last example that although our label did not capitalize "and", the case filename does so in order to distinguish each word.
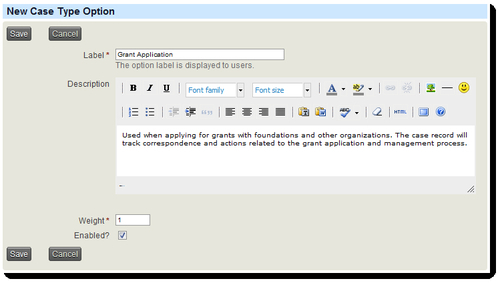
After naming/renaming the file, open it in your text editor and locate the<name> field located within the<CaseType>. Enter the exact name of your case type defined earlier between the opening and closing tags, as shown in the following screenshot:
You now have the core shell for your configuration file in place and are ready to begin building out the various options and functions.
The heart of a case is its grouped history of activities. Whether you plan to use formal workflows and timelines or not, creating cases always provides the opportunity to manage a series of activities on a single topic. Once a case record is created, most of your interaction with it is likely to be in the form of creating and editing activities as you work toward case resolution. Consequently, the next step in your configuration process should be to define which activities will be available to your specific case types.
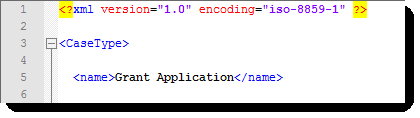
It's likely that a number of your general activity types will apply to case records and there are a number of standard case management activity types that should be included with all cases (such as change case status). In addition to these, you will need to create any activity type that will be used specifically for one or more case types. Create these by visiting Administer | Option Lists | Activity Types.
Note that if this activity is specific to cases and you do not want it visible and available as a standard activity, you should select CiviCase from the Component drop-down field.
Tip
Don't forget that specific activity types may be extended through custom data. You may want to plan on collecting additional information when creating certain types of activities.
Once these are defined in the system, you may add them to your configuration file. The full list will reside inside the<ActivityTypes> tag and each type will be inside its own<ActivityType> tag. Within that, you will add a<name> tag in which the exact name of the tag, as created in your system, will be placed.
Note
As part of its Grant Application case type, FPAGM anticipates a number of activity types unique to this case type. It creates the following activity types in the system:
- Initial Inquiry/Notification
- Permission to Submit/Application Received
- Scope Definition
- Internal Draft Submitted for Review
- Final Internal Approval
- Grant Proposal Submitted
- Denied/Case Closed
- Accepted
- Thank You Letter
- Report
The list of case activity types, in conjunction with several general use activity types, should accommodate the various steps or decision results in the grant application process.
Each type may have an optional<max_instances> value which limits how many times the activity may be added to the case record:
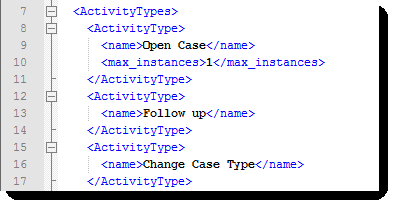
Note that the Open Case activity type has a max_instance of one. This makes sense as a case record can only be opened once, and thus this activity should only be present once in a single case.
Tip
When constructing your configuration file, make every effort to retain the indentation structure as found in the sample files and previous screenshot. Doing so will help you ensure that each tag closes properly and you don't get lost in the structural hierarchy.
As you define your activity types, you may want to have your configuration file open and ready for editing so that you can copy and paste the values from your browser to the xml file or vice-versa and thus ensure that the values match exactly.
After you have finished adding all activity types that apply to this case type, be sure to add a closing</ActivityTypes> tag in your xml file.
The next configuration block is where you define your timeline(s). It is labeled ActivitySets in the configuration file. Before we construct it, let's review exactly what a timeline is and what it does.
The purpose of a timeline is to establish a series of activities that happen in a defined order and are targeted for a period of time relative to other activities (dependencies). In addition:
- Timelines are optional. If your case type is primarily used for grouping activities and not to establish a defined workflow, you may not need to define a timeline beyond the initial
Open Caseactivity. - Timelines may be implemented automatically when a case is opened or made available as an option that can be applied to an already open case. In the first scenario, the activities defined in the timeline are automatically added to the case when it is opened. In the latter, the option of adding the timeline is available within the
Manage Casescreen. - More than one timeline can be defined for a single case type. With the ability to make timelines optional and manually applied, this can allow for fairly complex workflow branching. For example, in our Grant Application use case, we could construct an initial timeline that takes us through the application process, and then create manually-applied timelines that address the workflow requirements based on our decision tree, whether the application is accepted, declined, or more information is required.
- Timelines can be used for audit reporting. The concept of an audit report is to track the progress of case resolution against a defined standard. For example, if you've defined a certain step in the process that needs to be completed within five days, you may want to run analysis on actual completion dates to determine if that window is too short (case workers are chronically late completing the task) and make adjustments to the workflow.
Let's look at the construction of our xml configuration file and the options available to better understand how timelines work.
The timelines will be grouped together inside the<ActivitySets> tag and each timeline will reside inside an<ActivitySet> tag (note the use of plurals and singulars to define the containing group and individual sets). Each set consists of the following tags:
<name>:Unique name for the timeline. This should not contain spaces or other special characters. For example, you can name your initial timeline asstandard_timeline.<label>:User-friendly label to be displayed in the interface. This should be meaningful enough to distinguish it from the other timelines you might be creating.<timeline>:Set this value totrueif you want the timeline to auto-populate the case record at the time it is opened.<ActivityTypes>:Container for the list of activities that are part of the timeline.
Inside the<ActivityTypes> container, you will list the individual activities that should be constructed when this timeline is applied to the case record. The structure is similar to what we did earlier where each type is contained inside an<ActivityType> block. However, there are additional options available while defining them here:
<name>:Name of the activity type as previously defined in your system.<status>:The status of the activity when it is created on the case record. The default isScheduled, but you may set the value to any of the available values previously defined in your system.<reference_activity>:The heart of the timeline function is the ability to schedule an activity with reference to a previous activity. This referencing consists of three values. The first is the activity that is the basis for defining the subsequent activity. Most often, you will base your references on the initialOpen Caseactivity, but you may choose any activity type that precedes the current activity in your timeline.<reference_offset>:The number of days after the reference activity to schedule this activity.<reference_select>:If the reference activity occurs multiple times in your timeline, this value is used to determine if the newest or oldest instance of that activity should be the reference basis. Valid values arenewestoroldest.
Note
Activity types must be defined in the first part of the xml file in order to be available for inclusion in the timeline. If you add activities to the timeline that are not listed in the earlier section, your case record will render an error.
Timeline activities should be listed in chronological order within your configuration file or the case record will render errors. Specifically, any activity that is used as a reference basis for future activities must precede those future activities. The reasoning is simple —when CiviCRM creates the timeline and works through your configuration file, it will look for the existing activities in order to set the date for those reference-dependent activities.
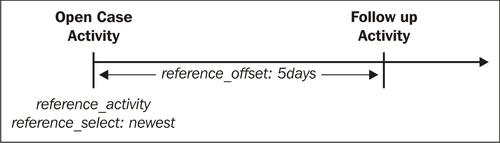
Consider the following diagram to better understand how the reference-related fields are defined. In this case, our Follow up activity is defined to start at an offset of five days after the Open Case activity. In our configuration file, we reference the newest instance of the Open Case activity. As Open Case is present only once, either newest or oldest would yield the same result.
Note
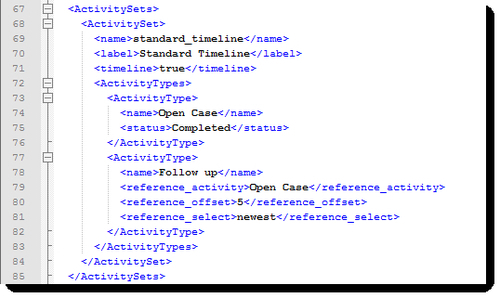
FPAGM is uncertain whether their Grant Application process will warrant a fully defined timeline. As a result of the involvement of outside organizations in the process, they will not be able to reliably set firm deadlines for each step. However, they do want to make sure that staff stays on top of the application process, particularly in the early stages when the grant opportunity is identified and a case record is opened. Consequently, they create a standard timeline with a single Follow up activity scheduled for five days from when the case is opened. This will help ensure that some action is taken on the application within a relatively short period of time. The<ActivitySets> block from their xml file is shown in the following screenshot.
At this point, you should have a good sense of the concepts involved in the timeline construction and understand the basic idea of defining multiple steps that are separated by a certain number of days. However, you may still be unclear as to how this will work out in the system.
Later in this chapter, we will open and work with a case record. When inside a case, you will see a list of all activities associated with the case. If you've defined a case timeline, the list of activities will be pre-populated when you open a case with these scheduled activities using due dates defined by your offset values. What does that achieve? It creates your case task list--the list of actions that must be taken by you and other staff to begin the process of investigating and resolving the case record.
One of the other benefits of using a case is the ability to define case roles for the key players involved in resolving and managing your cases. A case role represents an individual directly involved in case resolution (usually your staff). whereas an individual activity record may have assignees; the case roles function goes further by defining the nature (role) of the person's involvement in the case. By attaching them to the case itself (and not just individual activities), we provide another level of management control over the case process.
Case roles are relationship types that your configuration file defines as applying to a specific case type. In order to implement them, you must first create the relationship types through: Administer | Option Lists | Relationship Types. Create the type as you would any other, but take note of the text used for Relationship Label-B to A, as that is the text that will be referenced in your configuration file.
When creating your case role relationship types, ask the following questions:
- Who will be involved in the case resolution process?
- Are there clear lines of responsibility that can be defined?
- How will I want to track and report on cases? For example, will I need to pull reports to determine which staff members are involved in what cases and in what capacity?
- Do different roles translate to different levels (and amounts of time) of engagement, such that I can determine staff resource allocation based on their roles?
Note
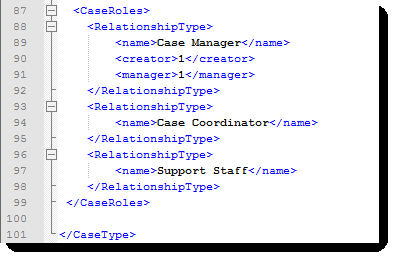
FPAGM determines that there are three clear roles with regard to case management— Case Manager, charged with overseeing the progress of the case and managing resources, Case Coordinator, who is the primary day-to-day person working on a specific case, and Support Staff, who will occasionally be assigned to a case based on their expertise and the nature of the case. They use the Relationship Types tool to construct these three case roles.
Once you've created the relationship types, return to the configuration file to add them as case roles. They will reside inside the<CaseRoles> tag, and each will be defined in a<RelationshipType> tag. Within that tag, you define the following:
<name>:The name of the relationship type using the Relationship Label-B to A noted previously<creator>:If set to a value of 1, the current logged in user who opens the case will be assigned this role<manager>:If set to a value of 1, the role will be designated as the case manager
The third option above,<manager>, may be a bit confusing. If I have a case role (relationship type) defined as Case Manager, what is the significance of flagging a role as Manager in the configuration file? CiviCase assumes there is always one person primarily responsible for overseeing every case, regardless of what relationship types have been defined or how they are labeled. You flag the appropriate relationship as the case manager in order to have it easily displayed in the case listings and other views.
Your xml file will contain content similar to the following:
At this point, you have finished configuring your case type xml configuration file. As displayed in the preceding screenshot, be sure to include the</CaseType> closing tag.
Along with case roles (people directly involved in case resolution), you will generally have additional contacts that are indirectly involved in the case process. These may be outside agencies, government bodies, consultants, or other organizations that assist you and are a general resource for your organization. We call them Case Resources and collect them as a directory of contacts available to the case.
To set them up in the system, first copy the Settings.xml file that was included in the configuration.sample directory to your configuration directory, open it, and locate the line containing<group name="Case_Resources" />. The name corresponds to a group you must create in your system that will contain the directory of resources. Use Contacts | New Group to create your Case_Resources group. You may, of course, name it differently. If you do, be sure to alter the Settings.xml file appropriately, replacing any spaces in the label with underscores as in the preceding example.
Any contacts you add to this group will appear in the case management page for easy reference when people are working with the case.
When we begin looking at a case record, we will also see that any existing relationship the contact has (employer, spouse, household, and so on) will be listed within the case relationships panel. This is all for the purpose of putting the most pertinent and useful information at your fingertips while you are working on the case.
At this point, your case types have been configured, you have created any activity and relationship type that will be part of the case process, and you've created a Case Resources group and populated it as desired. Before testing your configuration, let's take one more look at the Settings.xml file.
While working with this file to configure the Case Resources group, you may have noticed there are several other settings listed in this file. Let's review them:
<RedactActivityEmail>:If set to 1, the send copy of activity via email feature within the case activities will be redacted. In other words, your redaction rules will be run against the activity before it is sent.<AllowMultipleCaseClients>:By default, each case is associated with a single contact record. If you potentially need to associate multiple contacts with a single case, enable this option.<ActivityTypes>:If desired, you may list activity types you wish to make uneditable. As you can see from the default file that ships with CiviCRM, theChange Case StatusandChange Case Start Dateactivities are marked as uneditable. Why would you want to do that? The primary reason is to provide an auditable record of the case. The case record represents an ongoing list of actions taken in an effort to resolve the case. If that status changes at any time, it should be recorded as a point in time (an activity record). If the status changes five times over the life of the case, we would expect five time-stamped activities so that the history of what had transpired is retained. Consequently, those activity types should generally not be editable lest the history be manipulated or lost.
Once you've reviewed and made any changes to the Settings.xml file, it's time to test your case types and confirm that they are configured correctly.
Enter a contact record, navigate to the Cases tab, and create a new case. Alternatively, you could use the contact Actions button or Create New button to create a new case.
Tip
You should create a new record for each case type you have defined in the system to make sure each one is configured correctly.
You will know immediately if the configuration is correct. If there are any typos or misconfigured elements, CiviCRM will display an error message indicating that it was not able to create the case successfully. If the case is successfully opened, you should still review the list of available activities, case roles, and any activities auto-generated via a timeline to make sure it is constructed as expected.
If you do receive an error, review the following troubleshooting tips and common problems:
- Ensure that all activity types defined in your configuration files exist in your system.
- Ensure that all relationship types defined as case roles in your configuration files exist in your system.
- Check spellings carefully.
- Make sure that your case configuration files are titled and labeled accurately. Remember that they must match the case type defined in the system with title case text and no spaces.
- If you have renamed an activity or relationship after creating it, the configuration file may have difficulty recognizing the new name. Rather than renaming the types, it is safer to delete and recreate them to ensure that the name recorded in the database matches what is configured in the
xmlfile.
If you continue to have problems, focus on a single case type configuration file and remove sections to isolate the problem. For example, you don't need the CaseRoles and ActivitySets sections in order to have a functioning case type. Try removing them, running the case, and then adding each back in and re-testing to isolate the issue.