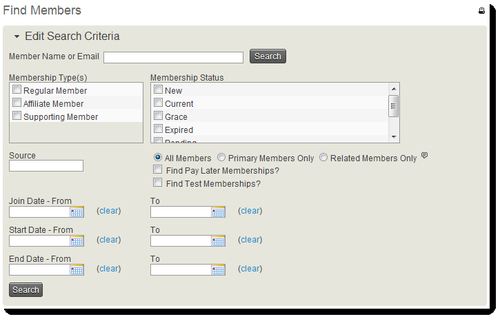
We mentioned earlier the Find Members tool on the Membership menu. Let's take a few moments to explore the options available and review membership reports.

Most of the search options here are self-explanatory—you may search by a contact name or e-mail, membership types, and membership status. For these types and statuses, selecting multiple options is inclusive: the result will yield records matching any of the selections.
Below the membership status field is a set of important options if you are making use of membership inheritance via relationships. Recall that you can configure a membership type to extend the membership to other contacts based on the selected relationship(s). If ACME Corp. is a member and the employer/employee relationship is selected for their membership type, all employees of the business will receive a membership record as well.
While this functionality is useful, it may be confusing to understand how you calculate members. If ACME has three employees, a membership search would yield four results for this one membership record. That may be useful when you are sending out a broadcast e-mail and want all members to receive it, but if you are seeking to count the number of actual membership records that were purchased, your numbers will be inaccurate.
The three options on this form help you control your search as it relates to membership inheritance. Do you want to view all the members, just the membership record owners (primary members), or just those who are members through inheritance?
As one would expect, the three date fields associated with membership records are searchable as date ranges. With some creative thinking, these date range search fields can generate some powerful tools for understanding your membership. Consider the following examples:
- You want to know who did not renew in the previous year (2010) for a membership type that has a fixed period of January 1 through December 31: Set the End Date - From and End Date - To fields to December 31, 2010. All members who joined or renewed in 2010, but did not renew for 2011 will be included.
- You want a list of members who joined in the last few years: Set Join Date - From to January 1, 2008. Any join date occurring after that date will be provided in the result.
- You want a list of members who joined sometime in 2006 to 2010, but did not renew in 2011: Set Join Date - From to January 1, 2006, and End Date - To to December 31, 2010.
These example searches illustrate the benefits of the date structures in membership records.
CiviCRM is packaged with several reports geared toward membership management. From the navigation bar, select Reports | Create Reports from Templates. Before we dig in, let's review some terminology and concepts as it relates to CiviCRM reports:
- Report Template: Templates are the guts of a report—the code that determines what fields, filtering, sorting, grouping, and visual options are available.
- Report Instance: Often just referred to as a report, this is a specific implementation, or instance, of a template. In other words, you choose specific criteria and options available in a template and save it, print it, or export it.
A single report template may have multiple (or no) instances associated with it. Each instance presumably has different filters and settings rendering different results, though based on the same originating template. Almost all of the report templates that ship with CiviCRM also have an initial report instance created. Many of these are found in the Reports menu drop-down, and all are listed at Reports | Reports Listing.
There are three templates available for membership records:
- Membership Report (Summary): The options available are geared toward generating summary totals of members by date or membership type. The resulting report includes details on any contributions associated with the membership records.
- Membership Report (Detail): This report is geared toward the membership records themselves. You can select which contact and membership-related fields you would like listed in the results and can filter on standard options such as membership types and status, as well as contact-related selections such as groups and tags.
- Membership Report (Lapsed): This report is a bit more specialized, as it displays the records whose membership has lapsed (are no longer current). It is intended for organizations that want to reach out to lapsed members in a focused way to encourage them to renew or rejoin the organization.
From the Reports | Create Reports from Templates screen, you can create a new report as follows:
- Select Membership Report (Summary).
- Choose the "group by" and filter options as you like. For example, leave the defaults for the Group by Columns (both Join Date (Frequency = Month) and Membership Type enabled), set the filters so that Join Date = This Year and the Contribution Status = Completed.
- Click on Preview Report.
- In order to proceed with saving the report, you must have valid results generated. In other words, you must have at least one completed membership signup. If your report yields no results after clicking preview, create a test membership for yourself at Memberships | New Membership.
- In order to proceed with saving the report, you must have valid results generated. In other words, you must have at least one completed membership signup. If your report yields no results after clicking preview, create a test membership for yourself at Memberships | New Membership.
- Review and adjust the Report Criteria as necessary. After making changes, click on Preview Report to refresh the results.
- Once you are satisfied with the report results, click to expand the Create Report panel. The options in this section are grouped into three areas:
- In the first one, you name your report and can modify the header and footer region that will be generated if the report is published to
PDF. - In the second one, configure the report to be e-mailed to the desired contacts.
Note
For the report via e-mail functionality to work, you must create a cron job to trigger the mailings. For more details on installation and configuration, see Chapter 3.
- The final section controls permissioning (Drupal only) and lets you add the report to a menu item or make it available to the CiviCRM dashboard page. Choose an appropriate permission for viewing the report, such as access CiviMember.
- Click on Create Report.
- In the first one, you name your report and can modify the header and footer region that will be generated if the report is published to
Once saved, the report can be retrieved with your selected settings for viewing, printing as a PDF, or exporting as a CSV file. For a full and detailed discussion on reporting concepts and tools, see Chapter 12.
