The first step in event management is to configure your event in the system. Once configured, you can begin collecting registrations and tracking participants. The event tools all reside under the navigation bar's Events menu. As with other areas of CiviCRM, the event administration tools are not always provided in a simple, task-oriented workflow. You are likely to find that the creation, configuration, registration, tracking, reporting, and managing happen in a more iterative pattern, rather than a linear one. We will begin by walking through the event creation process, touching on the various options available, and may circle back later to delve deeper into various areas.
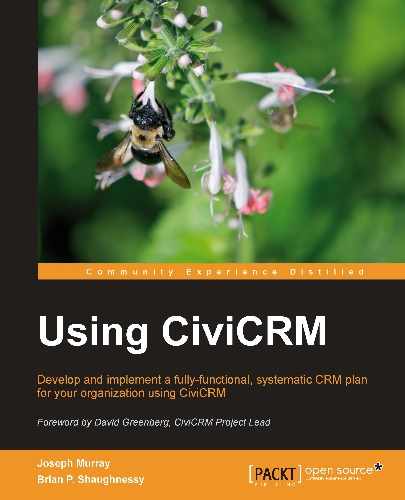
Use the New Event option to begin the process of setting up an event. This opens up an initial information and basic settings form. After saving it, you will be directed to a tabbed interface where you optionally configure four other settings areas (or return to adjust this first form).
You should carefully work through each tab in a sequential wizard-style way when first becoming familiar with the event tools.

The first form defines basic information about the event, including its category (type), title, description, dates, and so on. You may notice that the very first field on this form is for selecting an event template. If no event template exists, a notice to this effect will appear at the top of the page.
Event templates are very useful if your organization hosts a number of very similar events, such as a monthly breakfast seminar series, or a bi-monthly training workshop. From one event to the next, the structure, fees, location, and perhaps even the basic description remains similar. In such cases, you can save time and reduce errors by setting up an event template under Events | Event Templates. The template creation tool is almost identical to the five-tabbed form we will be working through now, with the exception of a few fields removed (such as event dates) that are presumed to be unique for each event.
When creating a template, complete only those fields which are common to all (or most) events of this type. For example, if your monthly breakfast seminar hosts different speakers on different topics, you will want to leave the summary and description fields empty.
When a previously configured template is selected while on the Info and Settings form for a new event, the event is pre-populated with any data stored in the template. You will have the opportunity to review, adjust, and fill in any fields in your event. Once a template has been selected for a new event, there is no association back to the template. In other words, changing template settings at a later date will have no impact on existing events that used the template. Its only purpose is to pre-populate the event, and in doing so, to facilitate the event creation process.
Returning to the initial event creation form, we see event type and participant role fields. The event type is used to categorize your events, which can be useful when analyzing and managing events. You can, for example, define an event type for your annual fall conference and later run searches based on the event type, such as displaying all constituents who participated in any of the fall conferences over the last five years. The event type options are managed under Administer | CiviEvent | Event Types.
Custom data fields used to collect information about your registrants can be configured based on these event types. Since events of the same type will often have similar data collection needs, this is a useful and efficient way to repurpose fields for multiple, similarly-structured events. We will discuss custom data later in this section when we review the use of profiles. They are created and configured through Administer | Customize | Custom Data.
Participant roles categorize the nature of the participant. For example, your event may have attendees, guests, speakers, staff, volunteers, and other types of registrants you will track, but also want to classify. Participant roles are managed through Administer | CiviEvent | Participant Roles. Similar to event types, custom data sets may be constructed based on the participant's role. In this way, speakers can be prompted to provide a title and description of their talks, exhibitors can be asked questions about their needs for space, power, and equipment, volunteers can be asked their preferences for an assignment, and basic attendees can be asked their breakout session preferences.
When defining a participant role, you have the option of deciding if a role will be counted. We will see later in the event management tools that CiviCRM provides up-to-date counts of your participants, organized into various categories, one of which is the main participant count. Typically, you will want to "count" any attendees who have paid or have committed to pay, but exclude from your count any attendees who have canceled or are in a non-attendee role. Many organizations will not count speakers or staff when reporting the number of attendees for a conference. By creating a staff role and choosing to not count it, you can still track the fact that they were present at the conference and generate name tags from the system for them, but exclude them from the counts provided to your Events Committee or Board of Directors in various reports. Be clear on who is included in your counts as there are some purposes for which you will want a "full" count, such as the number of meals required at the event.
Returning to our form, the selection of a participant role in this location determines what role will be assigned when participants register using the event registration form. In most cases, you will select the Attendee role, as that is the standard role intended for event participants.
Peer pressure may be a useful tool in your event promotion toolbox. CiviCRM provides the option of exposing a participant listing to site visitors. When visited, a current list of all participants will be displayed.
There are three listing templates included in the standard installation, namely Name Only, Name and Email, and Name, Status and Register Date. Unfortunately, at this time, there is no interface for setting up alternative collections of fields to be included in listings. If you have the ability and resources to edit PHP and Smarty .tpl templating files, you can create more templates and tell the system about them through Administer | CiviEvent | Participant Listing Templates.
Tip
While participant listing pages may serve as an effective peer-pressure promotion tool, they may also be perceived as invasive to privacy by your attendees. Make sure the nature of the event (and the nature of your constituents) supports displaying such a list. In particular, be sensitive to the use of the name and e-mail template, as some contacts may not want their e-mail information disseminated in this way.
Enter the title of your event, keeping in mind that it will be publicly visible in the event information and registration pages. You also will want the event to be uniquely named to avoid confusion with other events. For example, if you host an annual conference, you might name it: Annual Conference 2010, Annual Conference 2011, and so on.
Use the Event Summary and Complete Description fields to describe the event, such as the topics covered, speakers, audience, and so on. As the name suggests, the Event Summary field should be brief and succinct. It will be included in RSS and iCal feeds generated by the system, which you may use for promotional efforts. The Complete Description field should be more complete, and is displayed on the event information page.
Note
Your RSS feeds allow other websites to automatically pull content from your site and display it on their site. The event feeds include information about your events, such as links to send their visitors to your registration pages. iCal feeds are another similar format for publishing your event information. People can set up their Google Calendar, Outlook, and other similar calendaring applications automatically to read in these feeds and display your events on the right date and time.
Define the event's start and end date/time. For a single-day event, it is sufficient to just complete the start date field.
We'll spend a bit of time in a moment on the waitlist option. Proceed to the final set of fields on this first step of the event wizard, and click to enable or disable the following options:
- Include Map to Event Location?: Inserts a Google or Yahoo! map on the information page with the event location plotted. You must have a location defined on the second step of the wizard and must have geocoding configured in your Global Settings to make use of this function.
- Public Event?: Determines if the event appears in RSS/iCal feeds, in the HTML event listing page, and in Drupal's CiviCRM Upcoming Events block. Turn this off if you have "invitation-only" events that you don't want to publicize through the automated methods.
- Is the Event Active?: Enables or disables the event. A disabled event will be hidden from RSS/iCal/HTML listings and cannot be visited through event information pages or registration forms. Be careful about disabling past events thinking they would not be accessed by site visitors. If you have older content articles on your site that reference the event information page, it's possible that people will visit older events to learn what information was covered. We will see later on that there are options for limiting the date/time window when people may register for the event, so you do not need to be concerned about people registering for past events inadvertently.
One of the more advanced tools available in the event management process is the ability to define a maximum number of participants for an event and determine how to handle people who try to register after that maximum is reached. This is an important feature, as one of the consequences of providing online registration forms is that you lose some control over the event management process. Unlike a pure paper-based system (registrants mailing or faxing their registrations to you), you and your staff are not "touching" each registrant as it comes in. This can create a problem if you have limitations on the size of events due to space or other factors. You can't rely on manually shutting down the registration form once you near the maximum, as you have no way of knowing or controlling how many people register within a short period of time, potentially pushing you over your limit.
Enable the maximum participants tool by entering a value in the Max Number of Participants field. Two additional fields will become visible— Offer a Waitlist? and Message if Event is Full. The second field is fairly obvious if the maximum number of registrants has been reached, the registration form will be shut down and this message will be displayed to people who attempt to register.
The waitlist and administrator approval options make use of special participant status types that are disabled when CiviCRM is first installed. To use them, you need to configure the ParticipantProcessor.php script and a cron job to run it as described in Chapter 3, Installation, Configuration, and Maintenance, and then enable the following at Administer | CiviEvent | Participant Statuses: On waitlist, Awaiting approval, Pending from waitlist, Pending from approval, and Rejected.
The waitlist feature places people on a list in the order received, where they will be maintained until space opens up with the event. Available space may be the result of a new venue that accommodates more people (in other words, you increase the maximum number of participants), or due to existing registrants canceling, which opens up new spaces.
In either case, registrants remain on the waitlist until space becomes available, at which point they are sent an e-mail inviting them to register. We will see one additional option impacting this process on the Online Registration form—the ability to define an expiration period for their Pending status. Let's review how the process works through an example:
- While attempting to register, an individual is informed that the maximum number of registrants has been met.
- The person chooses to go on the waitlist, and then enters his/her name and e-mail address.
- After three days, your organization decides to move the event to a new venue that accommodates 10 more people. After altering the settings in the system, the first 10 people on the waitlist (first come first served) receive an e-mail, inviting them to register. CiviCRM automatically changes the status of their registration from On waitlist to Pending from waitlist. If they have not registered after the expiration period is over, then their registration status changes to Expired.
- During the period when the status of these 10 registrations is Pending from waitlist, only those waitlisted contacts may register. New visitors to your website will not be able to register, as preference is given to waitlisted people. Waitlisted individuals beyond the first 10 (who were invited to register) remain on the list. As these waitlisted individuals respond to the invitation to register or allow the invitation window to expire, new people are invited to register (if there are additional individuals on the waitlist) or the registration form becomes publicly available.
While the assumption is that those 10 invited people on the waitlist will sign-up in a timely fashion, that's not always the reality of the situation. Some of those people may drag their feet or simply lose interest in the event. In either case, your ability to successfully fill the event to capacity and give fair opportunities to others on the waitlist to attend is compromised.
The expiration period option improves this by limiting the window of time during which places are held for waitlisted invitees to register for the event. We will review how to configure it in the Online Registration section. There are a few things to consider when using this feature:
- Other sorts of pending registrations, that is, Pending from pay later, Pending from incomplete transaction, and Pending from approval also expire based on the same expiration period. "Pay later" transactions usually require a few weeks before a check is received in the mail, so your expiration period for "pay later" events may need to balance quite different lengths of appropriate periods. You may decide not to provide the option of paying later for events you expect will reach capacity. Alternatively, if you're monitoring the event carefully, you could initially enable "pay later", and then disable it when the initial capacity limit is reached.
- When you define the expiration time in the event settings, the cron job triggers the script that runs analysis on your records and determines if and when any e-mails should be distributed. If your cron job is configured to run nightly, expiration periods less than a couple of days may have undesirable effects, as the actual window during which the individual may register could be too short. Also be aware of the fact that many people do not get around to reading, never mind responding to, e-mails over the weekend. This leads to undesirable impacts on waitlisted users if you have an expiration period of less than 72 hours.
If you are new to CiviCRM but are interested in this functionality, it may be worth setting up a test event and running through the various scenarios with test records to understand how the behavior works.
After completing this form, click on Continue/Save. Now, click on the Location tab to proceed to the next step.
If you are creating a new event, notice that you are only given the option of continuing or canceling after filling out this form. After continuing, the full five-step tabbed interface appears and you may navigate between the form pages as desired. Note that you must save each page separately as you complete or edit it. For example, if you proceed to the second step and then want to return to the first tab, you must save the second form before proceeding to the first tab. In other words, the Save button only impacts the form you are on; it does not impact the other tabs. After the initial save, you will have the option of Save, which saves the information but keeps you in the event configuration form, Save and Done, which saves and returns you to the event management screen, and Cancel, which returns you to the event management screen without saving.
The second tab is used to enter the location of the event. Note that this is intended for the actual physical location of the event, and not the location of your organization. It will be included in the event information page, and if you've enabled mapping in the first step, it will include a Google or Yahoo! map.
Once you've created your first event and entered a location, that location will be available as a selection option for future events. At the top of the form will be an option to enter a new location or use an existing one. This is very useful if your organization uses various training or event locations on a regular basis. However, be aware that any changes to the location will affect all instances where that location is used.
You may enter one or more phone and e-mail address associated with the event. The person who answers at this number should be knowledgeable about the event, how to register for it, and how to get to it. In some cases, it may be a number in your organization, and at other times it might be a number associated with a venue. For example, the phone number might be the hotel's phone number where your convention is being held, and where attendees should call to make overnight accommodations.
The last field controls whether the event location should be visible on public-facing pages.
After entering the information, click on Save and advance to the next tab.
If your event requires payment of fees for people to attend, enable this option and begin completing the fields.
If you have set up a payment processor in your site to handle real-time credit card transactions, you may select the processor from the drop-down list. If you are not accepting credit card payments on your site, or do not wish to enable that for this specific event, you may still collect fees by clicking on Enable Pay Later option?. The idea behind "pay later" is to ask people to commit to payment, which will be made outside the real-time context of the registration process. For example, you might allow people to pay with check, to call and pay by credit card, or to pay onsite with cash.
"Pay later" may be used in conjunction with payment by credit card or each option may be used independently. However, if you have enabled fees for your event, you must have at least one option activated. If both credit card and "pay later" options are enabled, the registrant will be given the option of selecting "pay later", which hides and disables the credit card fields from the public-facing registration form.
After enabling "pay later", you must complete two additional fields. Pay Later Label is the text to display beside the Pay Later checkbox on the registration form. Pay Later Instructions is a field that can contain a sentence or two of instructions on how to pay later. It will be included in both the thank-you page and the receipt sent to registrants. We recommend including in your instructions: who the check should be made out to, where the payment should be sent, and when it needs to be received. For example:
Payments should be made out to "FPAGM" and mailed to 123 Main St, Metropolis, ThisState, 12345. Payments must be received within 30 days or at the convention, whichever is earlier, or your registration may be cancelled without further notice.
The Contribution Type field determines how the fees will be categorized when the contribution record is created. Your selection is used for the public-facing registration form and will set the default value for registrations created through the administrative interface. Enter a Fee Label to determine the text displayed on the public facing information and registration pages.
At this point, you must configure your fees. There are two ways to construct fee options— Price Sets or Regular (basic) Fees. The Regular Fees presents a basic list of fee options from which the registrant may select one option. Price Sets allow the construction of more complex series of options. A Price Set is a collection of fee fields which may include radio button options (user selects one from a list), checkbox options (user may select more than one from the list), select field (user selects one from a list), or a text field (user enters a quantity which is calculated against the configured per item rate to determine the total cost).
While Price Sets provide you with much more control and flexibility when constructing your fee options, there are two benefits only available when using the Regular Fees—the simplicity of the structure makes it easier to use (when searching and reporting on the events), and Regular Fees may have date-based discounts configured through the interface.
Let's review the Regular Fees with discounts first, then return to discuss the configuration of Price Sets.
Use the Fee Label and Amount columns to define your fee options. You may select one option to appear as the Default. Once you have your fees configured, click to enable Discounts by Signup Date. The date-based discount tool consists of one or more discount sets with associated fees. Because you can define multiple discount sets, you can create a tiered structure for your discounts. For example, let's say your event will take place on March 15. You might construct the following:
- Early Registration: Now through January 15
- Standard Registration: January 16 to February 15
- Late Registration: February 16 to March 14
What we've defined as late registration will be entered as your Regular Fee options. You'll then create two discount sets which have the appropriate date ranges to handle the early and standard registration fees. After naming the discount sets and entering the date ranges, click on Add Discount Set to Fee Table to create those sets.
Once saved, two new fee option tables will be added to this form, pre-filled with the Fee Labels you defined in your Regular Fees grid. In most cases, your fee options will remain the same; only the fee amounts will change. However, you can restructure the discount fees as you wish. For example, you might have a preconference program registration that is only available for people who register before January 15, which you only add to the first discount set.
The end user visiting your site to register will only see the fees appropriate to the time in which they register. CiviCRM takes care of determining what options are listed, ensuring that you don't have people trying to register at the discount rate past the associated date window.
Note
Coupon discounts
While not fully available through the interface, CiviCRM is "prepped" for handling coupon-type discounts. In this model, you disseminate a code to selected contacts, who may enter it into the event registration form in order to have a discount applied. Using this functionality requires implementation of some custom code, but is not beyond the grasp of a beginner programmer. For more information, see the blog post online outlining how to set this up at http://civicrm.org/node/566.
As just described, price sets allow more advanced options for configuring event fees. The one downside of using price sets is that they do not currently accommodate date-based discounting through the interface.
Price sets must be created in the price set management tool before assigning them to a specific event. While we are still on the event fee configuration page, note the message concerning price sets. If you already have at least one price set configured, a select box will display allowing you to select one. Doing so will hide the Regular Fee sections, as you must choose one system or the other when configuring fees.
To construct a price set, visit Events | New Price Set, or Manage Price Sets to view the existing sets. Each set will consist of a series of fee fields. The set may be reused any number of times, so you may want the name to be general enough for use in multiple events. For example, if your organization holds a monthly breakfast seminar series with standard rates for each event, name your price set "Monthly Seminar Fees" rather than "March, 2011 Seminar". Be sure to indicate that the price set will be used for events.
Note
The price set functionality may be used for both events and contribution pages. In the context of a contribution page, it allows you to have different levels and types of donation options.
Each fee field will use one of the following display/format types:
- Text/Numeric quantity: The registrant is given a text field where they enter a quantity value. The unit price is set by you and the total is calculated during the registration process. You might use this when selling banquet tickets at a conference where registrants may invite their spouse or colleagues to attend.
- Select: List of options displayed in a select form field.
- Radio: List of options displayed in a list of radio buttons where the user may only select one option.
- Checkbox: List of options displayed in a list of checkboxes where the user may select/unselect any of the available choices.
For each field, you may choose if the fee amounts are visible and whether the field is required. The required field option means the registrant must select an option from this one field. It does not impact how this field relates to other fields. Radio and checkbox type of fields will have an additional option where you indicate how many options should be displayed on a single line.
You may optionally allow a price set field to impact the total registrant count calculated by CiviCRM to ensure that the maximum number of participants for the event has not been exceeded. For example, let's say one of your fee options is a checkbox indicating that the registrant will bring his or her spouse. You are not charging the full registration fee if a spouse attends, which is why it is handled as a fee option for the main registrant. However, your event space has a firm capacity limit of 250 people and you need to make sure any spouses attending do not cause you to exceed that limit. You enter 250 in the Max Participants field (step 1 of the event creation wizard) and enter 1 in the Participant Count field. If a registrant selects this option, a count of 2 will be logged against the max participant value (one for the registrant, one for the spouse). This functionality is also useful if you are selling bulk options, such as the ability to purchase a table (seating eight people) at a banquet.
Tip
Version 3.3 extends the max participant concept to price set field options, which can be used for managing session attendance. For example, you might create a price set field called "Afternoon Breakout Sessions" with three options. Each of these breakout sessions will be in different rooms, with different space capacity. You can set a maximum value for each option, and thereby control how many people sign up for each session.
Toward the end of this form is the option to make the field publicly visible or admin only. As the option suggests, a publicly visible field will appear on your public-facing registration form, while an admin-only field will only appear when you are registering people through the backend administrative tools. An admin-only field may be useful for structuring discount rates that only administrative staff may apply, or for registering speakers and guests for which special rates are available.
Note
Price set fields may be configured using a negative value which could be used to allow discounting options. For example, your organization may offer a $25 discount if people agree to arrive an hour early and provide volunteer assistance with the event setup.
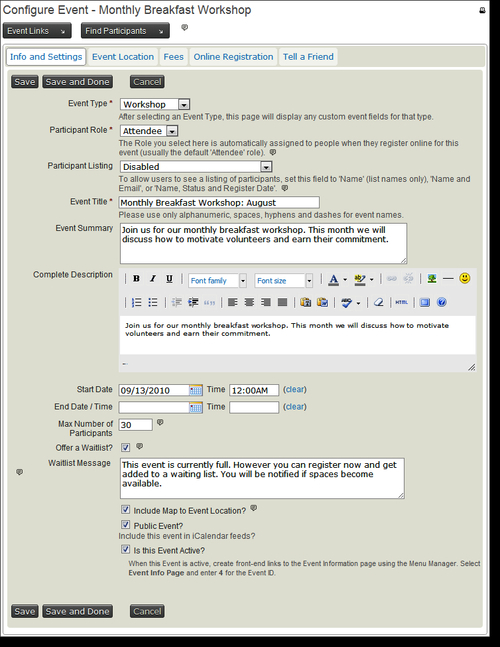
The image below displays a price set that contains two fields radio buttons for the registration fee (required) and a $10 discount for FPAGM members:
After configuring all your fields and saving them, you can return to your event configuration and select the price set for use in your event. Save the form and continue to the next tab to proceed with your event setup.
Online Registration is where the power of CiviCRM is realized in the event management realm. No longer do you need to rely solely on processing paper-based registrations or to migrate data from a third-party event registration system into your contact database. Everything happens in real-time, directly integrated with your constituent management software. As people register for the event, you see current statistics at any given point of time summarizing attendees by status and role.
The first few fields in this page control various options for how the form functions. After entering the text for how the registration form should be labeled when accessed from the event's information page, you specify the time period when the form will be available. You may, for example, want to cut off online registration a few days prior to the event in order to calculate total registrants, finalize numbers with your caterer, and begin preparing attendee packets. Once the end date has passed, site visitors who try to access the registration form will be redirected back to the event information page with a notice informing them that registration is closed.
The next two fields control multi-registrant capabilities. When Register multiple participants? is enabled, registrants will have the option of indicating a number of people besides themselves that they wish to register. Based on the number indicated, they will be given a separate form to complete for each registrant. The confirmation page will detail each registrant and the total amount charged will reflect all registrants. This is particularly useful for organizations whose constituents consist of businesses that may send multiple people to a conference, exhibit show, or a political party that allows a certain number of delegates from each region to attend a convention. The second of these options makes the e-mail field on the additional registrant forms optional (by default, each registrant must have a unique e-mail address).
Require participant approval? is used if you want the administrative staff to review registrants before they are allowed to complete their registration and pay. Enabling this will mark each registrant as pending approval in the participant status field and exposes an approval message field where you provide guidance to the registrant regarding this function.
Before using the participant approval functionality you need to enable the Awaiting approval, Pending from approval, and Rejected statuses at Administer | CiviEvent | Participant Statuses, and configure the ParticipantProcessor.php cron job, as described in the Waitlisting section.
If you are using either the waitlist or approval functionality, you may optionally configure a Pending participant expiration (hours) duration, as reviewed earlier. This value determines how long approved/accepted waitlisted registrants are given to complete their registration after CiviCRM sends them an e-mail inviting them to register. For more discussion on this functionality, refer to the Waitlisting section.
The rest of this form handles the page titles and text that will be displayed on each of the three steps of the registration process—the registration form, confirmation page, and the thank you page. Note that the registration form section has the ability to include a profile on the top and/or the bottom of the registration form.
A profile is a collection of fields, both basic system fields (first name, last name, and so on) and custom fields that you have configured in the system. A standard event registration form with no profile configured will only include the event fees and e-mail address fields. That is the minimum requirement of CiviCRM to complete a registration. However, in almost every case, you will want to collect additional fields for the registrant, including name, address, phone, fax, and perhaps some options specific to the event (meal choice, special needs, session attendance, and so on). These will need to be gathered together in one or two profiles and included in your form.
If you have enabled multiple-registrant capability, you have the option of selecting a different set of profiles for use with the additional registrants. Let's say you are hosting an exhibit show in which businesses frequently send multiple representatives. Your first registrant form should include details about the exhibit display, such as display size, special needs (such as electricity), and preferred location. However, you only need the name and contact information for all subsequent registrants. So you create a profile for the first registrant, which contains the exhibit-related details, and another for all additional registrants containing the name and contact information.
Profiles are an important part of the event registration tool. If you are not familiar with how they are used, please refer to Chapter 5, Collecting, Organizing, and Importing Data for a full discussion of how they are configured. Also review the Custom data section in that chapter, taking particular note of the different ways in which custom fields for event participants can be created. For example, you can create custom participant fields that are role-specific, event type-specific, event-specific, or available for participants in all events. Keep in mind that the creation of a custom field does not itself impact whether it's visible in your registration form; you must also add the desired fields to the profile that will be used in your form.
Another consideration you should review in relation to profiles is how CiviCRM interacts with contact records as people register for events. When unauthenticated people register for events (that is, they have not logged in to the site but are anonymous users at the time they complete the form), CiviCRM will attempt to match them to existing contacts in the system using the default strict Individual rule defined in Contacts | Find and Merge Duplicate Contacts. Be sure to review that rule to ensure that it is sufficient for your purposes.
Consequently, make sure that the fields in the default strict Individual rule are included in your profile or you may find more duplicates created than desired. For example, if your rule matches the first name, last name, and e-mail address, but you do not assign a profile that includes the first and last name, every registrant will be entered as a new contact, as there will be insufficient data to ensure a reliable match.
Of course, you could require your users to log in to the site in order to register for your event. Doing so would ensure that you're always interacting with the right contact record. However, your organization model and website structure may not support that option, and requiring that people log in before registering will inevitably result in some abandoned registrations.
The final section in this form controls e-mail-based confirmation and receipting. When registrants complete the form, you generally want them to receive an e-mail confirming that they are registered, detailing the options they selected, and serving as their payment receipt for paid events. In this section, you may add an event-specific message that will appear at the top of the e-mail, specify who the e-mail is from (name and e-mail), and indicate whether it should be CC/BCCed to anyone (such as your event director on staff).
The event and receipt-related fields are inserted by CiviCRM and may be configured through Administer | Configure | Message Templates. Note that several event-related templates exist there by default. The one impacting the online registration form is titled Events - Registration Confirmation and Receipt (on-line). Depending on what options you selected, other templates may be used as well. In general, the default templates are basic but sufficient, laying out the fields in a table grid format.
After completing the configuration of this form, click on Save and advance to the final tab by clicking on Tell a Friend.
The final tab enables a social networking feature, providing tools for registrants to tell others about your organization and event. When enabled, registrants will be given a button on the event Thank You page, inviting them to share the event with others. The button directs them to a form where they may customize a default message and enter the names and e-mail addresses of those they wish to invite (up to three people).
You configure the page title, message given to registrants on the Thank You page encouraging them to tell others, the suggested (default) message that registrants may then customize, and the link provided to recipients. Typically, you will direct people to the event information or registration page, but you have the flexibility to send them anywhere.
After registrants complete the Tell a Friend form, they will be directed to a Thank You page that you can configure, as desired in the last two fields on this form.
Click on Save or Save and Done to complete the event configuration. The following screenshot shows the options presented in the Tell a Friend configuration:

At this point, your event is configured and ready to go. The next and very important step is to test your registration form. This is particularly important when you are working with events for the first time and are not fully familiar with the various features. Test the information page and registration form; make sure you are comfortable with how the fees and fields are structured, and how messages are displayed in each step of the process. Be sure to walk through a complete registration so that you can receive and review the receipt e-mail. If you have both credit card and pay later options enabled, exercise both workflows to ensure that you have crafted your text appropriately for all pages and e-mails.
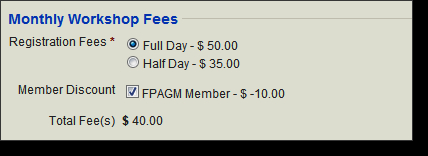
To access event-related links for testing and promotion, use the Event Links button from within the event configuration form or the pop-up link in the Event Management listing. There are three link options you will review:
- Event Info: Displays the live information page about the event.
- Registration (test-drive): Displays the registration form in test drive mode. Test drive mode will not actually process a credit card and the registration will be flagged as a test record for exclusion in your registrant counts.
Tip
While searching for test registrations at Events | Find Participants, you might be confused if your test transactions don't show up. Make sure you check Find Test Participants? to explicitly include test registrations in the result list.
Tip
Although CiviCRM does provide a test-drive option, we recommend testing with the live registration link until you are comfortable with the configuration options. You may want to temporarily add a small-value registration fee option for live testing with a credit card in order to avoid the cost of issuing a refund.
The live links above (Event Info and Registration (live)) can be used in your website content, e-mails, and other promotional methods. Joomla! users may also construct links to these pages through the creation of a CiviCRM menu item.
In addition to direct links to your event pages, you may want to provide access to lists of upcoming events. There are several ways to do that using native CiviCRM methods. From the Manage Events page, you will find four icons in the top-right region of the Find Events block:
- HTML listing of events
- RSS feed of events
- iCalendar file download of events
- iCalendar feed of events
Each link publishes a list of current and future events that are designated as public. Recall that in the first page of the event setup process, we had the option of setting an event as public; the primary use of that function is to control what appears in these listing pages.

CiviCRM provides Drupal with a block to display events. You can enable it within a Drupal theme at Site Building | Blocks | List | ThemeName by specifying a region for the CiviCRM Upcoming Events block and clicking Save blocks. Additional configuration options for Link name to display and Max number of events to display are available by downloading and enabling the CiviCRM Event Block module from http://drupal.org/project/civicrm_eventblock.
Advanced Drupal users interested in more control over the formatting and display of CiviCRM Event information within Drupal should use Views. Views provides extensive customization of how you display event information on pages, blocks, and feeds. In Drupal, click on Site building | Views | Add, provide a View name, select CiviCRM Events as the View type, and click Next. You can see the CiviCRM Events fields available for display by clicking on the "plus" sign beside Fields, and then selecting CiviCRM Events in the Groups selector. For more information on using views, refer to Advanced Help on your site, or use a good Drupal book on the topic.
An events listing module is also available for Joomla! at the CiviCRM website and Joomla! Extension Directory at http://wiki.civicrm.org/confluence/display/CRMDOC/CiviEvent+Joomla+Module. The module has numerous options for controlling what is displayed in the list of events, including whether it links to the information page or registration page, whether a Register now link is included, the event summary, and how you want the list filtered (event type, date range, all current/future, specific events, and so on). For Joomla! users, this presents many useful options for promoting your events.
Now that you've constructed your event and tested it, get out there and tell people about it!
One of FPAGM's goals for the year is to provide more training resources for food pantries in the region. Many of these pantries are volunteer-run and managed by churches, community organizations, and other small local groups who are seeking to support their neighborhood. To achieve this goal, they have constructed a series of breakfast workshops where volunteers and pantry workers can come together and discuss a predefined topic. FPAGM will invite speakers to facilitate the discussion around topics such as financial management, volunteer solicitation and coordination, food storage and distribution, and support resources for clients.
Each breakfast seminar will charge a nominal fee to cover the cost of the food provided. FPAGM would like all registrations to go through the website (no mail or phone-based registrations), though they will enable the "pay later" option for people who wish to pay by cash on-site.
Since they anticipate hosting other types of events, they begin by creating a "Breakfast Seminar" event type to categorize these monthly meetings. They also construct an event template, as each of these meetings will be nearly identical. Since the fee structure is very basic and the template will replicate from one event to the next, they choose not to construct a price set. They will offer two basic fee options: standard and supporter. The standard fee will cover the cost of the breakfast and incidentals associated with hosting the event, while supporter will add an additional amount as a way of encouraging people to go beyond the basic cost and help support the association.
Space is limited, as the meetings will take place in the association's conference room that holds about 30 people. FPAGM sets a max participants value and enables the waitlisting features. They also include a profile to capture basic details such as the individual's name, organization name, and phone number. They choose not to enable the multi-participant option, as they prefer each person signing up on their own. Once complete, they promote the events through blog-style announcements and provide direct links to the registration form.