It's all about the data, right? You can have the latest and greatest software tools available, perfectly customized to meet the needs of your organization; but if your data is incomplete, virtually non-existent, or just plain lousy, all of those wonderful tools will mean nothing.
In the previous chapter, we walked through the ins and outs of the CiviCRM interface, understanding the different types of records that will be attached to contacts. However, how do we collect data, organize it, and import it into the system?
In this chapter we will:
- Create custom data fields to store data
- Organize data fields in profiles for the purpose of creating online forms and other tools
- Integrate profile forms with membership, event, and contribution pages
- Update multiple contact records at once
- Import contact records and activities from an external source
Out of the box (or more accurately, off the website), the fields included in CiviCRM to store your data are pretty basic. They include standard communication fields (phone, e-mail, website, and so on), address fields (street, city, state/province, country), demographics (gender, birth date, and so on), and a few additional miscellaneous fields.
Whether you are migrating from an existing database or starting from scratch, you will inevitably have additional data you need to store in fields. CiviCRM provides for this need through its custom data tools.
Custom data consists of groups and fields. You first define a group and assign it to an existing data object; you then create fields within that group.
By data object, we mean an existing type of record. Your custom fields will extend some type of record in your system, such as individual contacts, membership records, or groups. You configure what record type will be extended, along with any associated subtypes or options, when you create the custom data group.
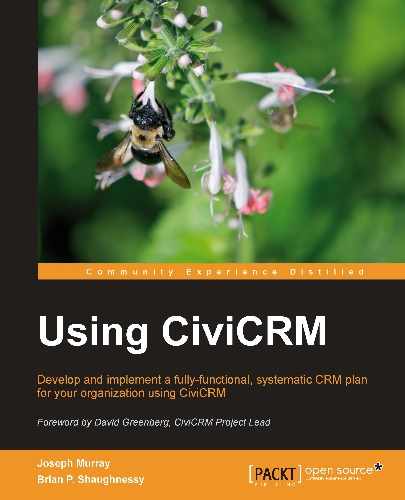
Let's take a look at the custom data interface and walk through the creation of new custom fields to get a better sense of how this works. We can access custom data through Administer | Customize | Custom Data.
Begin by clicking Add Set of Custom Fields. Enter a name for the group and select how it will be used (what record type it will extend). This is the most important step in the process—once you begin collecting data in these fields, you will not be able to change the type of data it is connected to. Many of the options available will provide additional sub-options. For example, if you create a custom data group attached to events, you may then specify one or more event types that the data set will be used for (select- Any- to expose the custom fields to all event types).
Let's briefly review the uses available:
- Activities: Available when creating or editing an activity record. You may further restrict its use to one or more activity types.
- Contacts: Available to all contact types. Use the Individual/Household/Organization options if you wish the fields to only be available to a single contact type or subtype.
- Contributions: Attached to contribution records and may be restricted to one or more contribution types.
- Events: Available when creating an event and may be restricted to one or more event types. Note that this is used for tracking information about events, and not for collecting information from registrants. Use one of the participant options for registration data.
- Grants: Available when working with a grant record.
- Groups: Available when working with a group.
- Household: Used with Household contact types and may be restricted to one or more Household subtypes if defined in the system.
- Individual: Used with Individual contact types and may be restricted to one or more Individual subtypes if defined in the system.
- Memberships: Attached to membership records and may be restricted to one or more membership types.
- Organization: Used with organization contact types and may be restricted to one or more organization subtypes, if defined in the system.
- Participants: Available to all participant (that is, registration) records.
- Participants (Event Name): Available to participant records for the event(s) selected.
- Participants (Event Type): Available to participant records for the event types selected.
- Participants (Role): Available to participant records for the roles selected.
- Pledges: Attached to pledge records.
- Relationships: Attached to relationship records and may be restricted to the relationship types selected.
At the risk of being repetitive, we want to underscore the importance of thinking through exactly how your data will be used and where it should be attached before creating your custom data set. Once defined and in use, you cannot change the way the custom data group is used.
Note
Note that you are not limited to one custom data set per used-by type. You may create as many custom data sets as you wish and may create multiple sets attached to the same record type for the purpose of organizing your fields into different tabs or inline collapsible sets.
After naming your group and choosing how it will be used, you can set the order (helpful if you have multiple groups used for the same record type), add descriptive text before and after the fields, and choose from several configuration options. These include:
- Whether the field set should be collapsed when the record is first opened, or expanded so that the fields are visible
- Whether the field set should be collapsed when viewed in the advanced search or expanded by default
- Whether the group is active
If your group is attached to one of the contact record options (Contacts, Individual, Household, or Organization):
- Display Style: The fields may be presented inline (Inline), appearing in the contact's summary and edit screens, or in their own tab (Tab) in the contact record.
- Multiple records: This is used for collecting multiple sets of records for a contact. By default, the fields you create will have a one-to-one relationship with the contact record. Selecting this option allows multiple records for the contact. This is helpful, for example, if you want to track education records for individuals where each record will have details about a single educational experience. A contact might have multiple records indicating their secondary school, undergraduate, and graduate education.
Note
There are currently some limitations when using the multiple-record options, most notably that there is no way to expose those fields to website forms (profiles) without custom coding. Multiple-record sets must be displayed in a tab, not inline, and only the first of multiple records will be exported. In addition, be aware that once you flag a custom group for use with multiple records, you cannot undo that setting and change it back to a single-record structure. This is because you may have added multiple data records and CiviCRM would have no way of determining which of the multiple records should be retained as the single set of data.
Save your custom data set and advance to the form for creating your first custom field associated with this set. You may return at any time to adjust the settings for your group or add/delete/modify settings for fields.
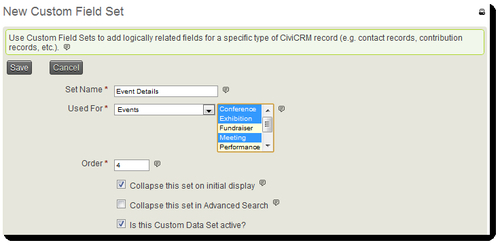
As with the configuration for custom data sets, it is important to think carefully as to how your fields will be used. While you may return at a later time to alter some of the settings, the Field Type cannot be changed once it is set. This is for a simple reason—once data is collected for a specific field type, it will be stored in ways specific to that type. Changing the type could easily result in data loss. For example, if I create an Alphanumeric Text field and later want to change it to a Date type field, existing data would be lost, as it cannot reliably convert a string to a date-type format.
After naming your field, select the data type and corresponding display type. The options available will depend on what data type you've selected. The following data types are available:
- Alphanumeric: This is used for standard text fields. It may hold numbers, but they will be stored as text (you cannot run calculations with them). The field length is limited to 255 characters.
- Integer: The size of numbers that can be stored depends on your server, but is likely to be about plus or minus two billion on 32-bit operating systems, and about plus or minus 9E18 on 64-bit operating systems.
Note
CiviCRM silently rounds integer values entered outside the allowable range to the minimum or maximum value without displaying an error.
- Number: This should be used for values requiring decimals.
- Money: Used for monetary values. It will be displayed according to the default currency selected in your global settings.
- Note: This field is used for longer text strings, such as lengthy descriptions or comments.
- Date: You are given the option of selecting what date and time format will be used, including using only parts of the date. For example, if you want only the year and month, you may choose from several options displaying those values. When configuring dates, you also decide how many years in the future and past will be available to the calendar widget.
Note
Currently, all date fields make use of a popup widget to select the date. While this is helpful for ensuring accurate data storage (the widget constructs the value from the selection and places it in the required database format), it means partial date fields (such as selecting year only) will still operate by selecting a specific month/day/year. This is unfortunately non-intuitive from a data-entry standpoint. It also impacts searches on these custom date fields, and may yield unexpected results. If you need month or year-only fields, you may find it easier to use an alphanumeric select box field as it provides more control over the display and searching.
- Yes or No: While alphanumeric checkbox fields can be used for yes/no functionality (where checked equates to Yes), this field may be more useful when you need to easily search for explicit "no" values. You could make this field required and set a default value of 0 (that is, No) to ensure all records have a value recorded, thereby improving your control over searches through this field.
- State/Province: This will populate with a list of states and provinces enabled in your site.
- Country: This will populate with a list of countries enabled in your site.
- File: Browse button to upload a file. Files will be stored in the upload directory defined in global settings. A link to access the file will be presented in the custom data display. When you return to edit a record for which an existing file has been attached you will have the option of replacing the file with another upload or deleting the existing file.
- Link: Hyperlink, which will be hot-linked when in view mode.
- Contact Reference: Used to link to another contact record. The field will render as an auto complete field and will allow you to begin typing to locate another contact in the database.
Note
By default, the contact reference type field will pull contact matches from the entire database. In most cases, you will not want to do this, as it would expose all your contact records to whoever is using the form. CiviCRM provides a hook for customizing the list of records available to the auto complete field: hook_civicrm_contactListQuery. For more details about using hooks to customize CiviCRM, visit http://wiki.civicrm.org/confluence/display/CRMDOC/CiviCRM+hook+specification.
After selecting your field type, choose your preferred display format. The options available depend on the field type, and several field types have only one option value. We will list and describe all of the display types that may be available.
When choosing a display type that includes a list of options (such as select/checkbox/radio buttons), you will be provided a form for creating the option labels and values. You can enter up to 10 options initially; after saving them, you can add more. You are also given the option of reusing a list previously created for another field. The label is what will appear in the forms; the value is what will be recorded in the database and exported from the system.
Note
Label text should be descriptive and meaningful to the person completing the form. Most of the times you will enter the same value for both label and value, unless you have a good reason to make them different.
The display types that appear are as follows:
- Text: Basic text field.
- Select: Drop-down box; select one option.
- Radio: Radio buttons allow you to select one option from the list available. If the field is not required, a link to unselect any options will be included in the display. You may decide how many options will be listed per line.
- CheckBox: Checkbox list allows you to select or deselect any of the options. You may decide how many options will be listed per line. Note that one weakness of checkbox options is the inability to easily search for unchecked values. If that option is important to you, consider creating yes/no type fields for each option and make it required. That will result in explicit values for both options.
- Multi-Select: List of options, allowing the user to select one or more option. Use the Shift key to select multiple consecutive options, or the Ctrl key to select multiple independent options. This is useful for larger option lists, where checkboxes would require too much space.
- Advanced Multi-Select: Displays two columns of options—the left column displays all the available options, and the right column displays the selected options. Use the arrows between the two columns to move options to or from the selected list. This overcomes the primary weakness of standard multi-select boxes—the tendency to accidentally de-select your options while working with the field.
- Autocomplete Select: This is similar to the Select box drop-down, but you begin typing a value to have it search for possible matches among the option list. This is useful for single-select fields that have a large number of options.
- TextArea: Displays a multi-line box for entering longer text. It will store the content as plain text with no HTML. You may decide the height and width of the box, though it will be expandable by the user.
- RichTextEditor: Displays a multi-line box for entering longer text: with the WYSIWYG editor toolbar, as configured in Global Settings.
- Select Date: Popup calendar widget for selecting a specific date.
- Select State/Province: Select one state or province from the list enabled at Administer | Configure | Global Settings | Localization.
- Multi-Select State/Province: Select one or more states or provinces.
- Select Country: Select one country from the list enabled at Administer | Configure | Global Settings | Localization.
- Multi-Select Country: Select one or more countries.
- Select File: Provide a browse/upload file field.
- Link: Hyperlinked URL field.
Proceed with completing the field creation form, entering a default value (if desired and available), providing help text, and determining if the field is required. Note that if you designate the field as required it will impact all administrative forms—not simply forms exposed to the front of your site. When creating frontend forms you will have another opportunity to designate which fields are required (during profile construction).
If you would like this field included in the advanced search tool, designate it as searchable. Typically you will want most of your fields to be searchable, though it's worth considering the question. For fields that are unlikely to be searched, keeping this option off streamlines the advanced search interface.
The last option on the field creation form is to mark a field as view-only. There are two situations where this can be helpful:
- If you are importing data from a legacy system, you may have some fields which you would like to retain in the new system, but would not want to maintain on an ongoing basis. Most often this happens because the legacy fields find a different expression in CiviCRM, such as becoming part of the tags or groups structure. After creating the fields and importing the data you would return and mark this field as View Only. In this way you ensure that the data is available for reference, but users will not add to or edit it.
- View Only fields are also helpful if you wish to populate the field with values calculated by hooks or other code. We will discuss hooks toward the end of the book, but for our immediate purposes, understand that they are a way for developers to run custom code at certain times. For example, you might create a custom field called "age" which calculates the age of the contact based on the birth date (a standard field), and the current date. You want the value updated automatically with code every time it is displayed rather than relying on users to manually record the value.
Note
Note that you cannot import data into a field designated as View Only using the Import Contacts tool. You should leave the field as editable, import your data, and then return and mark it as view-only.
On the subject of importing legacy data, you may also find it useful to initially import and then later completely hide some fields (not just mark as view-only). As with most tools in CiviCRM, you can easily disable custom fields. Doing so retains whatever data is stored in the fields, but completely removes it from the interface.
Note
Are you interested in understanding how CiviCRM handles custom fields in the MySQL database? Open up your database in phpMyAdmin, SSH, or your preferred database management tool. The creation of a custom group adds a record to the civicrm_custom_group table containing your configuration options, and creates a new table called civicrm_value_[unique text based on group name and id]. Each custom field adds a record to civicrm_custom_field and creates a new column in the appropriate table.
The table created by the custom group will always have an entity_id column that is a foreign key to the object's table it extends. For example, a custom group used for individuals will use the entity_id to link the custom data record to the civicrm_contact table's ID field.
This is helpful to know should you ever need to run custom queries on your data. The structure makes it very easy to build relationship diagrams and queries between custom data tables and the records they extend.
Custom data sets and fields are a powerful tool in your CRM strategy. You are likely to find the need to construct them during your initial implementation to meet defined data recording needs, to import legacy data, and throughout your ongoing use of the system as data needs continually evolve.
Note
FPAGM will use custom fields to collect information about the food pantries they serve and businesses supplying food to the organization.
Since the information collected for these two types of contacts are significantly different, the association will define two custom field sets and designate them for use with each contact subtype respectively. This is done by selecting Organization as the Used For value and choosing the appropriate contact subtype in the multi-select box that appears.
One important thing to keep in mind as it relates to the impact of custom fields on your database structure is that if you migrate your site to a new server, you will need to make sure the additional tables created by custom groups are migrated. In other words, it is not sufficient to export only your data; you must also export the database structure. Importing only the data into a clean installation of CiviCRM on the new server is insufficient as you will be missing the custom data tables from your old database.