Profiles provide excellent tools for empowering constituents to work with their own record or to construct simplified data entry forms for your organization staff. However, quite often you are working with a large number of contact records that must be added to your system, which may be too many to efficiently enter manually through a profile form.
It's also very likely that your CiviCRM implementation project will involve some migration of data from an existing legacy system. Even if you're a startup not-for-profit, you are likely to have some contact records obtained from an external source that will seed your CRM database.
CiviCRM provides some powerful interface tools to import records from comma separated values (CSV), files, or from a recordset specified by an SQL query. Even with a very powerful interface, there will be some work to do with your existing data to prepare it for import.
Let's take a moment to review the import interface and then retrace our steps to understand the data preparation concerns involved in importing. CiviCRM provides tools for importing contacts, activities, contributions, membership, and event registration records. Our concern in this section will be contacts and activities.
To access the contact import tool, browse to Contacts | Import Contacts. This tool consists of a four-step wizard where you will upload your file, map the import file to the existing CiviCRM fields, review the mapping and choose to add contacts to a group or tag, and then complete the import with any subsequent notifications about the data.
In the first step you will choose to upload either a CSV file or connect to a database through an SQL query. In most cases you will be working with a CSV file. If you choose to construct an SQL query for retrieving the data, the database must reside on the same server and the database user configured in your CiviCRM installation must have sufficient permissions on that database. In either case, CiviCRM will retrieve the data and allow you to map the fields to CiviCRM fields.
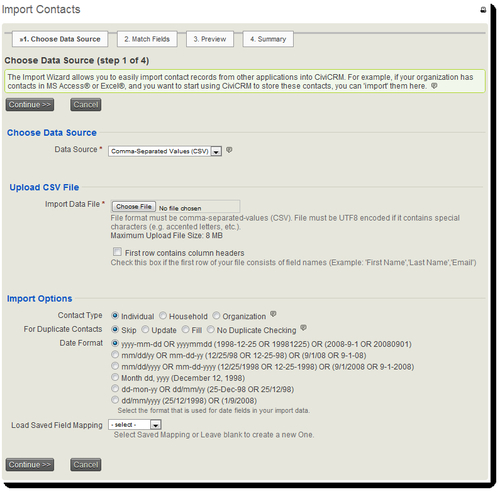
If you are importing from a CSV file there are a few things to keep in mind:
- There will be a maximum upload file size depending on the configured PHP settings for your server. The file size limit will be listed in the notes under the upload box.
- The number of records CiviCRM will be able to upload and process through this tool will largely depend on the resources and settings of your server. If you are on shared hosting or a low resource VPS, you may find that you need to split your import file into smaller chunks (less than 1000 records) in order to process the import. If you have your own server or high-resource VPS, you may want to increase the PHP timeout and memory limit significantly. If the site is not live or you are not experiencing much site traffic, you could consider setting the timeout value to zero, which will prevent it from timing out altogether. Be sure to return it to a proper setting after conducting your import.
- The best format for importing data is UTF-8. If your data has special characters, this format is required. If you need to import data from a different format you should visit Administer | Configure | Global Settings | Localization, where you can configure an alternate Legacy Encoding. By default, CiviCRM will have the Windows-1252 format configured for this setting (used by MS Excel). Wherever possible, use UTF-8 as it provides the greatest data integrity.
Before you proceed with the import process, back up your data. Should the import script run into problems, timeout, or you inadvertently assign data to an incorrect field, you will want to have a reliable backup for restoring your existing data and re-implementing the import:
- After browsing to select the file for upload, indicate if the first row of your data contains column headers. You will want to use column headers when possible as it will greatly assist your field mapping step. Then review the import options.
- When importing contacts, you may only import a single contact type at a time. In other words, your import file is not allowed to have a mixture of organization and individual records, or individual and household records. If your data has mixed contact types, you will need to separate the records into different files or queries for each type represented.
- Select how duplicate records should be handled on import. CiviCRM will use the default Strict rule for the appropriate contact type found in Contacts | Find and Merge Duplicate Contacts. There are four options available; give some thought to your existing data and import data before you select your option. The options are as follows:
- Skip: The default behavior, Skip, will alert you about any matching records, produce a report which can be downloaded, and when processing the records, will completely skip the matched record.
- Update: When a duplicate match is found, the data in the import file will update (overwrite) the existing data or fill the fields if no existing data is present. The update option will not affect the fields not included in the import file. Note that this option will not overwrite existing data with blank data from the import file—it preserves the existing data in such cases.
- Fill: The import data will only write to a field if no existing data is present. If the field has a value, it will be skipped during import.
- No Duplicate Checking: Records are imported, irrespective of the existence of matching records.
- If your import file contains date fields, select the format for the fields. Note that all the date fields in your import file must be formatted in the same way and the data must be consistent throughout. This is often an area where you must do some scrubbing with your existing data before importing.
- For sites configured for geocode mapping, you may choose to do a mapping lookup on import. This option should only be used for small data sets as it takes significant time for your server to communicate with your mapping provider for each address imported. If you are importing a large set of data, you will need to run the
/civicrm/bin/UpdateAddress.phpscript from the command line or URL after importing. That script is better suited for large scale mapping lookups. - In the second step of the Import wizard, you will map the import fields to CiviCRM fields and will be given the option of saving the import mapping for future use. Using a saved mapping is particularly helpful if you've had to slice your data file into smaller chunks in order to process the import, if you regularly import records from a common source, or if your data is dirty and the import might fail or need to be rerun. Once one mapping is saved in the system, you will see an option available for selecting that mapping on the first step of the import wizard. Don't worry; if your import file differs slightly from a previous mapping, you will still have opportunity to review and modify the mapping before proceeding with the import.
- After completing this form, proceed to step two, where you will map import fields with CiviCRM fields. The following screenshot demonstrates a sample mapping:
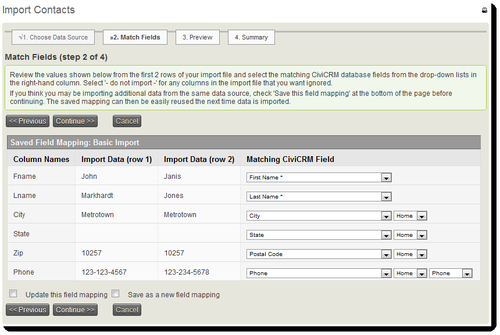
- When CiviCRM first loads the file, it attempts to map the fields for you. You'll need to review and complete the mapping. In the following step you'll have opportunity to review the mapping and be notified if there are any initial errors in the import file. If there are errors, CiviCRM will provide a link to download a
CSVfile containing the rows with errors and a description of the error. In most cases, the errors will be due to an invalid value, such as a malformed e-mail address or a value that does not match an option for a field. - After reviewing the errors file, you may choose to correct the errors, return to the first step, reload it and continue, or proceed with the import and handle the errors separately. This step also provides the option of adding the contacts to a new or existing group, or a new or existing tag.
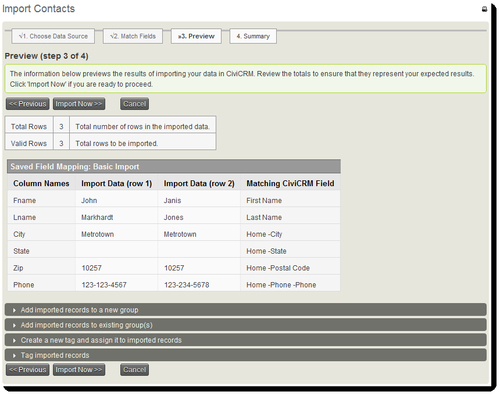
- Adding your imported records to a tag or group is an excellent way of tracking when the import took place or what was the source of the data. It can also prove useful for post-import data integrity comparison or to identify what records were imported during a partial/failed import.
- If you are ready to proceed, click on Import Now to begin the import and monitor its progress. Depending on which option you chose for the duplicate record setting, you might receive a message indicating that there were duplicate records skipped during the import. You will be provided a downloadable
CSVfile where you can review the duplicate records.
The activities import is accessed through the Contacts menu and will walk you through a similar four-step wizard. The most significant difference is that your imported records must connect with existing contact records. In other words, you cannot create associated contact records as part of the activity import; the activities must be imported to existing contact records.
The connection to existing contacts can be made by including the internal contact ID or external identifier in your activity import file. Using those fields ensures the most reliable connection with contact records, as both must be unique values in the system. CiviCRM can also connect records using the default strict dedupe rules (which by default will be the e-mail address).
Note
The External Identifier field is intended for storing unique IDs from the database system you are migrating from. It can be particularly useful when you have core contact data as well as related record data (such as activities) that you are importing from that legacy system.
Imported activity data must also include a column containing the activity type, which must correspond to one of the types configured in CiviCRM. If you have not done so, visit Administer | Option Lists | Activity Types to review the existing types and add new ones as needed.
Activity imports must be done with CSV files (the SQL option we saw with the contact import is not available to activity import), and you will not have any dedupe processing. If an import errors file is returned, it is likely to contain unmatched records as well as invalid values. Unmatched records are those for which no matching contact was found within the existing contact records.
While CiviCRM may facilitate the actual import process, the hard work comes with preparing your data for import.
You should begin by taking time to scrub your data. That will involve removing old records you don't want to clutter your new system with, ensuring valid values for fields such as e-mail and website, creating consistent values for any fields using option values, and generally reviewing your data to ensure it is as clean and well-ordered as possible.
Depending on how your legacy system handled individuals, households, and organizations, you may need to do some work to split your data into subsets of records based on their contact type. Remember that you can only import a single contact type at once when using the CiviCRM import tool. That being said, there are some exceptions, or rather clarifications, to that rule.
When mapping your contact import, note the series of Related contact info fields toward the bottom of the field list. These fields will allow you to import data to the primary contact type (for example, Individuals) while inserting data into related records. If the related record does not exist, CiviCRM will create it and then build the relationship.
This is not the most efficient way to handle imports, and if you're not careful, can inadvertently create unintentional related records. However, for imports with only a few fields to be inserted in the related record, it may be useful. Also be aware that if your imported data has empty values for the related record fields, CiviCRM may create the related record anyway (with empty data). This will require some cleanup in the system after the import.
The preferred method is to import records for one contact type and then import the related record. For example, you might import all your organization records and then import individuals using the related fields to match on the organization name.
After completing your contact imports, you may want to run a dedupe search and merge duplicate records. Despite your best efforts, duplicate records are bound to show up, especially after an import. What is great about the CiviCRM merge function is that you can easily combine related records. For example, if ACME Company and ACME Co. are the same firm, each may have related records in your legacy system (for example, contributions, activities, and relationships). When you merge the two records, those related records will be combined together in the resulting merged contact. Handling the data merge from within CiviCRM can reduce the pain and annoyance of trying to track down and merge the various related records in your previous system.
As noted above, take database backups before you begin importing and at regular intervals throughout the process. You will want a path for reverting to a previous dataset should something go wrong.
One common question involves how to best migrate your data from a development or staging server to your production server. Unfortunately, there's no "one-size-fits-all" answer to that question. Your internal workflows and the general nature of your system will dictate the best method available.
Understand that currently there is no convenient way to merge two CiviCRM databases. If you are doing a large import into a staging server, you will need to identify and export any changes to your production database before deploying from your staging server. The change logging that is being introduced in version 3.3 may provide some support for these types of needs.
The CiviCRM tables found in your database are very portable. There are really only two that may need to be reset or cleared out when moving the database: the civicrm_domain table that contains directory and URL settings that may change once you've migrated to a new server, and the civicrm_uf_match table that connects your CMS users to CiviCRM contacts. With the domain table, you may need to set the config_backend field to null in order to force CiviCRM to reset the values, and the uf_match table may need to be emptied in order to force new matches with the existing CMS users. In addition, you should truncate the various cache tables to ensure that new content is being generated from the new location.
For a full discussion of migration steps and troubleshooting tips, see: http://wiki.civicrm.org/confluence/display/CRMDOC/Moving+an+Existing+Installation+to+a+New+Server+or+Location.