In Chapter 3, Installation, Configuration, and Maintenance we outlined how to set up CiviCRM to send e-mails. Once that is done, CiviCRM sends a number of messages automatically as part of its workflow. The text and formatting of these messages provided in the standard installation is basic and serviceable. During your initial configuration, you should consider customizing these messages to fit with your organization's communication style. Alternatively, it is easier though a bit less professional to wait until you see problems before changing default automated message templates. When you or your users start to see workflow messages that don't have quite the right tone or polish of the rest of your organization's communications, you can find the message template at issue and modify it.
The process begins by noting the text that is problematic, working out what should replace it, finding the text in the appropriate template, and then replacing it with the new text.
We reviewed the basic workflow template tools earlier in this book. However, it's worth reviewing again at this juncture because those automated messages are certainly part of your overall communication strategy. On one hand, they serve the primary purpose of providing details about an event registration, online pledge, or case record, for example, and so it is natural for the content to primarily focus relaying the necessary details. However, as stated earlier, these messages also provide an opportunity to share your message in different ways with people who clearly have a level of commitment to the organization. Further, the essence of branding is consistency. If all the e-mails generated from your system have a certain look and feel except for the automated response e-mails, you risk compromising the brand you've established.
Workflow message templates are accessed through Mailings | Message Templates, from the System Workflow Templates tab. The templates are pretty clearly titled; click on Edit in the appropriate row to access the content.
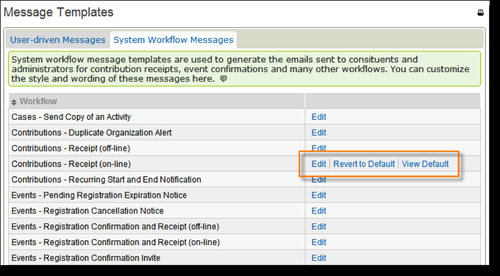
After editing and saving a template, the row will have two additional action options: Revert to Default and View Default. As a result of the automated function of these templates, it's important that they should be constructed properly and should include the necessary fields. If you edit a template and find it is no longer working correctly, you may view the default version (for comparison) or revert to it and re-implement your edits.
The edits we are about to describe benefit from a higher level of technical expertise than needed for most other material in this book. The good thing is that it is easy to fix anything you break by reverting to the default. Still, you might want to have a communications wordsmith, a graphic designer, and a technically skilled HTML coder work together on this if you want to do more complicated changes than what we describe.
The template content may appear overwhelming at first as it contains many conditional statements (if/else), HTML, and field variables. Workflow e-mails use the Smarty templating system to render field values and perform operations and calculations on the content.
Smarty has much more power than the basic token replacement we saw in the user-driven e-mails. These system templates take advantage of that power in many cases. In order to edit the more complex system templates, it helps to know how to recognize things that are safe to change, things that may break the system template if you change them, and how to revert back to the default template if things start going wrong. We're not aiming to learn how to use the more programming-like functions in Smarty, but just to learn how to edit the text strings mixed in among the programming constructs.
Let's take a brief look at a frequently used message template that often benefits from editing: Contributions - Receipt (on-line). If we click on its Edit link, we can use the first 15 or 20 lines of content in the Plain-Text Format field to illustrate how to approach customizing these files. We see the following:
{if $receipt_text}
{$receipt_text}
{/if}
{if $is_pay_later}
===========================================================
{$pay_later_receipt}
===========================================================
{else}
{ts}Please print this receipt for your records.{/ts}
{/if}
{if $amount}
===========================================================
{ts}Contribution Information{/ts}
The first thing to notice is that there are two pieces of text that display in the receipt message: Please print this receipt for your records, and Contribution Information. Both are surrounded by opening ({ts}) and closing {/ts} tags. These ts tags are used to identify strings of text that are translatable into other languages. Inadvertently, this helps non-technical users identify relatively easily what can be changed and what cannot. Anything in between opening {ts} and closing {/ts} tags should be modifiable, at least on first glance. Since Smarty uses curly braces to differentiate its constructs from non-Smarty content we can quickly identify them in the template and handle them accordingly with care.
For illustration purposes, let's assume that your organization finds the sentence Please print this receipt for your records too staid for its youthful constituents. You want to replace it with Just wanted to say thanks and let you know we got your payment. Since the text is between opening {ts} and closing {/ts} tags, changing it will not cause any problem.
Let's make the same change in the HTML version now. We start by putting our cursor in the text area field and use our browser to search for "print". We find the same line, more or less, as there is a minor variation with receipt having been replaced by confirmation. Once again, the text is between opening {ts} and closing {/ts} tags; so we can make this change without breaking the site.
Having made the same change in both versions of the message template, we click on Save.
We now see the new options beside this system message template: Revert to Default, and View Default.

In general, when making changes to system messages, it is a good idea to test out any change as soon as possible, preferably on a non-production server if you have one available. If there are problems, then you can revert back to the default version of the template.