Until this point, most of our attention has been spent understanding CiviCRM's administrative interface and customizing/configuring the system to meet your organization's needs. However, the power of CiviCRM isn't fully realized until you begin to collect and expose data to your website.
It's not uncommon for organizations to have very disjointed systems collecting and maintaining their constituent data. Perhaps you have a central database, such as MS Access, that is used by staff to track your members or donors and is stored on your office network. Several staff people may be maintaining spreadsheets with information relevant to their job functions and which they need access to while traveling (when they are unable to connect to the office network). Perhaps your current website has a database where user login access accounts are stored and a list of members is periodically updated in order to have an online directory.
CiviCRM provides an opportunity to bring these disparate data sources together—those used internally on your office network, those which must be accessible remotely, and those which should be exposed on your public or user-accessed website. In doing so, you streamline workflows and improve data integrity.
CiviCRM provides an opportunity to bring these disparate data sources together—those used internally on your office network, those which must be accessible remotely, and those which should be exposed on your public or user-accessed website. In doing so, you streamline workflows and improve data integrity.
In CiviCRM, you collect and expose data using profiles. Profiles are basically a collection of fields. You choose settings for the profile and its fields based on how you plan to use it. Profiles may be used to:
- Create forms where you collect information from users, either as a standalone form or as part of a contribution or event registration form
- Expose fields to logged in users and allow them to edit and save their data
- Display "view-only" fields to logged in users
- Update contact details through a website user account form (Drupal only)
- Create website user account signup forms
- Provide contact record search forms and control what appears in the result list and detail view
- Create alternate search result views in Advanced Search
- Perform batch record processing on search results
As a result of their flexibility and diverse ways in which profiles can be used, it is sometimes difficult to grasp the extent of their functionality or see potential uses. As we walk through this section, we will take time to offer suggested uses as you build your website.
You administer profiles through Administer | Customize | CiviCRM Profile. This is where you will create new profiles, manage existing ones, and access the fields associated with each. You can also access several links for exposing profiles directly to users in various ways. We will see other locations in CiviCRM where you may insert profiles into event and contribution forms.
Note
When you first visit this page, you'll notice that several profiles already exist, some of which are marked as Reserved. In addition to the uses listed above, CiviCRM uses profiles for several internal functions. Specifically, when a new contact record is created "on the fly", CiviCRM uses the appropriate reserved profile listed here to determine what fields should be made available. For example, if you initiate creation of a new activity from the New drop-down field, your record must be associated with an existing contact record (using the autocomplete field), or with a new contact record. If the name you type does not exist in the database, a form will pop up allowing you to create the contact "on the fly". That form is controlled by these reserved profiles. The default profiles have only a few basic fields, but you can change that by editing them here. For example, you may decide that every time a new contact is created, several additional fields should be listed, some of which will be required.
Let's briefly review the various settings available when creating a profile and its fields, and the standard selections for each use type.
After clicking on Add Profile, enter a Profile Name (which will appear at the top of the form when presented on your website). Next, select what it will be used for:
- Profile: Used for data collection and search forms
- Search Results: Used for advanced search results and batch updates
- Drupal User Registration: Fields will be added to the user account registration form (Drupal only)
- View/Edit Drupal User Account: Fields will be added to the user account form (Drupal only)
You may return at any time to adjust these settings. As you can see, a single profile could potentially be used for multiple purposes. For the sake of reducing system clutter, it is best to initially only select those options you know you will be using.
Click at the bottom of this form to expand the Advanced Settings panel. The options listed here significantly expand the functionality of your profile. Remember that not all options will be applicable for every use of the profile. CiviCRM simply ignores options that don't apply to a specific instance of the profile on your site.
By "instance", we mean the use of a profile for a specific purpose. For example, you might create a profile containing contact address fields that is used for a profile view page on your site and is also used as a search results view on the administrative side. Settings related to search, such as what columns will be in the result list, will be ignored by the first use of this profile. Typically, you are creating a profile for a single use, and in general, this is a good way to think about the process. However, there is no actual limitation in the software as to the number of ways in which a single profile can be used.

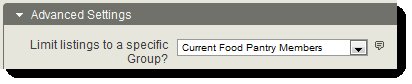
- Limit listings to a specific Group?: This only applies to profiles used as search forms. Selecting a group from this list will limit the contacts searched to only those included in the group. For example, if you are creating an online member directory, you will first create a smart group for current members and then limit your search profile to this group, so that only members in good standing will be returned in any search using this profile.
- Add new contacts to a Group?: This applies to profiles used as contact signup or edit forms, including those used in conjunction with contribution pages and event registrations. When a user completes the form, they will be added to the group you've selected. This provides a great way to trace the source of your contacts or manage mailing lists.
- Notify when profile form is submitted?: You can choose to have one or more persons e-mailed when a profile Create or Edit form is submitted. For multiple e-mails, separate each one with a comma.
- Redirect URL: After the form is submitted, you can choose where the user will be redirected. To use this field enter a fully qualified URL (including
http://). If the field is left empty, the user will be directed back to the profile form with a message indicating a successful submission. - Cancel Redirect URL: Similar to the last field, this is used to redirect the person if they cancel the form. Leaving the field blank returns the user to the profile form and clears the fields.
- Include reCAPTCHA?: Captcha is a method for discouraging spam and robots from completing your online forms. The tool displays a graphical representation of letters and numbers, requiring the user to successfully type the characters before the form can be submitted. Before enabling captcha on a profile form, you must first obtain an account at http://www.recaptcha.net (you will be directed through Google to create the account). After setting up an account and obtaining a private and public key, enter those values in: Administer | Configure | Global Settings | Miscellaneous. Once you've configured reCAPTCHA in the global settings, it will be available to any profile form.
- Joomla/Drupal user account registration option?: Earlier in this section we mentioned that a profile can be inserted into a Drupal user account form. The reverse is also available for both Drupal and Joomla!—you can create and expose a profile form and have the user account fields (username and password) included. You may make user signup optional or required, depending on your needs. This is particularly useful for including in contribution pages and event registrations. For example, you may want to encourage people who are registering for your annual meeting to create a user account for future access to the site. Note that your profile form must include an e-mail address field and user account registration must be enabled in your CMS settings (Joomla!/Drupal).
- What to do upon duplicate match: What happens if someone already in your database completes a form on your site? Should a new contact be created? Should the fields be ignored if there is already data in them or should the new data update and overwrite the existing data? Use this option to decide if duplicate contacts should receive a warning, be updated using the existing record, or if a new duplicate record should be created. Note that CiviCRM will use the default Strict rule defined in the Find and Merge Duplicate Contacts tool (Administer | Manage) for the appropriate contact type to identify matching contacts. Also note that CiviCRM will always update existing contact records for profile forms embedded in contribution and event registration pages.
- Proximity search: If a profile is used for searching, you can enable searches from it for contacts based on how proximate (close) they are to an address. If set to required, users must complete the proximity search fields in order to use the tool.
- Enable mapping for this profile: If mapping is enabled and CiviCRM has successfully geocoded the address for a contact, a link to view the location on a map will be included in the search results and on the record's detail view.
- Include profile edit links in search results?: This option is a powerful (but dangerous) way to empower sufficiently permissioned users to edit other records in the system through a profile. Since the access to edit contacts is funneled through a profile, you can easily control what records and what fields the user can edit. In Drupal, you will need to permission the user appropriately to access and edit records for this profile. In Joomla!, the user must be an administrative user. When enabled, the search result list will have an Edit link added to each record's row.
- Include Joomla/Drupal user account links in search results?: Enabling this option inserts a link to the user's website account page (view only) in the search results. For websites seeking to build a social community, this can help people connect with other users.
After completing the Settings form you will be directed to a form where you can define fields for the profile. Remember that your options for Profile fields are somewhat independent of the original custom field definition. For example, you can flag a field as Required in the profile that is not required in the original definition, or you can add custom text before or after the field to help explain its usage in this particular context.
Profile field settings can be a bit confusing as the options can impact the field display significantly depending on your use of the profile.
The first concept to grasp is the types of fields you can combine together in a profile based on your planned use. As with other parts of CiviCRM, the field selection process involves selecting the type, the field, and then any sub-options relevant to that field. You may add contact, activity, participant (event registrants), membership, and contribution fields to your profile. However, your use of the profile will dictate what combination of field types are allowed. In particular, there are two primary rules dictating usage:
- Different contact type fields cannot be mixed. This is the most common mistake for new users. The limitation means you can't construct a profile that includes both Individual and Organization-specific fields, or other such combinations.
- Participant/Membership/Contribution fields may only be used in profiles used within the associated type of page. In other words, you can't use these fields with profile view/create/edit/search pages. Profiles containing these fields can only be used within event registration or contribution pages.
If you fail to respect these rules, your profile page will render an error indicating that you have mixed-type fields and you will need to correct them before proceeding.
Note
The field type list contains a Contacts option, as well as options for specific contact types and subtypes (Individual, Organization, and so on). The Contacts option includes fields common to all contact types, such as the Address, Phone, and Communication preference fields. The contact type fields are specific to only that type.
After selecting a field, you may proceed to complete the other fields, such as the field label, whether the field is required, view-only, and help text. Note that View Only fields will not be included in profile search pages.
One very important field to configure is the visibility field, which determines how the field data will be controlled. There are three options available:
- User and User Admin Only: This is the default option and can be used for fields found in all profile create/edit/view and component pages (events and contributions). It essentially states that the only contact using the form will be the current user (whether they are logged in or not), or in the case of component and profile create forms, whoever the form is being completed on behalf of. For profile edit and view pages where you may be accessing existing data in the system, this option states that the logged in user may only view their own information (and not other contact records). Consequently, this option is the most restrictive and also the most secure. There generally is no need to change this field value unless your profile will be used as a search form.
- Public Pages: This option should be selected if you want to expose this field to a search profile either through the search form itself or as part of the resulting records' detail views. This includes profiles used for search results in administrative pages and batch updates. As the name suggests, it indicates that the contact record data may be viewed by contacts other than the logged-in user. For example, John Doe may use a profile search form to look up the address for Janis Smith.
- Public Pages and Listings: This option works the same as the previous one, but also includes the ability to hotlink values in the detail view. This is a great way to encourage follow-up searches from your resulting records. For example, let's say you have a custom field called "service types" that is attached to organization records. The field is displayed as a list of checkboxes from which the user selects one or more. After conducting a search and viewing a record, you see that they are associated with three of the services. In the profile form, this field was assigned the Public Pages and Listings visibility, which means the three services for this record are displayed and hyperlinked on the detail page. Clicking on one of the services generates a follow-up search based on that value. In this way the user can easily conduct multiple follow-up searches. Later in this chapter we will construct a profile which uses this field and point out how it is displayed and used.
The visibility option for profile fields is not the only way you control access to data through your website, but it is one important way to limit profile field use and should be considered carefully as you build your profile. As a general rule, you can leave the setting as User and User Admin unless you are using the profile in a search capacity.
If you have chosen either Public Pages or Public Pages and Listings for your visibility option, you will see two additional options appear in the form:
- Searchable: Checking this option indicates that the field should be available on search forms. Give some thought to the type of field you're working with when building out search forms. You typically will want only a small number of fields on the search form and several more fields included in the profile for display in the detail view.
- Results Column: After conducting a profile search, the user is given a paginated list of all records matching the selected search criteria. From that list, they can click to view the record details or map the contact (if enabled). Select this option to include the field in the result list table. Keep in mind that your horizontal screen real estate is likely to be limited based on the website template/theme you are using. You will only want to include a handful of fields in the search result view.
After completing the form, you may save it and return to the list of profile fields or click on Save and New to add additional fields.
Once you've completed adding your profile fields and have returned to the field listing, you can edit, preview, disable, delete, or reshuffle the order of the fields. Returning to the main profile page where each of your available profiles is listed, you'll notice several actions that can be taken with regard to them. In addition to links providing access to the profile fields and profile settings, you may:
- Preview the profile in create view.
- Use Profile-Create Mode, which sends you to the live profile page in Create mode (for collecting new information from users).
- Disable or Delete the profile.
- Access an HTML Form Snippet, which provides code for using the profile in the Create view outside the traditional means. The code generated is completely independent of your website, which means it could be used on other websites. Let's say your trade association has a sister foundation established that is used for disseminating scholarships to students interested in the organization's field of study. The two entities (the association and foundation) are separate, but are closely related. You publish a weekly e-mail newsletter and wish to encourage subscriptions through both websites, so you create a profile for this purpose and use the HTML Form Snippet code to insert the signup form on the foundation site while creating a standard menu link to the form on your main association site.
- Copy the Profile, which facilitates the configuration process when you need to create a new profile that is similar in construction to an existing one.
If you've read through this section for the first time without having a clear vision for how you want to use profiles, you may be overwhelmed. The challenge with profiles is that they are very flexible and can be used in many different ways, not all of which are immediately clear when you are new to the system. When setting up a profile, you shouldn't be surprised if you need to return to the profile settings several times to tweak the options as you build and test it in various uses.
Let's take some time now to look at profiles in action. We'll return to our Food Pantry case study (FPAGM) to see how they make use of profiles to meet several data collection and management needs.
As with many organizations, one of the reasons FPAGM chose to implement a web-based constituent relationship management system is to expose real-time data to their members and allow them to edit those details without staff intervention.
Employees of food pantries and food suppliers will have website user accounts that provide them with access to resources unavailable to the general public. Each of these employees will also have a contact record in CiviCRM where their contact details and event registrations are recorded.
Once a user logs into the website, FPAGM wants to provide a link to allow them to review and update their contact details, including the address, phone, and newsletter subscriptions. They begin by constructing a profile with the desired fields. Each of the fields will be pulled from the Contacts and Individual field lists and will have visibility set to User and User Admin since the only person accessing the fields will be the logged-in user.
FPAGM sets several fields as View Only, as they do not want the user to be able to modify their value. This will include the first name and last name fields. Locking these down ensures the contact doesn't transfer the record to another user (for example, if an employee leaves a supplier and hands the login details to the new person replacing them), and helps ensure that each record is preserved for historical integrity. If new employees replace existing ones, we want to retain the old record and create a new one rather than rename the existing contact.
Several fields will also be designated as required to ensure that the association collects and maintains as much complete data as possible. The resulting field list is shown in the following screenshot. Care is taken to ensure the field order presents a logical display of information.
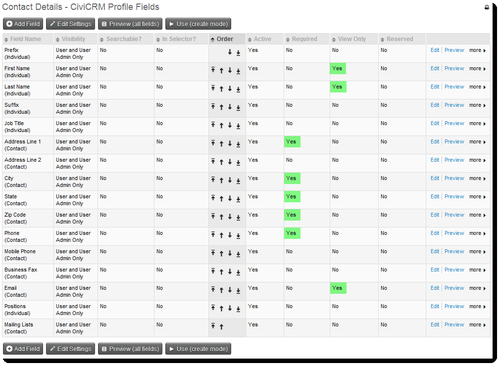
Take note of the highlighted values in the Required and View Only columns. Also note that in many cases we have modified the default label for fields to make them more user friendly and context appropriate. For example, Postal Code is changed to Zip Code, and the address fields do not contain the location value as inserted by default when you select the field. The Mailing Lists field is actually the Groups list. You may recall that groups are commonly used to manage mailing list subscriptions. Any groups assigned with a Public Pages visibility will be listed when this profile is displayed.
Before proceeding, FPAGM takes a moment to preview the profile and ensure that it is configured as desired. Note that the preview displays the profile in Create mode, which will exclude the View Only fields (Create mode displays a clean form, unfilled with existing data, and consequently, there is no View Only information to display).
FPAGM's website is built in Joomla!, so they will add a link to this profile to the existing user menu which displays when a user logs in, and set the access level to Registered to ensure only authenticated users may access it. We will discuss the various options for exposing profile pages later in this chapter.
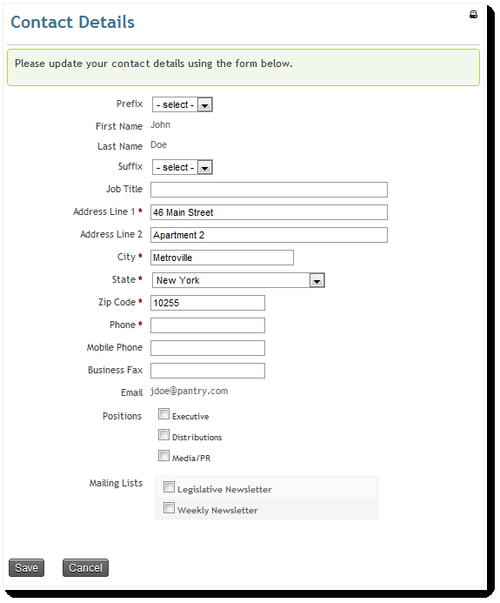
The particular user displayed here (John Doe) is missing some required information (Phone). By using this form along with the required fields, we will be able to encourage him (and other constituents) to provide a full set of contact details for their record.
As a member of FPAGM, food pantries are primarily looking for two things: support and exposure. The Association exists to serve the needs of the food pantries by serving as a clearinghouse of information and a community to connect food pantries to each other and their suppliers. Pantries also want the community at large to know more about who they are, where they are located, and whom they serve. FPAGM will help achieve this through an online searchable directory.
The directory should only list food pantry members in good standing. It should allow users to search based on address and service fields. To ensure that the profile searches current members, we first create a smart group to retrieve current food pantry members. While creating the profile, we use the Advanced Settings to limit the profile to this group.
We then proceed to define and configure the profile fields. The following field list is created:
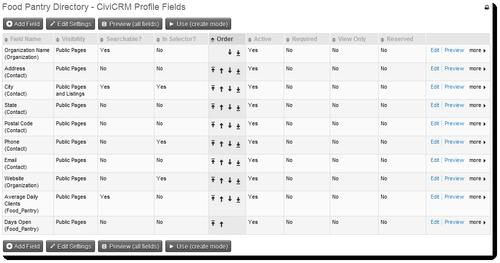
Note that only a few fields are designated as Searchable?, and only a few are configured for Public Pages and Listings visibility (creating hotlinked results).
After conducting some testing, FPAGM adds the directory link to the main menu as a publicly accessible search tool.
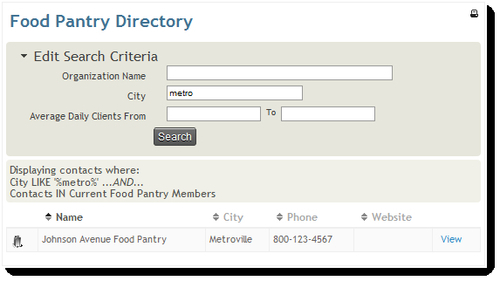
Notice that the Average Daily Clients field is searchable as a value range. This was an option available in the custom field definition.
After conducting a search, we click on View to look at the contact details for one of the records returned by the search:
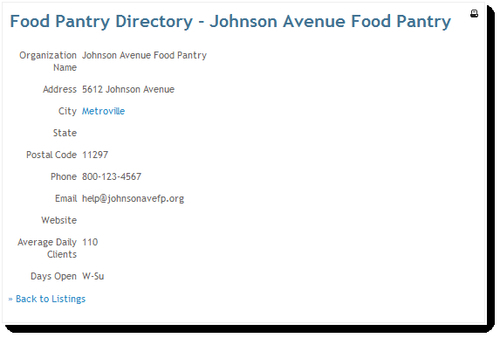
Take a minute to review the original field settings for this example and compare how the selected options resulted in different searchable fields, result list columns, and the detailed view. For example, note how the Public Pages and Listings visibility for the City field resulted in a hyperlinked value in the detail view. Clicking that link would trigger a new search based on that value—all contacts in Metroville. While using that option, give a careful thought regarding the usefulness of enabling the follow-up hyperlink. You wouldn't generally hyperlink a phone number or e-mail address, for example, as those are very likely to be unique to each contact record. General address fields such as city, state, and postal code would be good candidates for that feature, while street address would not (as it would only return contacts with the exact same address).
As discussed earlier in this section, one important use of profiles is in conjunction with event registration and contribution pages (which includes membership sign up pages). By default, both of these types of pages will only require the e-mail address as part of the registration/contribution process. Generally, you will want to include other important fields such as the individual's name, address, and communication details.
We won't walk through the creation of a profile for this purpose, but as you create one, keep in mind that you may include Participant, Membership, and Contribution fields (depending on its usage), in addition to Contact Details.
When configuring the event or creating a contribution page you will be given the option of inserting two profile forms in the page; one will appear toward the top of the page, and the other toward the bottom. If you have enabled the multiple contact registration capability for event registrations, you may assign different profiles for these additional registrants to help streamline and simplify the registration process for the end user.
Most of the time your use of profiles will result in some kind of form or other display on the public side of your website. However, there are two important uses that impact the backend administration of the site.
When conducting a contact search in CiviCRM, the resulting list of contacts contain the contact name, address, e-mail, and phone number by default. Sometimes you may want different sets of fields displayed in the search result list. You can do this by creating a profile to serve as a search result view.
You may select a profile when conducting an advanced search, or select one as the default search view by visiting Administer | Configure | Global Settings | Search Settings | Default Contact Search Profile. While using Advanced Search, use the Search Views drop-down to select your desired profile.
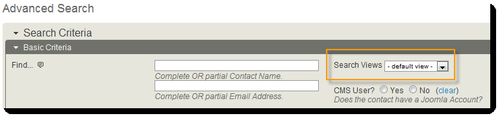
Note that in order to be available as a search view, your profile must have the Search option selected in the profile settings.
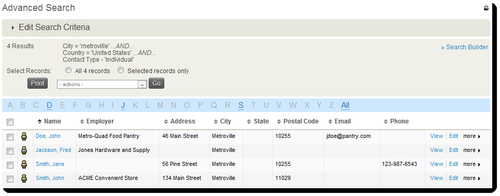
FPAGM wants an alternative search view that removes the Country column and includes the Current Employer field. When creating the profile for this purpose, they must select Public Pages visibility and indicate the fields which should be in the result column. After conducting a search for individuals located in the city of Metroville and choosing this profile view, users see the following:
FPAGM also wants to make use of profiles for batch updating address fields and communication preferences. Batch updates let you edit selected fields for multiple records at once (up to 100 at a time) and include the ability to copy values from the first record to all subsequent records.
To create this profile, they copy the search profile just made, remove the current employer and e-mail fields, and add the Do Not Mail and Communication Preferences fields. After running a search they select their desired records from the results list, choose Batch Update via Profile from the Action drop-down, click on Go, select the new profile, and then click on Continue.
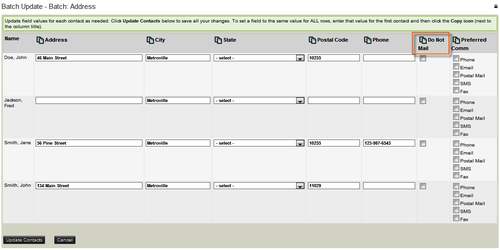
Notice the highlighted icon and mouse-hover help text that lets you copy the first row's column value to all rows in the table. This is an incredibly powerful feature of the batch update tool. FPAGM might decide that all of these contacts should not be mailed and may prefer communication via e-mail. They select the appropriate options for the first record and copy to all other records with one click.
In the earlier examples we briefly mentioned having exposed the directory search and user contact detail profiles to the FPAGM Joomla! website using menu items. However, there are other methods to consider while displaying profiles and different ways to go about doing this, whether you are using Joomla! or Drupal as your CMS. Let's walk through the Joomla!/Drupal-specific methods first, and then review some configuration options available to both.
If you are already a Joomla! user, you are aware that the primary method for creating page links is through menu items. In addition to providing an interface for selecting various configuration options for pages, menu items also provide access to module configuration. Modules are the blocks of content and functionality that are found in various positions (as defined in your template) around the page. They may include menus, footer text, login forms, recent content items list, and other such tools.
As a result of the connection between menu items and modules, you will often want to create links to CiviCRM resources through the menus. To do this, select your desired menu from the admin navigation bar and click on New to create a menu item. After selecting CiviCRM, you are given a number of sub-options for the type of page you wish to create. Our focus will be on the Profile options.
Note
If you want the benefit of building links to CiviCRM resources through menus but don't actually want the menu visible on your website, create a new menu called "Link Setting Menu" and leave the corresponding module in the Joomla Module Manager disabled. In Joomla!, the menu configuration is separate from its visibility/display on your site which is handled through the Module Manager. Your menu may exist and have valid, accessible links, but not actually be visible on your website. In this way, the menu manager serves more as an internal-link manager.
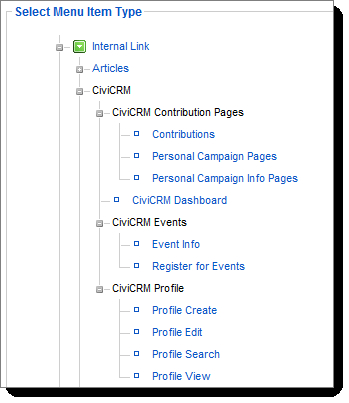
As you can see from the preceding screenshot, you have four options for exposing profiles: Create, Edit, Search, and View. After selecting one of these options, you choose the profile you wish to expose:
Since all of the configuration settings for the profile and its respective fields are handled in CiviCRM, you only need to choose which profile to display and in which desired method.
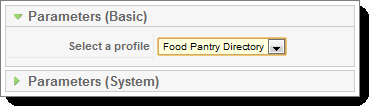
There are, however, some additional display options that can be passed to the profile through URL variables. We will discuss them later in this section. If you wish to implement these parameters through a menu item, use the External Link menu option that lets you set the link through a full URL.
Note
Joomla!'s module management options are somewhat limited—you can assign modules to all menu items, no menu items, or selected menu items. There are several Joomla! extensions that can significantly expand your configuration options for modules. If you are looking for more options, take a look at the Advanced Module Manager (http://extensions.joomla.org/extensions/administration/admin-structure/10307) that lets you assign modules to specific components, sections/categories, articles, templates, languages, user, and other options. It even allows date-based, URL-based, and script-based (PHP-based) controls.
In addition to wanting to add URL variables to profiles through menu items, you will inevitably want to insert links to profiles directly in your content items (articles and modules) without the need to build menu items first.
To do this, append one of the following URL strings to your website root domain, replacing "N" with the ID of your profile (visible in the profile list):
- Create:index.php?option=com_civicrm&task=civicrm/profile/create&reset=1&gid=N
- Edit:index.php?option=com_civicrm&task=civicrm/profile/edit&reset=1&gid=N
- Search:index.php?option=com_civicrm&task=civicrm/profile&reset=1&gid=N
- View:index.php?option=com_civicrm&task=civicrm/profile/view&reset=1&gid=N
For example, our FPAGM directory search page could be accessed at http://fpagm.usingcivicrm.com/index.php?option=com_civicrm&task=civicrm/profile&reset=1&gid=8.
After constructing your link, be sure to test it on your website and confirm that it is displaying as expected.
Joomla!'s native search engine friendly (SEF) option will correctly handle the initial link to a CiviCRM resource (subsequent pages are rebuilt as standard URL strings). If you are using a third-party SEF extension, be sure to test your CiviCRM pages thoroughly to ensure compatibility.
Links to CiviCRM profiles within Drupal will always be constructed through URL links to CiviCRM. These may be added as menu items or as links from within the content of a node. You can use either absolute or relative addressing for links. For absolute links, append one of the following relative URLs to the base URL of your Drupal site including a trailing slash (for example, http://yourdomain.org/), replacing "N" with the ID of your profile (visible in the profile list):
- Create:civicrm/profile/create&reset=1&gid=
- Edit:civicrm/profile/edit&reset=1&gid=N
- Search:civicrm/profile&reset=1&gid=N
- View:civicrm/profile/view&reset=1&gid=N
Drupal users may also configure permissions for accessing profiles. Use Drupal's Access Control tools to determine which roles can access profile pages and other CiviCRM forms (such as contribution pages and event registrations):
- If you want Anonymous (not logged in) visitors to access profile pages, grant the profile listings and forms permission to the Anonymous role
- If you are using custom fields in your profiles and want anonymous visitors to access the form or page, you also need to grant Custom Data Access to the Anonymous role
If you are using a profile for user account signups, you will need to configure permissioning as described previously. However, if you do not need anonymous access, you can restrict profiles to specific roles, as needed.
You can further control access to specific profiles for subsets of your users using CiviCRM's Access Control Lists (ACLs).
Additional fine-grained access (for example, exposing profiles to anonymous users by default, but restricting access for specific profiles) can be accomplished with functions added to your Drupal theme. Visit the CiviCRM online documentation for more examples and sample code: http://wiki.civicrm.org/confluence/display/CRMDOC/Linking+Profiles.
CiviCRM provides several additional options for refining profile display using URL variables. These parameters should be appended to the create/edit/search/view URL you've selected.
&force=1:If your profile is configured to limit results to a group, this option will display the group list when the profile search page is first opened (by default, search pages open to just the search form). This option only applies to search profiles.&search=0:This option will hide the search form for search page profiles. Used in conjunction with the previous option, you can create a profile page that displays members of a group with no searching options.&field_name=value:Use this option in conjunction with the&force=1 option to return a filtered list of results for your search and listing page. Multiple filters may be applied, if desired. For example, to return a list of records in New York, append:&state_province-Primary=1031. Note that the field must be present in your profile definition as a public user and listing field. If you are uncertain what the field name is you wish to filter on, view the search page source in your browser and identify the form field name. You can also retrieve the field value for select/checkbox/radio button fields, such as the numeric value of states in the example above.&map=1:Use this option to display a map by default for the result set. Note that you must have the profile configured to have mapping enabled (under Advanced Settings).
If you are using CiviMail to conduct broadcast e-mails from the system, there is a special checksum token that can be used while sending links to profile pages. Tokens are used in CiviMail to replace values unique to each contact record when the e-mail is sent. In essence, they allow you to do merge mailings with e-mails. The checksum token is a unique value created for each contact when the mailing is sent out. By appending the checksum token to your profile URL string, recipients can click the link and have the profile form loaded with their contact information pre-filled, even if they are not logged in to the site. We will cover CiviMail capabilities in more detail later in the book.
When using the checksum feature, the profile URL should have the following appended to it:&id={contact.contact_id}&{contact.checksum}. When CiviMail sends the e-mail it inserts the user's contact ID and unique checksum value.
If you find that your constituents are not accustomed to logging in to your website to update their contact information through a profile edit form, you may find it useful to e-mail them with the link to the edit form. They can access the page without logging in and can interact directly with their contact record. Note that the checksum value expires seven days after sending the e-mail for security reasons. While this improves security, there remain certain risks while using this feature. The link constructed by the checksum provides a gateway to the user's data (controlled by the profile) without requiring them to log in. That means if they forward the e-mail to someone, the recipient would gain access to their contact record (within the seven-day access window).