Chapter 3, Fundamentals of Digital Forensics, provided an overview of various forensic tools that are available to the incident response analyst. Some of these tools include Linux distributions that can be leveraged during an incident for various digital forensics tasks. The following example will demonstrate how a Linux distribution with forensics applications can be deployed to capture a forensically sound image of a potentially compromised computer.
The combination of a Linux distribution and a bootable USB device is an option you can use to conduct forensic imaging of potentially compromised systems. Incident response analysts may find themselves in a situation where multiple systems need to be imaged and the analysts have only one write blocker. A great deal of time will be wasted if the analyst must image each one of these systems in sequence. In this situation, the analyst can avoid this by creating a bootable USB drive for each system and imaging each one at the same time. All the analyst needs is an evidence drive and a bootable USB drive for each source of evidence. Utilizing this technique will allow the analyst to image each system at the same time, saving time that is better spent on other activities.
In this scenario, the Computer Aided INvestigative Environment Live (CAINE) Linux distribution will be utilized to image the hard drive from a potentially compromised system. First, the system is powered off and the bootable USB device containing the CAINE OS is installed. The suspect system is then powered on. Incident response analysts should be aware of how to change the boot order of a system to ensure that it boots to the USB device. Analysts should also be prepared to immediately power down the system if it attempts to boot into the native OS and not the USB device. Let's get started:
- Shut down the suspect system and power it back on. Once the device boots up, insert the evidence drive into another available USB interface.
- After inserting the evidence drive, open a Terminal and type the following:
caine@caine:~$fdisk -l
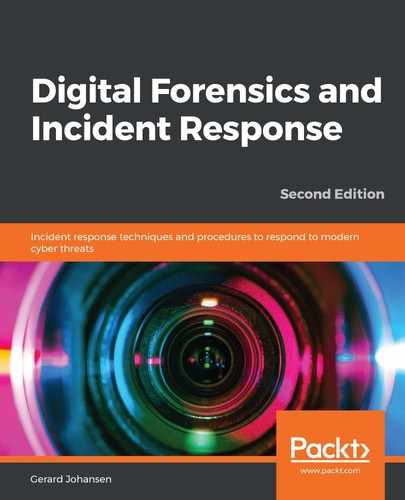
The fdisk -l command lists all partitions that are visible to the CAINE OS. The abridged output will look similar to this:
In the preceding screenshot, there are three separate disks, each with its own partitions. The disk labeled /dev/sdc is the USB drive that contains the CAINE OS that the system has been booted from. The /dev/sdd disk is the evidence drive that the system will be imaged to. Finally, the target system is labeled as /dev/sdb. It is important to identify the separate disks that appear to ensure that the right target drive is being imaged. By examining /dev/sdb more closely, the analyst can see the three separate partitions that make up the entire physical volume. CAINE indicates the boot volume, /dev/sdb1, in the entries with an asterisk. This information can be valuable as CAINE can be leveraged to image either the physical volume, as in this demonstration, or specific logical volumes.
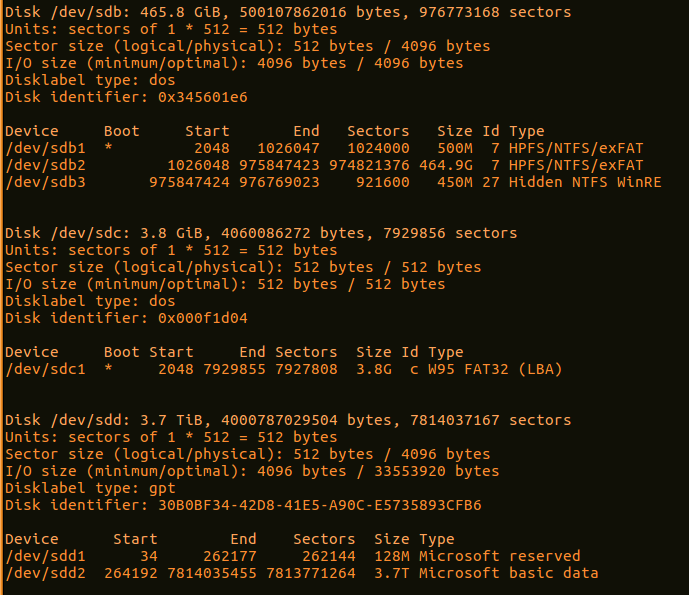
- After identifying the proper target drive of the system, it is critical that the imaging being performed does not change any of the target system's data. The CAINE OS has a built-in software write blocker. On the desktop, you will find "Block on/off" that is the title of the actual path to the software write blockers. This opens the software write blocker that will be utilized. While examining the list of devices, you will see that the only one that is writable is sdd, which we previously identified as the evidence drive. The other drives are set to read-only. This assures the incident response analysts that the imaging process will not alter the target drive (it is a good idea for analysts to take a screenshot of such information for subsequent reporting):
- After verifying that the evidence drive is in place and that the target system has been set to read-only, the analyst will configure the evidence drive so that it is mounted properly. First, a directory called EvidenceDrive1 needs to be made an mnt directory. Do this by entering the following command:
caine@caine:~$ sudo mkdir /mnt/EvidenceDrive1
- Next, mount the sdd disk on that newly created mount directory by entering the following command:
caine@caine:~$sudomount /dev/sdd2 /mnt/EvidenceDrive1/
Now, the evidence drive has been mounted on the mount point that was created.
- Next, change the directory to the evidence drive by using the following command:
caine@caine:~$sudomount /dev/sdd2 /mnt/EvidenceDrive1/
- The next step is to make a directory that will contain the image file. First, change to the EvidenceDrive1 directory by entering the following command:
caine@caine:~$ cd /mnt/EvidenceDrive1/
- Next, make the directory. In this case, the directory will contain the case number, Case2017-01, as the directory. It is a good idea to make this directory tie indirectly with the incident in some fashion. The following command will create the proper directory:
caine@caine :/ mnt /EvidenceDrive1$ mkdir Case2017-01
- The final step is to navigate to the new directory by entering the following command:
caine@caine :/ mnt /EvidenceDrive1$ cd Case2017-01/
- Now that you're in the proper directory, all you need to do is image the suspect drive. There are several tools available for doing this. In this example, the Dc3dd tool will be used. This tool was developed by the Department of Defense Cyber Crime Center forensic specialist Jesse Kornblum. This application has additional features that aren't found in the dd Linux imaging application. These include error reporting and multiple hashing algorithms that can be leveraged on the fly. To start the imaging process, the following commands need to be entered:
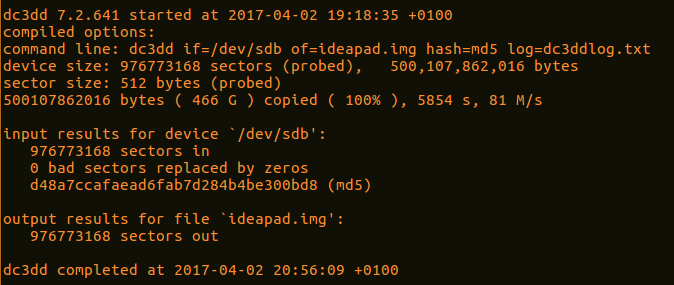
caine@caine:/mnt/EvidenceDrive1/Case2017-01$ dc3dd if=dev/sdbof=ideapad.img hash=md5 log=dc3ddlog.txt
The preceding command contains dc3dd. Start by imaging the disk at sdb to the evidence drive under the ideapad.img file name, and by hashing the output with MD5. Finally, the application will create a log file called dcddlog.txt that can be utilized for reporting purposes. This produces the following output:

- Depending on the size of the drive, this process can take hours. During this time, the analyst can keep track of any progress that is made. Upon completion, the application will produce some output indicating how many sectors were utilized for input and how many sectors were used as output to the image file. Ideally, these should be the same. Finally, an MD5 hash of the image file is calculated and utilized as part of the output:
- Examining the evidence drive from a Windows system reveals the image and log file that were created with the application:

- Examining the log file reveals the following information, all of which should be incorporated into any subsequent reporting:
dc3dd 7.2.641 started at 2017-04-02 19:18:35 +0100
compiled options:
command line: dc3dd if=/dev/sdb of=ideapad.img hash=md5 log=dc3ddlog.txt
device size: 976773168 sectors (probed), 500,107,862,016 bytes sector size: 512 bytes (probed)
500107862016 bytes ( 466 G ) copied ( 100% ), 5854.43 s, 81 M/s
input results for device `/dev/sdb': 976773168 sectors in
0 bad sectors replaced by zeros d48a7ccafaead6fab7d284b4be300bd8 (md5)
output results for file `ideapad.img': 976773168 sectors out
dc3dd completed at 2017-04-02 20:56:09 +0100
Linux is a viable option when it comes to acquiring disk evidence. One significant advantage it has is that it is easy to scale. In the event that multiple systems have to be acquired, responders can use several USB storage drives and Linux USB devices and acquire them in parallel, rather than waiting for software to become available. CAINE is an excellent option for this as the included write blocker also affords a measure of evidence integrity in the process.
Imaging is a critical process for responders to understand. The incident will often dictate which technique should be used. In any incident though, responders should ensure that the process is conducted in a sound manner as subsequent investigation will often rely on data acquired from these systems.