
Knowing how to render textures, animated characters, and particle effects at arbitrary positions already gives you great power to build incredibly rich and elaborate game worlds. However, some effects may be tricky to achieve, if not impossible, just by using these tools.
Let's imagine you want to implement smooth crossfade screen transitions in your game. When we talk about screens, we are referring to the main menu, game, victory, and so on. We will progressively decrease the alpha value of the old screen, while the new screen comes into play with an increasing alpha value. This cannot be accomplished by passing the corresponding transparency value to each screen, simply because the second we encounter overlapping elements with various alpha values, artifacts will start to appear.
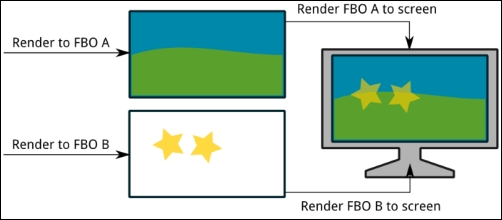
A possible solution involves rendering each screen to a temporary render surface and then mixing the two with our calculated alpha values. These auxiliary targets are known as frame buffer objects (FBO). The following diagram illustrates the process:
With this approach, you can take screenshots and generate a mini map. There are countless possibilities, and you can probably come up with a few more.
Throughout this recipe, we will show how to use Libgdx FBOs to create a small image gallery with transitions from one picture to the next.
We will work with one of the sample applications found in the [cookbook]/samples folder distributed along with this book. Import all the projects under this folder into your Eclipse workspace.
Find the images for your gallery in the JPG format under the [cookbook]/samples/samples-android/assets/data/gallery folder.
You will find the FBO example in the FrameBufferSample.java file that contains a classic ApplicationListener implementation. First, we have an enum that will define the two possible states, PICTURE and TRANSITIONING, of our application:
private enum GalleryState {
  PICTURE,
  TRANSITIONING,
}
A few self-explanatory constants follow, representing the number of pictures that make the gallery, the time that we spend on each picture before transitioning, and the duration of the transitions:
private static final int GALLERY_NUM_PICTURES = 4;
private static final float GALLERY_PICTURE_TIME = 3.0f;
private static final float GALLERY_TRANSITION_TIME = 2.0f;
The list of members starts with the well-known camera, viewport, and batch and continues with an array of TextureRegion references that will point to the gallery images and two FrameBuffer objects, one to hold the old picture and another to have the one we are transitioning to, to help with transitions. Finally, we keep the index of the current picture, the time we have spent in the current state so far, and the gallery state we are in:
private TextureRegion [] gallery;
private FrameBuffer currentFrameBuffer;
private FrameBuffer nextFrameBuffer;

private int currentPicture;
private float time;
private GalleryState state;
The create() method is responsible for instantiating and initializing our members as we are already used to. We iterate the gallery array creating new TextureRegion objects with the paths for each picture. The FrameBuffer constructor takes the color format (8 bits per RGB channel, in our case) and dimensions (our virtual screen size), and decides whether it uses a depth buffer (which we do not need since we work in a 2D space):
public void create() {
…

  gallery = new TextureRegion[GALLERY_NUM_PICTURES];

  for (int i = 0; i < GALLERY_NUM_PICTURES; ++i) {
    gallery[i] = new TextureRegion(new Texture(Gdx.files.internal("data/gallery/gallery" + (i + 1) + ".jpg")));
  }

  currentFrameBuffer = new FrameBuffer(Format.RGB888, VIRTUAL_WIDTH, VIRTUAL_HEIGHT, false);
  nextFrameBuffer = new FrameBuffer(Format.RGB888, VIRTUAL_WIDTH, VIRTUAL_HEIGHT, false);

  currentPicture = 0;
  time = 0.0f;
  state = GalleryState.PICTURE;

  camera.position.set(SCENE_WIDTH * 0.5f, SCENE_HEIGHT * 0.5f, 0.0f);
}
Some cleanup needs to be done within the dispose() method, as batch, all our textures, and the FBOs require us to deallocate resources. Note that we can access the texture a region points to through its getTexture() method:
public void dispose() {
  batch.dispose();

  for (TextureRegion background : gallery) {
    background.getTexture().dispose();
  }

  currentFrameBuffer.dispose();
  nextFrameBuffer.dispose();
}
As we usually do in our render() method, we clear the screen and set the batch projection matrix. Then, we increment our time variable according to the time that has passed since the last frame, and call updateStatePicture() or updateStateTransitioning(), depending on the current state:
public void render() {
…

  time += Gdx.graphics.getDeltaTime();

  switch (state) {
  case PICTURE:
    updateStatePicture();
    break;
  case TRANSITIONING:
    updateStateTransitioning();
    break;
  }
}
We use the drawTexture() and drawRegion() utility methods to render our backgrounds.
During the time a picture is being shown, we normally render it on the screen. We need to check whether enough time has passed for us to kick off a transition. If it has, we change the state and proceed to render the two pictures involved in our FBOs.
To tell OpenGL that an FBO is now the active render target, we need to call its bind() method. Then, we can work with batch like we always do. If we call bind() on the next FBO, the latter will become the active render target. Once we want to go back to rendering on the screen, we call the unbind() static method of FrameBuffer.
We render the current picture to currentFrameBuffer, increase the currentPicture counter, and render the next counter to nextFrameBuffer.
Note that we flip the region around its y axis with flip(false, true). Since everything that we render is mirrored around the y axis, we need to compensate for this. SpriteBatch does it automatically for us:
private void updateStatePicture() {
TextureRegion region = gallery[currentPicture];
batch.begin();
drawRegion(gallery[currentPicture]);
batch.end();
if (time > GALLERY_PICTURE_TIME) {
time = 0.0f;
state = GalleryState.TRANSITIONING;
region.flip(false, true);
currentFrameBuffer.bind();
Gdx.gl.glClearColor(0.0f, 0.0f, 0.0f, 1.0f);
Gdx.gl.glClear(GL20.GL_COLOR_BUFFER_BIT);
batch.begin();
drawRegion(region);
batch.end();
region.flip(false, true);
currentPicture = (currentPicture + 1) % GALLERY_NUM_PICTURES;
region = gallery[currentPicture];
region.flip(false, true);
nextFrameBuffer.bind();
Gdx.gl.glClearColor(0.0f, 0.0f, 0.0f, 1.0f);
Gdx.gl.glClear(GL20.GL_COLOR_BUFFER_BIT);
batch.begin();
drawRegion((gallery[currentPicture]));
batch.end();
nextFrameBuffer.unbind();
region.flip(false, true);
}
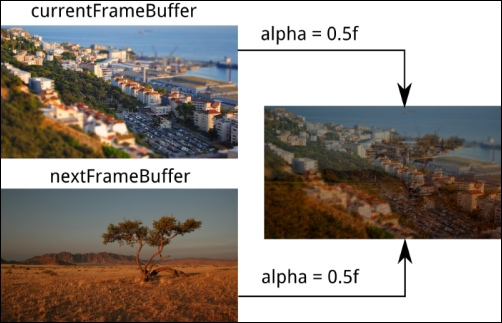
}Finally, we reach the function that manages the transitioning state. The transition is simply a linear interpolation of the alpha channel that initially shows the first full picture and progressively crossfades to the next one.
We can now render our FBOs to the screen using batch. In order to retrieve an FBO's texture data, we simply need to call its getColorBufferTexture() method. Lastly, we make sure we change to the PICTURE state when appropriate:
private void updateStateTransitioning() {
  float alpha = Math.min(time / GALLERY_TRANSITION_TIME, 1.0f);

  batch.begin();
  batch.setColor(1.0f, 1.0f, 1.0f, 1.0f - alpha);
  drawTexture(currentFrameBuffer.getColorBufferTexture());

  batch.setColor(1.0f, 1.0f, 1.0f, alpha);
  drawTexture(nextFrameBuffer.getColorBufferTexture());
  batch.end();

  if (time > GALLERY_TRANSITION_TIME) {
    time = 0.0f;
    state = GalleryState.PICTURE;
  }
}
After running the example, you should be seeing something similar to the following illustration:
FrameBuffer objects simply hold a Texture instance. Through bind(), we ask the OpenGL 2.0 API to use it as a target for all the following draw calls. Once we call unbind(), FBO asks OpenGL 2.0 to restore the screen as the target for all draw calls.
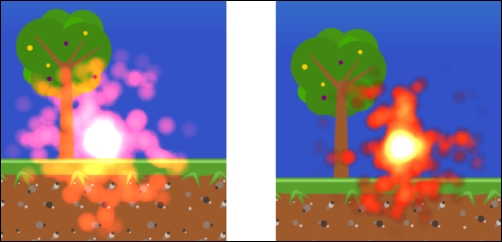
Drawing particles with transparencies on a dark background generally produces excellent results; however, they start looking pretty bad the second we introduce brighter environments, as shown in the following left hand-side picture. Additive blending adds overlapping pixel color values, resulting in areas that are unnaturally bright.
In FrameBufferParticleEffectSample.java, we render explosions to a black and fully transparent FBO. This FBO is then rendered on top of the background, producing the result shown in the following right hand-side picture:
We need to create the FrameBuffer object so that it supports alpha channel, which is why we use Format.RGBA8888 as opposed to Format.RGB888:
particleBuffer = new FrameBuffer(Format.RGBA8888, Gdx.graphics.getWidth(), Gdx.graphics.getHeight(), false);
Feel free to dive into the sample code; the render() process sticks with the following pattern:
- Set the render target to
particleBuffer, calling itsbind()method. - Clear the FBO with
Color(0.0f, 0.0f, 0.0f, 0.0f), which means black but fully transparent. - Render the particle effects to the FBO using
batch. - Call
FrameBuffer.unbind(). - Clear the screen with the solid black
Color(0.0f, 0.0f, 0.0f, 1.0f). - Render the background and the FBO's texture using
batch. Remember to flip the FBO around its y axis.