
Making games is an art and as such, it has a high degree of creative freedom, which means that there is no one single way to reach your goal.
On one hand, traditional hierarchy-based games development is quite intuitive as you can see in the next diagram:
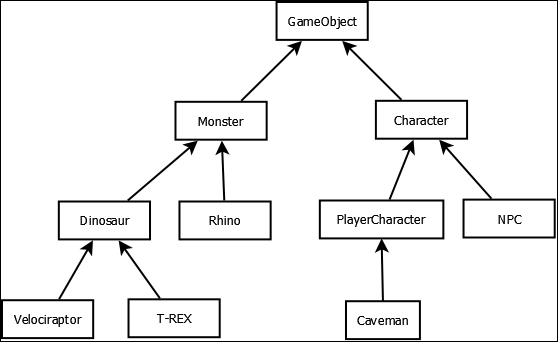
However, as the game grows, the class hierarchies become more annoying and hardly reusable.
On the other hand, a viable alternative to destroy that pyramid from hell is component-based development. In this way, we would have, for instance, our T-Rex class working as a container for a series of behaviors called components. The advantage of this is that those components are highly reusable for the rest of the entities in that game or any other one.
Ashley is a tiny high-performance entity framework integrated into the Libgdx family with a clear and easy-to-use API. You can learn more about it by visiting https://github.com/libgdx/ashley.
Understanding this new approach will take some time and you will need to practice first.
The code for this recipe is spread across different files within the samples-core project. As usual, you will find the one that works as the main file called AshelySample.java and the rest lives under the com.cookbook.ashley package.
However, you must add the Ashley dependency to the different projects through the gdx-setup tool for new projects (by ticking the Ashley checkbox) or updating your gradle.build file:
- Add compile
com.badlogicgames.ashley:Ashley:1.1.0to the dependency container of the core and Android project - Add compile
com.badlogicgames.ashely:Ashely:1.1.0:sourcesto the gwt project
At the end of this recipe, you will see the brave caveman following the user's clicks/taps, carried out through an underlying component-based implementation.
First of all, it is important that the main roles of this play remain fully explained:
- Entities: They are no more than bags to be filled up of components.
- Components: They work as data containers. Their base class definition is empty.
- Systems: They will perform all logic operations required to process game entities.
- Families: They group entities that satisfy certain conditions about containing all, one, or none of the specified components.
Once you have in mind a general idea of what we are about to do, it is time to get down to business. Perform the following steps:
- Everything begins in the
AshelySample.javafile by initializing the Ashley engine in charge of updating all entity systems:Engine ashelyEngine = new Engine();
- We cannot go any further without defining some components along with their corresponding systems. We will start by giving some movement to the entities through the most basic components:
TransformComponent: This stores the position, rotation, and scale of any entity and is implemented as follows:public class TransformComponent extends Component { public final Vector2 pos = new Vector2(); public final Vector2 scale = new Vector2(1.0f, 1.0f); public float rotation = 0.0f; }As you would have seen, the components' fields will be directly accessed as they are public.
MovementComponent: This will add the velocity feature to the entity:public class MovementComponent extends Component { public final Vector2 velocity = new Vector2(); }MovementSystem: Now that we have the basis, we are ready to deal with our first entity system. In general terms, it will just take all entities that are composed ofTransformComponentas well asMovementComponentand will add their current velocity to their position according to the elapsed time. However, we must first instantiateComponentMapperfor each of the component types to retrieve the ones belonging to the entity class in question:public class MovementSystem extends IteratingSystem { private ComponentMapper<TransformComponent> tm = ComponentMapper.getFor(TransformComponent.class); private ComponentMapper<MovementComponent> mm = ComponentMapper.getFor(MovementComponent.class);Its constructor needs to know which entities must be processed every update. Ashley makes it easy and provides you with the
Familyclass that gathers all the entities that contain a certain set of components. In order to provide movement, we just need both the components that we have just implemented:public MovementSystem() { super(Family.getFor(TransformComponent.class, MovementComponent.class)); }The action takes place within the overridden
processEntity()method responsible for the logic. Pay special attention on the way the components are retrieved for each individual entity making use of the previously definedComponentMapper:public void processEntity(Entity entity, float deltaTime) { TransformComponent transform = tm.get(entity); MovementComponent movement = mm.get(entity); transform.pos.x += movement.velocity.x * deltaTime; transform.pos.y += movement.velocity.y * deltaTime; }TextureComponent: We have provided support for moving entities but it means nothing if we do not show some screenshots to represent them. Consequently, the next step is creating aTextureComponentthat works as a container:public class TextureComponent extends Component { public TextureRegion region = null; }SizeComponent: At this point, we have everything to properly render our entities except for their size. This attribute allows us to make entities' size independent from the image file, so it will perfectly fit into the scene dimensions. The code looks as follows:public class SizeComponent extends Component { public float width; public float height; }
- Now, we definitely have all the required information to render our entities. However, we can carry out this with a component-based approach too:
RenderSystem: In order to show an entity with accuracy on the screen, we need its position, rotation, scale, width, height, and image. TheRenderSystemclass will keep track of all the entities whose components cover those attributes with the purpose of rendering them according to the camera settings every update tick.This functionality is translated as the following class fields:
public class RenderSystem extends EntitySystem {
   private ImmutableArray<Entity> entities;

   private SpriteBatch batch;
  private OrthographicCamera camera;

   private ComponentMapper<TransformComponent> tm = ComponentMapper.getFor(TransformComponent.class);
   private ComponentMapper<TextureComponent> vm = ComponentMapper.getFor(TextureComponent.class);
   private ComponentMapper<SizeComponent> sm = ComponentMapper.getFor(SizeComponent.class);
Its constructor will just deal with the initialization of the
Spritebatchinstance and store a reference to the camera.The
entitiesfield from which the system will take the instances to draw is filled up through the following method:public void addedToEngine(Engine engine) { entities = engine.getEntitiesFor(Family.getFor(TransformComponent.class, TextureComponent.class, SizeComponent.class)); }Finally, the
update()function assumes the responsibility for looping over theentitiesarray and retrieve the necessary components to render each entity of the game using the long version of the draw method from the previously definedSpriteBatch. Having said this, the code remains easy to understand:public void update(float deltaTime) { camera.update(); batch.begin(); batch.setProjectionMatrix(camera.combined); for (int i = 0; i < entities.size(); ++i) { Entity e = entities.get(i); TransformComponent transform = tm.get(e); TextureComponent visual = vm.get(e); SizeComponent size = sm.get(e); batch.draw(visual.region, transform.pos.x, transform.pos.y, size.width*.5f, size.height*.5f, size.width, size.height, transform.scale.x, transform.scale.y, transform.rotation); } batch.end(); }
- After this
ComponentandEntitySystemparenthesis that we made once the Ashley engine was initialized, we can carry on and put them into practice.First of all, we must instantiate the systems with the required arguments:
MovementSystem movementSystem = new MovementSystem();
RenderSystem renderSystem = new RenderSystem(camera);
The next step is adding them to the engine:
ashleyEngine.addSystem(movementSystem);
ashleyEngine.addSystem(renderSystem);
It is now when our first
Entityinstance can be created. As usual, the caveman will be the protagonist:Entity caveman = new Entity();
However, this is no more than an empty container. Let's fill it up with some components:
TextureComponent texture = new TextureComponent();
TransformComponent transform = new TransformComponent();
SizeComponent size = new SizeComponent();
MovementComponent movement = new MovementComponent();
As entities, components are empty and need data to be meaningful. Here is where the image, dimensions, position, scale, and/or rotation are set:
texture.region = new TextureRegion(new Texture(Gdx.files.internal("data/caveman.png")));
size.width = 1f;
size.height = 1.5f;
transform.pos.set(SCENE_WIDTH*.5f - size.width*.5f, SCENE_HEIGHT*.5f - size.height*.5f);
Once these components are ready, add them to the
caveman Entity:caveman.add(texture); caveman.add(transform); caveman.add(size); caveman.add(movement);
The next diagram illustrates what is really happening:
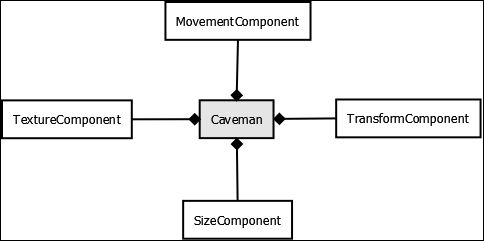
Finally, add the
caveman Entityto the engine and let theRenderingSystemclass know what to draw:ashleyEngine.addEntity(caveman); renderSystem.addedToEngine(ashleyEngine);
- The logic is internally managed by the different systems, so all we have to do is update the Ashley engine every frame through the
update()method:ashleyEngine.update(Gdx.graphics.getDeltaTime());
If we run the sample, the versatile caveman will now appear on the screen.
- Take this introduction as a starting point to think about the possible components and systems to implement. One more option is making the caveman move following the users' clicks or taps. All that you would have to do is define an empty
UserControlledComponentand its correspondingUserControlledSystem. The mission of the last one would be dealing with each individual entity inside of theprocessEntityfunction so that a velocity is applied in the direction of the user's click/tap. All this making use of theTransformComponentand theMovementComponentclasses.It is worth putting this recipe into practice but if you still need some extra help, do not hesitate to take a look at the
UserControlledSystem.javafile within thesamples-coreproject.
Although the idea of the component-based approach and a practical use case is given, there are still some gaps about the internal behavior of Ashley.
First of all, it is a good idea to show an overview diagram about Ashley's architecture:
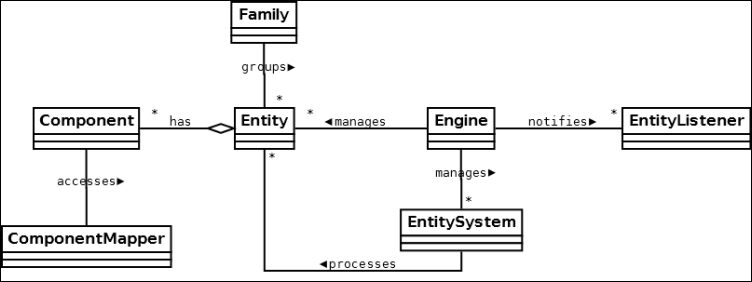
In the preceding diagram, we can find some unexplained classes such as EntityListener, EntitySystem, or its specific class, IteratingSystem. The first of them is an additional feature that is explained in the There's more... section, whereas the other two highly contribute to understand the underlying behavior of the Ashley framework.
The EntitySystem class is an abstract class to add the functionality of processing sets of entities. Its update() method is called every tick, so you can manually set what those entities will do. This implementation is the chosen one for RenderSystem to avoid calling the begin() and end() SpriteBatch functions for each entity processing.
The IteratingSystem class is the simplest way of repeating a set of actions with each entity from a family of entities as it will execute the content of processEntity every update tick.
Ashley also gives you the chance of being notified every time an entity is added or removed from the engine. All you have to do is create your own listener that implements EntityListener so that entityAdded and entityRemoved are overridden:
public class MyListener implements EntityListener {
   @Override
   public void entityAdded(Entity entity) {
      // Do whatever
   }
   @Override
   public void entityRemoved(Entity entity) {
      // Do whatever
   }
}
Finally, add/remove your custom listener to/from the engine:
MyListener mylistener = new MyListener();
ashleyEngine.addEntityListener(mylistener);
ashleyEngine.removeEntityListener(mylistener);