
After focusing on loads with synchronous methods, this recipe is in charge of making asynchronous heavy loads totally clear.
For a while, imagine what will happen if a Triple-A RPG game has to load a graphically awesome world where the final boss is waiting for you while spitting tons of different hungry flunkies. In the context of this chapter, it is a 10 second loading time with a decent machine. The player is freaking out because of the hype generated by his friends. You cannot disappoint him with an eternal black screen, or he will panic thinking the game is broken. However, if you satisfy him a little by providing a dynamic loading screen where some kind of teaser is revealed, his adrenaline will start pumping. What's the moral of the story? The player needs to receive continuous feedback. Nonresponsive interfaces are not okay.
The sample shown in this recipe will illustrate how to take advantage of loading resources asynchronously by displaying a reactive loading screen while our AssetManager class is working on it.
This recipe is mostly based on practical content. It is a good idea to take a look at the sample projects that go with this book by importing them through the Gradle Plugin. If you need to do it from scratch, refer back to Chapter 1, Diving into Libgdx, to get some help. You will find the projects under the [cookbook]/samples folder.
This sample is hosted by the ProgressBarSample.java file. In order to build a reactive loading screen, you must make the player feel that something is changing and, at the same time, show the progress of the change, making its end clear. To this purpose, a progress bar will do the trick.
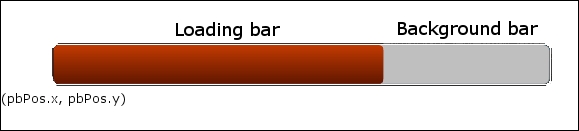
Next, we will explain a very easy and simple way to develop a progress bar by rendering a gray base image container; on top of this, we have the real progress bar image setting its width to the current progress of load.
First and foremost, let's declare all variables that will go into action:
private Texture progressBarImg, progressBarBaseImg;
private Vector2 pbPos;
private AssetManager manager;
The trivial matter is that progressBarBaseImg will contain the gray base image bar; progressBarImg will contain the front width-changing bar. Since the only dynamic element on screen will be the related-to-progress width of the actual loading bar, it is a good idea to cache its coordinates, pbPos.x and pbPos.y, instead of calculating them for every frame.
The next figure illustrates what we intend to do:
Within the create() method, once AssetManager is instantiated, just load the aforementioned textures:
manager.load("data/progress_bar.png", Texture.class);
manager.load("data/progress_bar_base.png", Texture.class);
The images used to draw the progress bar need to be loaded synchronously before starting to bring the required resources for the next screen from the disk, on another thread. Consequently, we should not forget to write the following line of code:
manager.finishLoading();
Then, retrieve the textures:
progressBarImg = manager.get("data/progress_bar.png");
progressBarBaseImg = manager.get("data/progress_bar_base.png");
It is a good idea to display elements relatively to other components on the screen in order to fit any resolution. In this case, the loading scene will contain a Libgdx logo that will be placed in the center, taking into account the application's width and height. The progress bar will be positioned below the logo:
pbPos.set(logoPos.x, logoPos.y– (logo.getHeight());
To close the create() method, queue the real bulk of resources needed for the next screen:
manager.load("data/1.png", Texture.class);
manager.load("data/2.png", Texture.class);
The next step is to draw the progress bar, but this is not that simple. To carry out the visual effect, it is necessary to know the current loading progress. This is achievable in two different ways. The first way is more laborious, but also more interesting. It starts by adding a private int loaded field to your class. Add the following code to your create() method after calculating the coordinates of the progress bar:
loaded = manager.getLoadedAssets();
The reason to do this is to know how many assets have been loaded only for the loading screen. It allows us to get the current progress by using the following code:
int currentAssets = manager.getLoadedAssets();
 float percent = Math.min(1, currentAssets – loaded) /
((float) (currentAssets + manager.getQueuedAssets() – loaded));
As you can see, we introduced a new method called getQueuedAssets() that returns the number of currently queued assets.
The second way of getting percent is as follows:
float percent = manager.getProgress();
Regardless of the way you choose, percent will store a float between 0.0 and 1.0 with the loading progress. Now that the real-time value is known, all we have to do is render, but with a slightly different method from SpriteBatch:
void draw(Texture texture, float x, float y, float width, float height)
Apply the following code to the context and at the end of render():
batch.begin();
...
batch.draw(progressBarBaseImg, pbPos.x, pbPos.y);
batch.draw(progressBarImg, pbPos.x, pbPos.y,
   progressBarImg.getWidth()*manager.getProgress(),
   progressBarImg.getHeight());
batch.end();
Note that the order of drawing is important to keep the progress bar rendered on top of the base container.
To conclude, still within render() and right after drawing the progress bar, you must make sure that the loading screen does not last forever and it gives way to the next screen. The update() method will return true, once the progress bar reaches 100 percent:
if(manager.update()) {
   // Go to next screen
}
In the meantime, you have a wide range of possibilities to keep the player's attention. Lots of games understand the loading screen as a fantastic moment to show some gameplay tips or relate story bits. Other games such as Call of Duty prefer to take advantage of the space by displaying a mission briefing. FIFA titles offer an interactive training mode; classic load screens such as Metal Gear Solid 4's warns against smoking.
Reading a resource from disk is slow, and during the time the computer takes to retrieve a few of them, it can keep executing other code so that the load is made in another thread.
It is important to make two key concepts highly bound to this chapter clear:
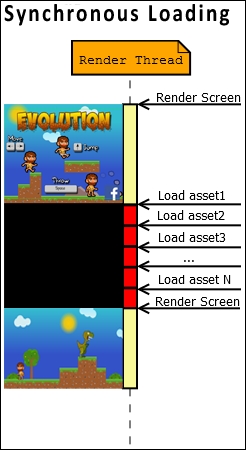
- Synchronous: Here, the application will wait for the load process to finish in order to carry on with the execution. All the action takes place on the rendering thread.
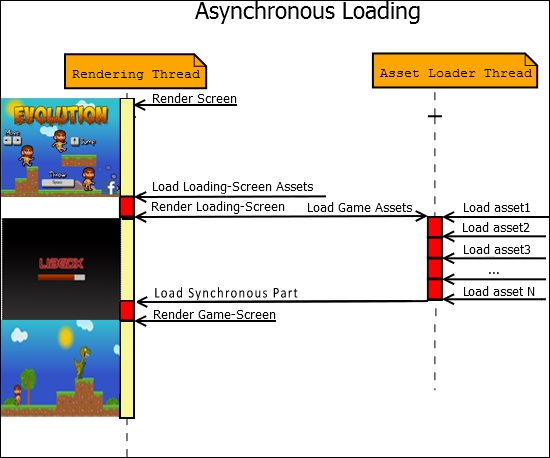
- Asynchronous: Here, some parts of the asset are loaded on a worker thread, and the OpenGL descendant part is performed on the rendering thread. Most of the load is managed in the background so that it is a nonblocking task, keeping your application responsive. The example scenario is illustrated in the following figure:
Every asset that you queue into the manager is treated as a task, or called AssetLoadingTask in Libgdx. It implements the AsyncTask interface that entails a public call() method to submit it to AsyncExecutor. This class is in charge of allowing asynchronous executions of AsyncTask instances on a worker thread.
The AsyncExecutor class internally relies on the java.util.concurrent package to manage threads. It is widely used in concurrent programming.
The AssetLoadingTask class is ruled by its update() method, which, if the asset is asynchronously loaded, calls the loadAsync(...) function from the loader on a separate thread. At the end of its execution, the rest of the asset is loaded on the rendering thread by calling loadSync(...).
The TextureLoader class is a good example of loading the asset, making use of both methods. The asynchronous concept loads the pixel data, whereas Texture is created synchronously. Do not hesitate to take a look at its source code, which is available on https://github.com/libgdx/libgdx/blob/master/gdx/src/com/badlogic/gdx/assets/loaders/TextureLoader.java.
So far, we have covered the usual flow of managing assets in a general application, but in some cases, you might want to offer support to pause and resume the app. It means that some assets must be reloaded whenever the user restarts playing, since OpenGL-context was lost. This issue is seen in Android when sending the app to the background by pressing the home button or receiving an incoming phone call, causing all OpenGL-associated resources (such as textures) to be deleted.
Resuming the app can take a few seconds, so why not give some feedback and say what the app is doing through a loading screen? You can carry out this once you have instantiated your AssetManager class and call the next function for each asset type:
Texture.setAssetManager(manager);
As seen in Chapter 3, Advanced 2D Graphics, Libgdx give us a resume() method when implementing the ApplicationListener interface. This is the place to locate your call to the loading screen and wait until update() returns true.
If you decide not to manage this scenario with AssetManager, all resources will be reloaded on the rendering thread, causing your app to be unresponsive for some seconds.