
Basic shapes work great when you do not need high precision to detect collisions but sometimes you will require an extra level of detail where, for instance, your actors' head is a circle and the rest of the body is grouped into a rectangle.
Mixing basic shapes in order to get a more complex one is definitely a powerful tool but there are still some entities that you could not model, such as an empty glass where objects can fall into it.
Be aware that this significant precision improvement has consequences on CPU consumption, so try to keep your body as simple as possible.
To follow this sample, you will need the Box2D physics editor created by Aurelien Ribon, which is downloadable from https://code.google.com/p/box2d-editor/downloads/list.
Once you unzip it, simply run the physics-body-editor.jar file and the application window will show up.
You will also need the loader Java file, which is within the extracted folder or under the aurelienribon.bodyeditor package of the sample-core project.
Finally, have on hand the /data/box2D/glass.png file and the source code of this recipe, which is stored in the Box2DComplexShapesSample.java file. Now, you are ready to go on.
This recipe is split into two parts: the first will illustrate the process of generating encoded JSON files from an image while the second will parse that information and transform it into a precise physics shape for your games.
Once you have opened the physics editor, feel free to follow this technical roadmap:
- Select New Project within the Project Configuration tab.
- Save it wherever you want with your desired name. You are recommended to add the
.jsonextension to maintain consistency with its content. - Click on the New button within the Rigid Bodies tab.
- Type a name, in our case
glass, for your new body and select an image,glass.png, for this example, whose size is not excessively big. Your application should look similar to the following screenshot:
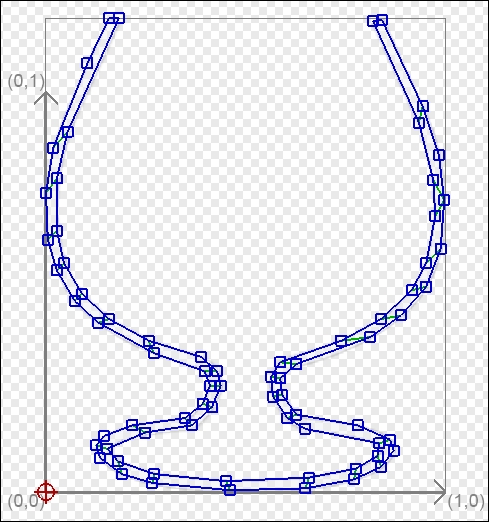
- The next goal is to link points until the desired shape is formed. The quickest way is to select the Auto-trace option and tweak the generated polylines by adding, modifying, or removing points. The final result should be similar to this:
Note
Although the usage of the editor is quite intuitive, you can consult the manual at http://www.aurelienribon.com/blog/projects/physics-body-editor/.
- Click on the Save option from the Project Configuration tab.
Once you have the shape data, the following steps will guide you through the simple and automatic process of importing it into your game:
- Declare the body field and set a default width:
private Body glassBody;
private static final float GLASS_WIDTH = 3.0f;
- Start the body creation process by instantiating
BodyEditorLoader:BodyEditorLoader loader = new BodyEditorLoader(Gdx.files.internal("data/box2D/glass.json")); - Create
BodyDefandFixtureDefas explained in the former recipe. - Create the final body and attach the fixture to it:
// Create the glass body
glassBody = world.createBody(bd);

// Magic happens here!! Glass fixture is generated automatically by the loader.
loader.attachFixture(glassBody, "Glass", fixtureDef, GLASS_WIDTH);
- As usual, step the world and render the debug lines.
Behind the scenes, the editor generates a JSON file with the following sample structure:
{
  "rigidBodies": [
    {
      "name":"Glass",
      "imagePath":"glass.png",
      "origin":{"x":0,"y":0},
      "polygons":[[{"x":0.7387387156486511,"y":0.37837833166122437}, ... ]]
      "dynamicObjects":[]
    }
  ]
}
The origin coordinates are represented by the red symbol located at the lower-left corner by default. The real meat of the file is the polygon section because it describes a set of vertices that forms a polygon and the union of them all gives way to the final shape.
As you would have already imagined, the loader parses this file with the purpose of getting the vertices information to generate a PolygonShape.
The physics body editor is not the only way to generate a nonprimitive shape. The ChainShape class allows us to specify a set of vertices to automatically build a closed polygon. These objects are intended to be used as static geometry because self-intersection between instances from this class is not supported:
ChainShape chainShape = new ChainShape();
chainShape.createLoop(new Vector2[] {
new Vector2(.0f, .0f),
new Vector2(WORLD_WIDTH, .0f),
new Vector2(WORLD_WIDTH, 1.5f),
new Vector2(6f, 1.5f),
new Vector2(3, 5.0f),
new Vector2(1.5f, 1.5f),
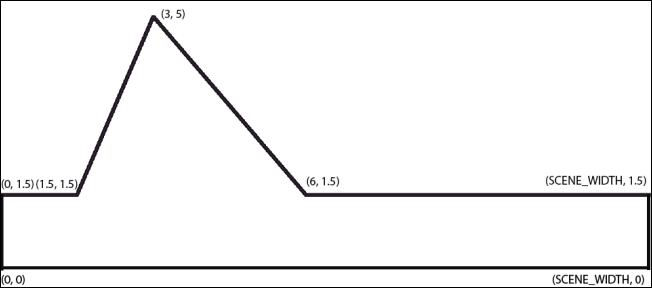
new Vector2(0, 1.5f),});The chainShape variable is now ready to form part of the typical process to create a new body. The previous piece of code would result in something like the following screenshot:
You can also build polygons with the PolygonShape class. However, they must be convex, which means that all edges joining two vertices in the interior should not cross any other edge of the polygon. Moreover, it must be a closed polygon of three or more vertices.
That is not all, you can group two fixtures in the same body. Before attaching the shape to FixtureDef, make use of the setPosition(…) method to set its local displacement from the body's origin. Adding both fixtures is a repetitive action:
body.createFixture(boxFixtureDef);
body.createFixture(circleFixtureDef);
An image is worth more than a thousand words:
