
Individual joints have no real value in a game by themselves. However, the mixture of some of them can enhance their final quality by simulating complex behaviors. Vehicles are good examples to illustrate the potential of joints.
In this recipe, you will learn how to build, step by step, the simplified model of a modern bike with suspension.
The process to implement the bike requires a good level of understanding about PrismaticJoint and RevoluteJoint. Make sure you feel fluent on these topics before carrying on.
The best way to take advantage of this recipe is to tweak the source code and understand how changes affect the final result. Therefore, feel free to take a look at the Box2DBikeSimulatorSample.java file.
Before diving into the code, it is a good idea to clarify the logic model of this complex mixture of physics bodies. For our purposes, we will divide this introduction into three components:
- Wheels: Each wheel is attached to a
RevoluteJointas it can rotate and move along the x axis. - Front damper: Its main function is to connect the frame with the front wheel, but it must allow suspension too through a
PrismaticJoint. - Back damper: This is in charge of connecting the frame with the back wheel. However, it must make the structure react with a small rotation when the back wheel bounces.
The next diagram shows the bike structure that we will finally implement:
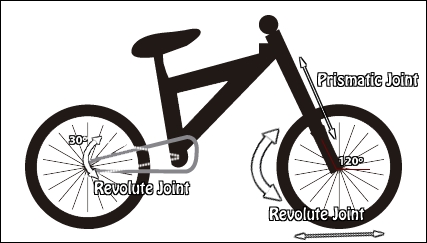
Anchor points are the local contact coordinates between the two bodies in a joint.
Once the model is clear, let's go into the real deal. Do not hesitate to review the code while going through these steps:
- As is becoming the custom in this chapter, initialize
Viewport,SpriteBatch,World, andBox2DDebugRendererand create a ground. - The different parts of the code will refer to the size of each of the bike components. That is why we will cache those values in world units:
final float WHEEL_WIDTH = 1.25f;
final float BACKDAMPER_WIDTH = 1.13f, BACKDAMPER_HEIGHT = .39f;
final float FRONTDAMPER_WIDTH = .71f, FRONTDAMPER_HEIGHT = 1.069f;
final float FRAME_WIDTH = 1.8f, FRAME_HEIGHT = 1.53f;
- This example requires visual interaction. Consequently, several
Textureinstances must be created:Texture frameTex = new Texture(Gdx.files.internal("data/box2D/frame.png")); Texture backDamperTex = new Texture(Gdx.files.internal("data/box2D/backDamper.png")); Texture frontDamperTex = new Texture(Gdx.files.internal("data/box2D/frontDamper.png")); Texture wheelTex = new Texture(Gdx.files.internal("data/box2D/wheel.png")); - Now that we know the image bounds of each component, we create the physics bodies as usual—spheres for the wheels and rectangles for the rest:
Body frontWheelBody = createSphere(BodyType.DynamicBody, 0f, 1f, 0.8f, 0f, 1.0f, WHEEL_WIDTH * .5f);
…
Body frameBody = createPolygon(BodyType.DynamicBody, 0f, 3f, 1f, 0f, 0f, FRAME_WIDTH * .5f, FRAME_HEIGHT * .5f);
…
- Once the puzzle is complete, it is time to join the pieces. The front damper connects with the frame through a
PrismaticJointwhose translation axis is about 120 degrees inclined, hence it is the last vector passed to theinitializefunction. The next diagram can be of help to understand this better: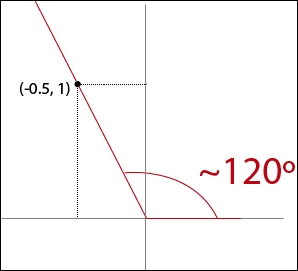
The movement range must be limited too. Anchor points are determined using the previously cached bounds and a little bit of trial and error:
PrismaticJointDef prismaticJointDef = new PrismaticJointDef(); prismaticJointDef.initialize(frontDamperBody, frameBody, new Vector2(0f,0f), new Vector2(-0.5f,1f)); prismaticJointDef.lowerTranslation =-.2f; prismaticJointDef.upperTranslation = 0f; prismaticJointDef.enableLimit = true; prismaticJointDef.localAnchorA.set(-FRONTDAMPER_WIDTH * .5f * + 0.065f, FRONTDAMPER_HEIGHT * .5f); prismaticJointDef.localAnchorB.set(FRAME_WIDTH * .5f - 0.165f,0.1f); prismaticJointDef.collideConnected=false; Joint fDamperFrameJoint = world.createJoint(prismaticJointDef); - The next step involves connecting the front damper with the front wheel through a
RevoluteJointfor the aforementioned reasons. The only complexity here is setting the proper anchor points:RevoluteJointDef revoluteJointDef = new RevoluteJointDef(); revoluteJointDef.bodyA = frontDamperBody; revoluteJointDef.bodyB = frontWheelBody; revoluteJointDef.localAnchorA.set(FRONTDAMPER_WIDTH * .5f - 0.065f,-FRONTDAMPER_HEIGHT * .5f); revoluteJointDef.localAnchorB.set(0,0); revoluteJointDef.collideConnected=false; Joint fDamperFwheelJoint = world.createJoint(revoluteJointDef);
- Another necessary
RevoluteJointconnection is the one between the back damper and the frame. The rotation range must be generously limited in such a way that it bounces only a little bit when necessary, for instance, 30 degrees (the range between -4 and 26):RevoluteJointDef revoluteJointDef2 = new RevoluteJointDef(); revoluteJointDef2.bodyA=backDamperBody; revoluteJointDef2.bodyB=frameBody; revoluteJointDef2.collideConnected=false; revoluteJointDef2.localAnchorA.set(BACKDAMPER_WIDTH * .5f,0f); revoluteJointDef2.localAnchorB.set(-FRAME_WIDTH * .5f + 0.5f, -FRAME_HEIGHT * .5f + 0.25f); revoluteJointDef2.lowerAngle = -4 * MathUtils.degreesToRadians; revoluteJointDef2.upperAngle = 26 * MathUtils.degreesToRadians; revoluteJointDef2.enableLimit = true; Joint bDamperFrameJoint = world.createJoint(revoluteJointDef2);
- The last joint of the model is in charge of connecting the back damper with the back wheel pretty much as the one explained in step 5 but taking into account that bikes are always powered by the back wheel, so we will add a motor force to improve the interaction:
RevoluteJointDef revoluteJointDef3 = new RevoluteJointDef();
revoluteJointDef3.bodyA=backDamperBody;
revoluteJointDef3.bodyB=backWheelBody;

revoluteJointDef3.collideConnected=false;

revoluteJointDef3.localAnchorA.set(-BACKDAMPER_WIDTH * .5f,-0.1f);
revoluteJointDef3.localAnchorB.set(0,0);

revoluteJointDef3.enableMotor = true;
revoluteJointDef3.maxMotorTorque = 100f;
revoluteJointDef3.motorSpeed = -135f * MathUtils.degreesToRadians;

Joint bDamperBwheelJoint = world.createJoint(revoluteJointDef3);
- If you run the sample with the current progress, the front damper will not work as the frame body is colliding with the front wheel. This is due to the low precision physics shapes attached to the bodies as we are using rectangles for non-rectangular shapes.
Box2D collision filtering techniques (explained later in this chapter) would be the way to go but, in this case, and in order to keep recipes independent, we will use an easy-to-adapt method for our model to prevent collision between the frame and a wheel, creating
MouseJointinstances:MouseJointDef mjd1 = new MouseJointDef(); mjd1.bodyA = frameBody; mjd1.bodyB = backWheelBody; Joint frameBwheelJoint = world.createJoint(mjd1); MouseJointDef mjd2 = new MouseJointDef(); mjd2.bodyA = frameBody; mjd2.bodyB = frontWheelBody; Joint frameFwheelJoint = world.createJoint(mjd2);
- Update the physics world and render the textures:
world.step(1/60f, 6, 2);

batch.begin();
batch.setProjectionMatrix(viewport.getCamera().combined);

batch.draw(
  wheelTex,
  frontWheelBody.getPosition().x - (WHEEL_WIDTH*.5f),
  frontWheelBody.getPosition().y - (WHEEL_WIDTH*.5f),
  WHEEL_WIDTH*.5f, WHEEL_WIDTH*.5f,
  WHEEL_WIDTH, WHEEL_WIDTH,
  1f, 1f,
  frontWheelBody.getAngle() * MathUtils.radDeg,
  0, 0,
  wheelTex.getWidth(), wheelTex.getHeight(),
  false, false);
… // Repeat a draw() call for each bike component
batch.end();
- Finally, remember to dispose the allocated resources:
public void dispose() { wheelTex.dispose(); backDamperTex.dispose(); frontDamperTex.dispose(); frameTex.dispose(); batch.dispose(); world.dispose(); } - Execute your code now and the bike from the previous diagram will appear on the screen.
This implementation uses an approach consisting of a mixture of RevoluteJoint and PrismaticJoint, but you could accept the challenge, take another path, and develop it with the WheelJoint.
As future work, you could do a search on the Internet for the structure of a car and carry it out yourself. The possibilities are endless.