
Box2D provides you with a powerful set of joints to connect bodies together or simply to the world with some particular constraints.
A wise usage of this tool can make the difference in your game with realistic physics behavior such as ragdolls, vehicles, ropes, and doors.
This recipe provides an explanation for each individual joint type. After reading it, you will be able to decide between a wide range of possibilities, which is the most suitable joint to achieve a specific real-life behavior. However, the best way to understand the upcoming explanation is to make a visit to the source code and run it.
Before getting on with it, one should mention that creating a joint follows the same line as creating bodies. We will make use of JointDef to construct the joint itself. In addition, you could build it through initialization functions, but they are only intended for prototyping purposes as defining the geometry directly makes the joint behavior more robust.
The Box2DJointsSample.java file contains the full source code; feel free to play around with it.
This recipe is not an exception so it needs the usual common steps to create your SpriteBatch, Viewport, World, Box2DDebugRenderer, and groundBody as explained previously. It will generate the necessary environment upon which this example is executed.
For simplicity and reusability reasons, we will make use of the next functions to easily construct circles and rectangles so we can focus on the important part:
Body createSphere(BodyType type, float x, float y, float density, float restitution, float friction, float radius)
Body createPolygon(BodyType type, float x, float y, float density, float restitution, float friction, float halfwidth, float halfheight)
Next, you will find a description and a usage example for each of the joint types.
It is intended to glue two bodies together. A real-life example can take place in a dart game where darts stick to the dartboard.
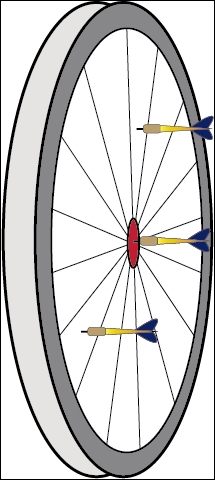
It has a pretty simple execution:
- Create two bodies.
- Define
WeldJointDef, specifying an anchor point for each body that will join them:WeldJointDef weldJointDef = new WeldJointDef(); weldJointDef.bodyA=smallBall; weldJointDef.bodyB=bigBall; weldJointDef.localAnchorA.set(0,0); weldJointDef.localAnchorB.set(.55f,0);
- Add it to the physics world:
world.createJoint(weldJointDef);
This type of joint ensures that one point from bodyA keeps a fixed distance with another point from bodyB. It does not restrict any relative rotation.
- Assuming that both bodies are already created, the process to implement it is quite simple. The key property here is
length:DistanceJointDef distanceJointDef = new DistanceJointDef(); distanceJointDef.bodyA=smallBall; distanceJointDef.bodyB=bigBall; distanceJointDef.length = 2.0f; distanceJointDef.localAnchorA.set(0,0); distanceJointDef.localAnchorB.set(0,0);
- Do not forget to add the joint to the Box2D world:
world.createJoint(distanceJointDef);
A rope joint works in the same way as the distance joint but instead of having a fixed separation, bodies are distanced for a maximum length, simulating an elastic rope. The steps are:
- Firstly, create two bodies.
- Connect them with a
RopeJoint, setting a maximum length:RopeJointDef ropeJointDef = new RopeJointDef(); ropeJointDef.bodyA=smallBall; ropeJointDef.bodyB=bigBall; ropeJointDef.collideConnected=true; ropeJointDef.maxLength = 4.0f; ropeJointDef.localAnchorA.set(0,0); ropeJointDef.localAnchorB.set(0,0); - As usual, add it to the world:
world.createJoint(ropeJointDef);
Bodies can have top-down extra resistance (transactional and angular) when a FrictionJoint is attached.
We will just place a box in the air under the influence of a FrictionJoint so that it will take longer to reach the ground. The process to implement it on your game is simple:
- Create two bodies, for instance,
squareBodyandgroundBody. - Define
FrictionJointDefand provide it with the previously created body along with the friction force. Unlike the previous examples and in order to tie up loose ends, we are going to use theinitialize(Body bodyA, Body bodyB, Vector2 anchor, Vector2 axis)function, but remember it is advised against in the production code:FrictionJointDef frictionJointDef = new FrictionJointDef(); frictionJointDef.initialize(groundBody, squareBody, new Vector2(SCENE_WIDTH*.5f,SCENE_HEIGHT*.5f)); frictionJointDef.collideConnected=true; frictionJointDef.maxForce = 6.0f; frictionJointDef.maxTorque = -.3f;
- Do not forget to add
FrictionJointDefto the world:world.createJoint(frictionJointDef);
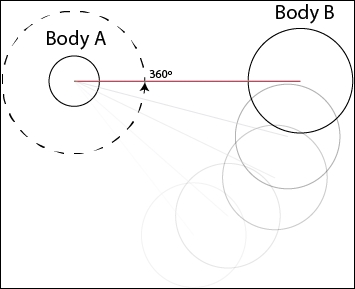
A revolute joint allows you to define an anchor point per body so that they get connected with a single degree of freedom, which is their relative rotation. In the next diagram, you can see a static bodyA and a bigger dynamic bodyB, which rotates around the first one with the help of a motor force.
Please follow these steps to bring the RevoluteJoint to your game:
- The code to implement it begins with the creation of both bodies:
Body smallBall = createSphere(BodyType.StaticBody, 0f, 3.75f, 1f, 1f, 0f, .25f);
Body bigBall = createSphere(BodyType.DynamicBody, 0f, 3.75f, 1f, 1f, 0f, .5f);
- Then we declare and define
RevoluteJointDefto connect the existing spheres through the anchor points defined in the upcoming diagram:RevoluteJointDef revoluteJointDef = new RevoluteJointDef(); revoluteJointDef.bodyA=smallBall; revoluteJointDef.bodyB=bigBall; revoluteJointDef.localAnchorA.set(0,0); revoluteJointDef.localAnchorB.set(-2.0f,); revoluteJointDef.enableMotor=true; revoluteJointDef.maxMotorTorque=360; revoluteJointDef.motorSpeed=100*MathUtils.degreesToRadians;
- Finally, add it to the world:
world.createJoint(revoluteJointDef);
You can also limit its upper and lower angle of rotation with the upperAngle and lowerAngle properties.
The previous code would result in something like this:
Revolute joints are good choices for wheels, chains, or swinging mace traps.
A prismatic joint allows two bodies to move along a specified axis within a limited range without the capability of rotating. An elevator clearly illustrates this behavior because it is moved along the y axis with an upper and lower limit and there is no possible rotation.
Some other examples are sliding doors, dampers, or pistons.
Follow these steps to get a PrismaticJoint working under Libgdx:
- Create two bodies, for instance,
squareBodyandgroundBody. - Define the
PrismaticJointDefobject with the involved bodies, the selected axis to slide, and the range limits. Moreover, we will add a motor force. The motor speed is expressed in radians per second:PrismaticJointDef prismaticJointDef = new PrismaticJointDef(); prismaticJointDef.initialize(groundBody, square, new Vector2(SCENE_WIDTH*.5f,SCENE_HEIGHT*.5f), new Vector2(SCENE_WIDTH*.5f+1f,0)); prismaticJointDef.lowerTranslation =-2; prismaticJointDef.upperTranslation = 2; prismaticJointDef.enableLimit = true; prismaticJointDef.enableMotor = true; prismaticJointDef.maxMotorForce = 100; prismaticJointDef.motorSpeed = 20f * MathUtils.degreesToRadians;
- Finally, we must add it to the world:
world.createJoint(prismaticJointDef);
Pulleys are extremely easy to carry out with the PulleyJoint class. The following diagram describes the process, which follows in the same line as the previous examples with some particularities such as the length of each segment of the rope:
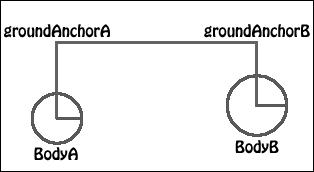
Please follow these steps to include this type of joint in your game:
- First of all, create two bodies.
- Initialize
PulleyJointDefas illustrated in the previous image. You must also supply aratiofor setting how much one segment changes compared to the other:PulleyJointDef pulleyJointDef = new PulleyJointDef(); pulleyJointDef.bodyA=smallBall; pulleyJointDef.bodyB=bigBall; pulleyJointDef.groundAnchorA.set(SCENE_WIDTH*.5f-1, SCENE_HEIGHT*.5f); pulleyJointDef.groundAnchorB.set(SCENE_WIDTH*.5f+1f, SCENE_HEIGHT*.5f); pulleyJointDef.localAnchorA.set(0,0); pulleyJointDef.localAnchorB.set(0,0); pulleyJointDef.lengthA = 0.7f; pulleyJointDef.lengthB = 0.7f; pulleyJointDef.ratio=1f;
- As usual, add it to the world:
world.createJoint(pulleyJointDef);
As the name suggests, GearJoint provides you with a powerful and simple tool to create gears, avoiding the traditional inefficient method consisting of complex shapes and extra hassle to get the teeth to run smoothly. It is a complex joint because it links revolute and/or prismatic joints. Instead of modeling the aforementioned example, we will implement the scheme shown in the following diagram where the revolute joint angular movement linked to body A causes y axis translation on body B and vice versa:
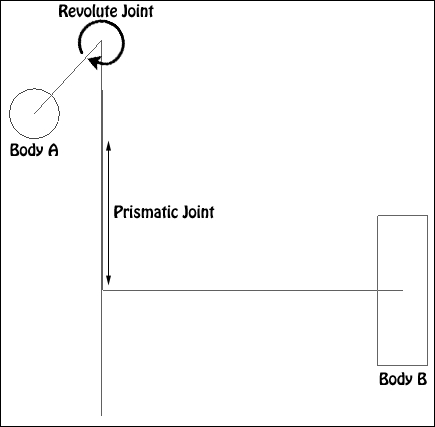
Take a look at the code to fully understand this example:
- First of all, create
bodyA(ball),bodyB(square), andgroundBody. - Implement the first component of our mechanism: the
RevoluteJointas follows:RevoluteJointDef revoluteJointDef = new RevoluteJointDef(); revoluteJointDef.bodyA=groundBody; revoluteJointDef.bodyB=ball; revoluteJointDef.localAnchorA.set(0f,5f); revoluteJointDef.localAnchorB.set(1f,0f);
- Continue to implement the second component: the
PrismaticJointas follows:PrismaticJointDef prismaticJointDef = new PrismaticJointDef(); prismaticJointDef.initialize(groundBody, square, new Vector2(SCENE_WIDTH*.5f,5f), new Vector2(0f,1f)); prismaticJointDef.lowerTranslation = -2f; prismaticJointDef.upperTranslation = .5f; prismaticJointDef.enableLimit = true; - Add both components to the world and keep a reference to them:
Joint revoluteJoint = world.createJoint(revoluteJointDef);
Joint prismaticJoint = world.createJoint(prismaticJointDef);
- Build
GearJointDefand add it to the world too. Along withPulleyJointDef, you must supply a ratio. Take into account that this one is different because you are dealing with different terms as angular movement (revolute joint) and translations (prismatic joint) do not work in the same way:GearJointDef gearJointDef = new GearJointDef(); gearJointDef.bodyA=ball; gearJointDef.bodyB=square; gearJointDef.joint1 = revoluteJoint; gearJointDef.joint2 = prismaticJoint; gearJointDef.ratio=(float) (2.0f * Math.PI / 0.5f); world.createJoint(gearJointDef);
The wheel joint is a good candidate to implement a car suspension model as it allows your body to translate along a fixed axis and, at the same time, rotate freely. So it is basically a PrismaticJoint without the rotation restriction. Follow these steps to add it to your game:
- Create a spherical body.
- Define
WheelJointDef, which includes a motor. The suspension frequency can be specified through thefrequencyHzfield where0means no suspension. The damping ratio is also customizable and critical damping is enabled when the ratio value reaches one:WheelJointDef wheelJointDef = new WheelJointDef(); wheelJointDef.bodyA=groundBody; wheelJointDef.bodyB=wheel; wheelJointDef.collideConnected=true; wheelJointDef.localAnchorA.set(0,0); wheelJointDef.localAnchorB.set(0,0); wheelJointDef.motorSpeed = 5f; wheelJointDef.enableMotor = true; wheelJointDef.maxMotorTorque = 50f; wheelJointDef.dampingRatio = 0.5f; wheelJointDef.frequencyHz = 0.2f;
- Add it to the world:
world.createJoint(wheelJointDef);
Apart from the classical joints, Box2D provides you with an extra one to manipulate bodies with the cursor: MouseJoint. It is intended to make a point of one body go towards the position of the cursor. This can be extremely useful for debugging purposes.
All you have to do is follow this process:
- Declare a class field for the
MouseJointandBodyto store a reference to the clicked object:MouseJoint mouseJoint; Body hitbody;
- Instantiate a new
MouseJointwhenever a click is processed. Take into account that two bodies are required and we have just defined one. The first one will be the body affected by the user's click/tap. The second is mandatory asMouseJointextends theJointclass even if it is not used:public boolean touchDown (int x, int y, int pointer, int button) { // Mouse coordinates to box2D coordinates viewport.getCamera().unproject(point.set(x, y, 0)); if(button == Input.Buttons.RIGHT) { //Make a query to get the clicked body (omitted for simplicity, see provided source code for details) hitBody = ...; … MouseJointDef mouseJointDef = new MouseJointDef(); mouseJointDef.bodyA = groundBody; mouseJointDef.bodyB = hitBody; mouseJointDef.collideConnected = true; mouseJointDef.target.set(point.x, point.y); //click coordinates mouseJointDef.maxForce = 1000.0f * hitBody.getMass(); mouseJoint = (MouseJoint) world.createJoint(mouseJointDef); } … } - Update the target if the user is dragging the mouse:
public boolean touchDragged (int x, int y, int pointer) { if (mouseJoint != null) { viewport.getCamera().unproject(point.set(x, y, 0)); mouseJoint.setTarget(target.set(point.x, point.y)); } … } - Delete the target when your mouse click is over:
public boolean touchUp (int x, int y, int pointer, int button) {
  // if a mouse joint exists we simply destroy it
  if(button == Input.Buttons.RIGHT) {
    if (mouseJoint != null) {
      world.destroyJoint(mouseJoint);
      mouseJoint = null;
    }
  }
…
}