
The Texture and TextureRegion objects have proven sufficient to render 2D game worlds, but Libgdx also offers the Sprite class to make our lives more enjoyable. The Sprite class is nothing less than a glorified TextureRegion, adding state properties such as color, position, scale, and rotation.
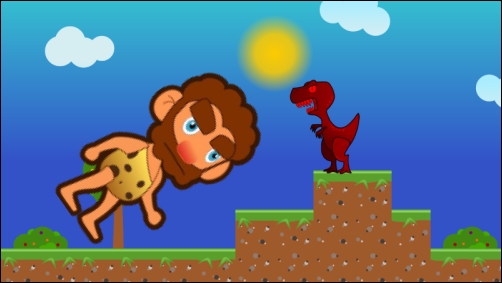
For this recipe's example, we have taken the jungle scene in TextureAtlasSample and added some modifications so we can play around with sprites. To begin with, Mr. Caveman will constantly follow the mouse. Whenever the user touches the screen or performs a left-click, the dinosaur will acquire a new color tint. Finally, the caveman will rotate upon scrolling and vary its size when scrolling while holding the right mouse button.
As you will see in just a moment, sprites are extremely easy to use. Please focus your attention on SpriteSample.java. Besides the typical camera, viewport, and batch references, we have an atlas and, for each element in the scene, we have a Sprite member: background, caveman, and dinosaur. The colors array holds the list of tints to be applied to the dinosaur and currentColor keeps track of the color cycle:
private TextureAtlas atlas;
private Sprite background;
private Sprite dinosaur;
private Sprite caveman;
private Array<Color> colors;
private int currentColor;
Inside create(), our members are initialized. The Sprite class has many constructors, one of which only takes a TextureRegion; we pass the corresponding constructors to each one of the sprites. Later, we populate the colors array with a few values: white, black, red, green, and blue. The setPosition() method changes where the sprite's bottom-left corner is placed in the world space while the setOrigin() method establishes its center for rotation and scale operations. Finally, we tell Libgdx that we want SpriteSample to capture input events. The code is as follows:
public void create() {
   ...

   atlas = new TextureAtlas(Gdx.files.internal("data/prehistoric.atlas"));
   background = new Sprite(atlas.findRegion("background"));
   caveman = new Sprite(atlas.findRegion("caveman"));
   dinosaur = new Sprite(atlas.findRegion("trex"));

   background.setPosition(-background.getWidth() * 0.5f, -background.getHeight() * 0.5f);
   caveman.setOrigin(caveman.getWidth() * 0.5f, caveman.getHeight() * 0.5f);
   dinosaur.setPosition(100.0f, -85.0f);

   currentColor = 0;
   colors = new Array<Color>();
   colors.add(new Color(Color.WHITE));

   ...
}
We only need to worry about disposing SpriteBatch and TextureAtlas as sprites do not need any cleanup:
public void dispose(){
   batch.dispose();
   atlas.dispose();
}
In every game loop iteration, we transform the mouse/touch coordinates into the world space using camera.unproject() to place Mr. Caveman. We then proceed to render the game elements. Since Sprite holds state data, it knows how to draw itself, which is why we call its draw() method passing in the SpriteBatch:
public void render() {
   tmp.set(Gdx.input.getX(), Gdx.input.getY(), 0.0f);
   camera.unproject(tmp);
   caveman.setPosition(tmp.x - caveman.getWidth() * 0.5f, tmp.y - caveman.getHeight() * 0.5f);

   ...

   batch.begin();
   background.draw(batch);
   caveman.draw(batch);
   dinosaur.draw(batch);
   batch.end();
}
When the user fires the touchDown event with Buttons.LEFT, we advance one position through the colors array and apply the tint to the dinosaur using setColor():
public boolean touchDown (int screenX, int screenY, int pointer, int button) {
   if (button == Buttons.LEFT) {
      currentColor = (currentColor + 1) % colors.size;
      dinosaur.setColor(colors.get(currentColor));
   }

   return true;
}
Upon mouse scrolling, we check whether or not the right mouse button is pressed, and if so, we scale the caveman using the scale() method; otherwise, we rotate him clockwise using the rotate() method:
public boolean scrolled (int amount) {
   if (Gdx.input.isButtonPressed(Buttons.RIGHT)) {
      caveman.scale(amount * 0.5f);
   }
   else {
      caveman.rotate(amount * 5.0f);
   }

   return true;
}After playing with the example for a bit, you can easily end up with a situation similar to the following screenshot:
Essentially, the Sprite class makes it easier to manage visual entities in your game, rather than having to manage regions. To sum it up, it holds all the necessary data to model a texture quad that can be rotated, scaled, moved around, and tinted.
The Sprite class provides a ton of convenience methods to access and modify the state. The complete list is too vast to be pasted here. It is much more productive to check the official documentation at http://libgdx.badlogicgames.com/nightlies/docs/api/com/badlogic/gdx/graphics/g2d/Sprite.html to see what it can enable us to do.
Let's dig into how we can use sprites to detect collisions between game objects and the design implications this approach entails.
Many games need to perform some sort of collision detection. Even though you may not need all the fanciness provided by physics engines such as
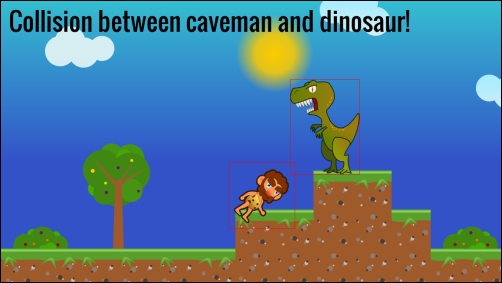
Box2D, you could still do with some simple polygon overlap tests. Luckily enough, we can check a sprite's bounding rectangle taking into account its full transform with getBoundingRectangle() and then call the Rectangle overlaps() method passing in another rectangle:
Rectangle cavemanRect = caveman.getBoundingRectangle();
Rectangle dinosaurRect = dinosaur.getBoundingRectangle();

if (cavemanRect.overlaps(dinosaurRect)) {
   // handleCollision();
}
Be aware that these are axis-aligned bounding rectangles, which means that if the objects are rotated, the bounding area could be a lot bigger than the sprite itself. This approach is extremely cheap but may not suit your needs. The following screenshot shows the potential inaccuracies of this approach:
- More advanced collision detection is treated in Chapter 10, Rigid Body Physics with Box2D
- The Component-based entity systems with Ashley recipe in Chapter 11, Third-party Libraries and Extras, could give you more insight into how to manage your game entities