
Animations contribute to a more dynamic feel for the user so he or she stays engaged. In real life, movement hardly ever follows a linear function because there are a lot of external and internal factors that distort it. This is where other types of more complex interpolations come into scene, generating smooth effects, closer to reality.
It is not strange if this sounds familiar to you as we talked about animations. We talked about animations, interpolations, and so on in Chapter 8, User Interfaces with Scene2D. The difference between this and what you are about to learn is implicitly included in the definition that the author himself, Aurelien Ribon, gives for the Universal Tween Engine library:
The Universal Tween Engine enables the interpolation of every attribute from any object in any Java project (being Swing, SWT, OpenGL or even Console-based)
The Scene2D Actor class is well equipped by the Libgdx team to perform these interactions but its system does not apply out of that context. In contrast, Universal Tween Engine allows you to animate anything, since it is generically implemented.
In this recipe, you will need to have two files in hand: TweenEngineSample.java and ActorAccesor.java. The first one is located together with the rest of samples and the second one is contained within the com.cookbook.tween package.
In order to let you do a fair comparison between Tween and Scene2D animation systems, we will build this example with Scene2D objects.
The awesome beauties of a generic system have a little price to pay, consisting in making the object type and the engine to talk the same language, which in other words is to tell the engine how to interpolate a specific object.
The TweenAccessor interface is the interface to implement if we want any class to be covered under the Tween Engine's understanding. All that it will demand is explicitly indicate how to get/set the values that will be interpolated, independent of the function. This means that if we want to interpolate the position of an object, the accessor must know how to get/set the object's x and y points. Perform the following steps:
- To begin with, we will create our custom accessor for the
Actorclass, identifying each possible operation with an integer. Notice that field names should be self-explanatory:public class ActorAccessor implements TweenAccessor<Actor> { public static final int POS_XY = 1; public static final int CENTRALPOS_XY = 2; public static final int SCALE_XY = 3; public static final int ROTATION = 4; public static final int OPACITY = 5; public static final int TINT = 6; ... - Once the supported operations are explicitly defined, we have to fill the inherited
getValues()method, indicating how to get each specific value for every operation and store it in a low-level float array. Finally, the number of parameters to interpolate must be returned (-1 if there is an error). The next code snippet makes use of theActorinterface to retrieve the necessary data. Review Chapter 8, User Interfaces with Scene2D, to refresh your mind, if necessary:public int getValues(Actor target, int tweenType, float[] returnValues) { switch (tweenType) { case POS_XY: returnValues[0] = target.getX(); returnValues[1] = target.getY(); return 2; case CPOS_XY: returnValues[0] = target.getX() + target.getWidth()*.5f; returnValues[1] = target.getY() + target.getHeight()*.5f; return 2; case SCALE_XY: returnValues[0] = target.getScaleX(); returnValues[1] = target.getScaleY(); return 2; case ROTATION: returnValues[0] = target.getRotation(); return 1; case OPACITY: returnValues[0] = target.getColor().a; return 1; case TINT: returnValues[0] = target.getColor().r; returnValues[1] = target.getColor().g; returnValues[2] = target.getColor().b; return 3; default: assert false; return -1; } }The same applies to the
setValues()method:public void setValues(Actor target, int tweenType, float[] newValues) { switch (tweenType) { case POS_XY: target.setPosition(newValues[0], newValues[1]); break; case CPOS_XY: target.setPosition(newValues[0] - target.getWidth()*.5f, newValues[1] - target.getHeight()*.5f); break; case SCALE_XY: target.setScale(newValues[0], newValues[1]); break; case ROTATION: target.setRotation(newValues[0]); break; case OPACITY: Color c = target.getColor(); c.set(c.r, c.g, c.b, newValues[0]); target.setColor(c); break; case TINT: c = target.getColor(); c.set(newValues[0], newValues[1], newValues[2], c.a); target.setColor(c); break; default: assert false; } }
Now the Actor class is able to speak with the Tween Engine with everything that it entails.
Universal Tween Engine is not hard to use, so let's go for a walk through it.
The first thing that we have to do is register our custom accessor in the Tween Engine and here is where the core class, Tween, comes into action:
Tween.registerAccessor(Actor.class, new ActorAccessor());
However, this is not its only mission because, as its name says, you will have to make use of it each time an interpolation is required. There are different types of tweens:
to (Tweenable object, int tweenType, int duration): This will interpolate from the current values to the given target.from (Tweenable object, int tweenType, int duration): This will interpolate from the target values to the current ones.set (Tweenable object, int tweenType): Here, no interpolation is applied, values are instantaneously set.call (IterationCompleteCallback callback): Here, a callback method can be called. This can be useful for building simple timers.
The previous explanation constantly refers to the target values, which can be specified like this:
Tween.from(…).target(x,y);
In addition to the absolute target float numbers, you can also provide values relative to the current ones:
Tween.to(…).targetRelative(x,y);
Besides the end values, you can lead the way that the interpolation should take by supplying waypoints. However, take into account that you must inform in advance about the number of waypoints in order to allocate some extra memory through the following static method:
Tween.setWaypointsLimit(10);
Waypoints usage keeps the same chaining dynamic:
Tween.to(group, ActorAccessor.SCALE_XY, 0.6f).waypoint(1.6f, 0.4f).target(1.2f, 1.2f).ease(Cubic.OUT)
That is not all since you can still customize your Tween a little bit more with the following methods:
ease(TweenEquation equation): This allows you to specify which function should follow the interpolation process.delay(int delay):Tweenwill wait for the given delay time (in seconds) to start.setCallback(TweenCallback callback): This callback will be called at the end of the execution ofTween. ATweenCallbackcan be instantiated if the inneronEvent(int eventType, BaseTween<?> tween)method is defined:private final TweenCallback callback = new TweenCallback() { public void onEvent(int eventType, BaseTween<?> tween) { if(eventType == TweenCallback.COMPLETE) { ...Possible
evenTypesareSTART,BEGIN,END,COMPLETE,BACK_START,BACK_BEGIN,BACK_END,BACK_COMPLETE,ANY_FORWARD,ANY_BACKWARD, andANY.repeat(int count, int delay): This makes yourTweenrepeat for count times with the given delay.repeatYoyo(int count, int delay): This is the same as the former but adds back motion just like a yoyo does.
The Tween class building works by chaining these methods one after the other. For instance, to fade in a Scene2D Label object during half a second:
Tween.to(label, ActorAccessor.OPACITY, .5f).target(1).ease(Quad.OUT)
We already have the tools to animate our objects through the Tween class but we will need to organize our code a little bit instead of placing delays everywhere. With the aim of achieving this, you can create Timeline instances that are composed of two control structures:
The way to insert tweens to them is by chaining the push () methods, for instance:
Timeline t = Timeline.createSequence()
.push(
Tween.set(label1, ActorAccessor.OPACITY).target(1))
.beginParallel()
   .push(
Tween.to(label1, ActorAccessor.POS_XY, 1.25f).targetRelative(0, -340).ease(Quart.OUT))
   .push(
Tween.to(label2, ActorAccessor.POS_XY, 1.25f).targetRelative(0, 340).ease(Quart.OUT))
.end()
.beginSequence()
   .push(
Tween.to(label1, ActorAccessor.OPACITY, .2f).target(0).ease(Quad.OUT))
   .push(
Tween.to(label2, ActorAccessor.OPACITY, 2f).target(0).ease(Cubic.IN))
.end()
The preceding code will start by immediately setting label1 opaque. Then, label1 and label2 will concurrently move to a relative target. Finally, both labels will fade out.
You can add pause times:
.pushPause(.5f);
Also, you can recycle some of the already explained methods, setCallback(…), delay(), repeat(…), repeatYoyo(…) and some new others to control Timeline such as pause(), resume(), and start().
Managing timelines individually can be a little messy because you will have to update each of them at the right moment. Fortunately, TweenManager comes to your rescue and takes absolute responsibility of Tween and Timeline life cycles. All we have to do is instantiate it, let it know about the existence of new timelines, and update them all as follows:
TweenManager manager = new TweenManager();

Timeline.createSequence()
...
.start(manager);

manager.update(Gdx.graphics.getDeltaTime()); //Must be called every render call
Now you should have a decent understanding about the Universal Tween Engine. However, its API is very extended, so feel free to take a look at the official documentation if you want to dive into some extra methods.
Functions that mark the motion of Tween extend the TweenEquation abstract class. The next figure, extracted from the official source of influence of Aurelien Ribon (http://www.robertpenner.com/easing/), makes the behavior of each of them clear:
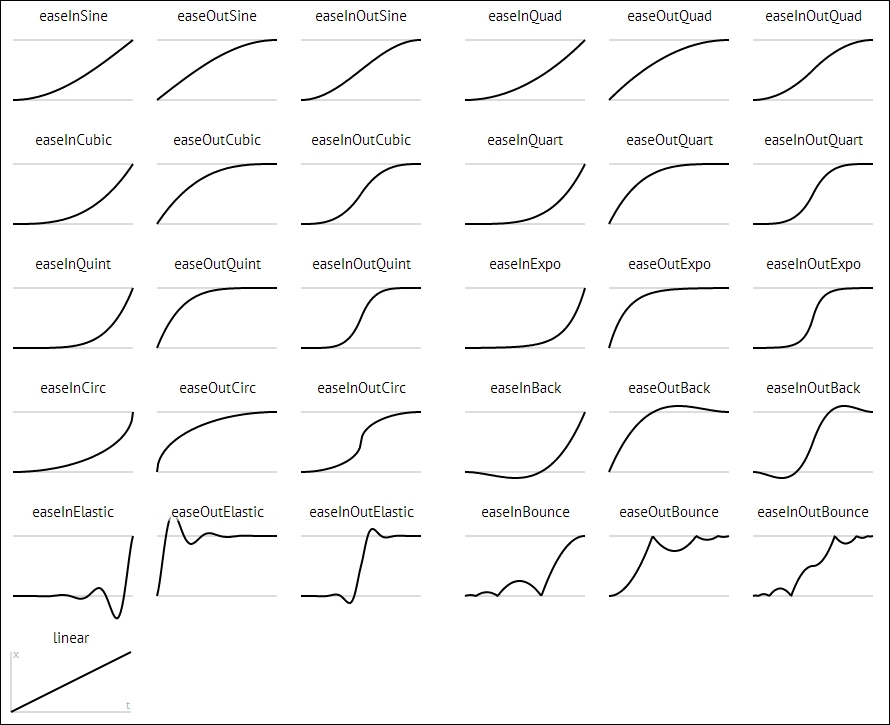
The vertical axis represents a value while the horizontal axis represents the time. Consequently, these functions determine values over time. This applies to our animations by defining the rhythm of the motion. For instance, QUINT.OUT will concentrate the action in the first steps of the timeline, as you can see in the previous screenshot.