
Until now, this chapter's recipes have been oriented to cover an enormous cut in the Scene2D API. From now on, you will find real cases to put the already explained concepts into practice with a few additional extras.
Almost every game has a main menu screen to allow the player to flow across the application. As it works as a facade, it must be neat so as not to give a bad first impression.
A very simple menu example will be explained in this recipe, but it can really serve you as a quick template to customize your own menu in a few minutes. To maintain chapter cohesion, it will make use of actions and some selected widgets.
This recipe is not an exception, so please import the sample projects into your Eclipse workspace. The source code for this recipe lives in the MainMenuSample.java file. It is a good idea to tweak that code at the same time that you learn the upcoming new concepts.
The content of this sample is now described step by step:
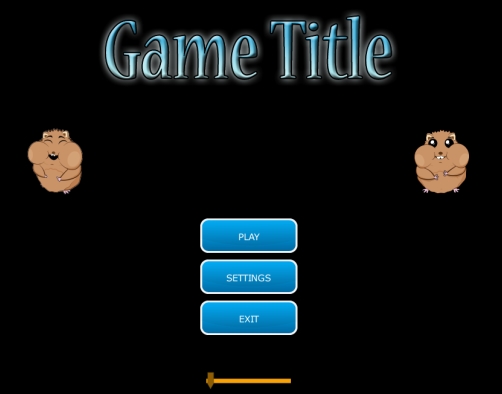
- First of all, decide which components will appear in your menu screen. This example will contain the game title, some pictures of the main character, three buttons, and a slider to change the volume, as shown in the following screenshot:
- Once you have your mental (or drawn) distribution of the screen space, declare your actors:
private Image gameTitle, hamsty1, hamsty2;
private TextButton btnPlay, btnSettings, btnExit;
private Slider slider;
- Apart from visual components, you will also need some structural ones to organize and encapsulate your actors:
private Table table;
private Stage stage;
- Within your
onCreate()method, place the typical viewport stuff:viewport = new FitViewport(VIRTUAL_WIDTH, VIRTUAL_HEIGHT);
- Select your preferred font type:
BitmapFont font = new BitmapFont(Gdx.files.internal("data/font.fnt")); - Choose the images for the title and the main character. Note that an animation might be more suitable to get the player's attention, but for simplicity reasons, we will just use static images. Remember to dispose them all when the application exits:
Texture gameTitleTex = new Texture (Gdx.files.internal("data/gameTitle.png")); Texture hamsty1Tex = new Texture (Gdx.files.internal("data/hamsty.png")); Texture hamsty2Tex = new Texture (Gdx.files.internal("data/hamsty2.png")); gameTitle = new Image(new TextureRegionDrawable(new TextureRegion(gameTitleTex))); hamsty1 = new Image(new TextureRegionDrawable(new TextureRegion(hamsty1Tex))); hamsty2 = new Image(new TextureRegionDrawable(new TextureRegion(hamsty2Tex))); - Define a common
TextButtonStylefor all three buttons and instantiate them:buttonUpTex = new Texture( Gdx.files.internal("data/scene2d/myactor.png")); buttonOverTex = new Texture( Gdx.files.internal("data/scene2d/myactorOver.png")); buttonDownTex = new Texture( Gdx.files.internal("data/scene2d/myactorDown.png")); TextButton.TextButtonStyle tbs = new TextButton.TextButtonStyle(); tbs.font = font; tbs.up = new TextureRegionDrawable(new TextureRegion(buttonUpTex)); tbs.over = new TextureRegionDrawable(new TextureRegion(buttonOverTex)); tbs.down = new TextureRegionDrawable(new TextureRegion(buttonDownTex)); btnPlay = new TextButton("PLAY", tbs); btnSettings = new TextButton("SETTINGS", tbs); btnExit = new TextButton("EXIT", tbs); - Repeat the process with
Slider:Slider.SliderStyle ss = new Slider.SliderStyle(); ss.background = new TextureRegionDrawable(new TextureRegion(new Texture(Gdx.files.internal("data/slider_background.png")))); ss.knob = new TextureRegionDrawable(new TextureRegion(new Texture(Gdx.files.internal("data/slider_knob.png")))); slider = new Slider(0f, 100f, 1f, false, ss); - Instantiate the
Tableactor, which plays a key role in this recipe:table = new Table();
- Insert your first row, which will contain the game title. Don't worry about the details of the code because they will be explained in the upcoming How it works… section:
table.row();
table.add(gameTitle).padTop(30f).colspan(2).expand();
- Add new rows to insert the remaining content. Pay special attention to the difference between
add()andaddActor(), as when using the former, the actors' position, size, and so on will be ignored when it is put inside a table:table.row(); table.add(hamsty).padTop(10f).expandY().uniform(); table.add(hamsty2).padTop(10f).expandY().uniform(); table.row(); table.add(btnPlay).padTop(10f).colspan(2); table.row(); table.add(btnSettings).padTop(10f).colspan(2); table.row(); table.add(btnExit).padTop(10f).colspan(2); table.row(); table.add(slider).bottom().colspan(2).expandY(); table.padBottom(30f);
- Size the table to the stage:
table.setFillParent(true);
- Pack our structural component to fit the bounds of its content:
table.pack();
- One advantage of
Tablesis that they work as a group so that you can apply anyActionover the whole set. Let's try afadeInanimation, so the first thing is to hide the table by setting its transparency to0:table.getColor().a = 0f; table.addAction(fadeIn(2f));
- You can handle the user's interaction with the buttons as follows:
Gdx.input.setInputProcessor(stage);

// Play button listener
btnPlay.addListener( new ClickListener() {
  @Override
  public void clicked(InputEvent event, float x, float y) {
    Gdx.app.log(TAG, "PLAY");
  };
});
There are many types of
InputEvent. Take a look at the Libgdx official documentation at http://libgdx.badlogicgames.com/nightlies/docs/api/com/badlogic/gdx/scenes/scene2d/InputEvent.Type.html to explore them. - Do the same with
Slider:slider.addListener(new InputListener() { @Override public void touchUp(InputEvent event, float x, float y, int pointer, int button) { Gdx.app.log(TAG, "slider changed to: " + slider.getValue()); // Set volume to slider.getValue(); } @Override public boolean touchDown (InputEvent event, float x, float y, int pointer, int button) { return true; }; });If
touchDownreturnstrue, the listener is ready to receivetouchUpandtouchDraggedevents until the first one is executed. It will also prevent the event from feeding other listeners outside the stage. - To complete the
onCreate()method, add the table to the stage:stage.addActor(table);
- Finally, update our stage and draw it on the
rendermethod:stage.act(Gdx.graphics.getDeltaTime()); stage.draw();
- Last but not least, remember to dispose the stage within the
dispose()method:public void dispose() { batch.dispose(); font.dispose(); stage.dispose(); }
As mentioned earlier, Table becomes a really powerful and essential actor in the Scene2D ecosystem. It is even present internally on several of the other actors. It is mainly responsible for organizing the screen space to fit your needs without too much hardcoding. In this section, you will learn how to deal with this old enemy of UIs through the Libgdx interface.
Table is composed of Cells, which have a lot of interesting and tweakable properties related to space treatment.
The first way for a cell to occupy the space is by expanding its logical table's bounds up to the main table's bounds (stage). You will understand this quickly with the following screenshot:
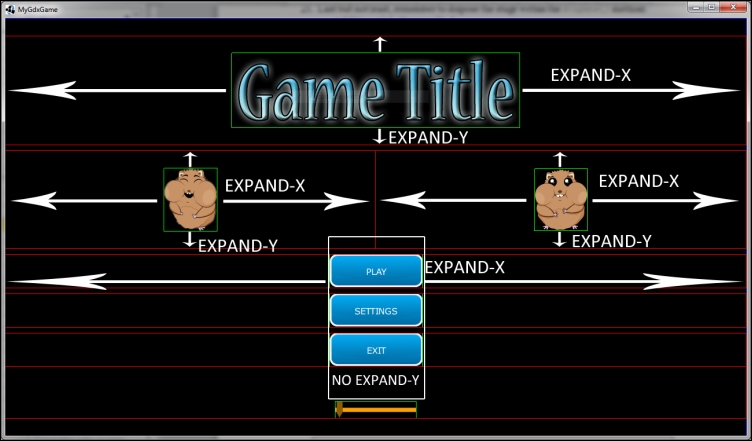
You can carry this out using these methods: expand(), expandX(), and expandY(), which only differ on the axis they affect.
In case we decide to avoid the expansion, we will get the following screenshot:
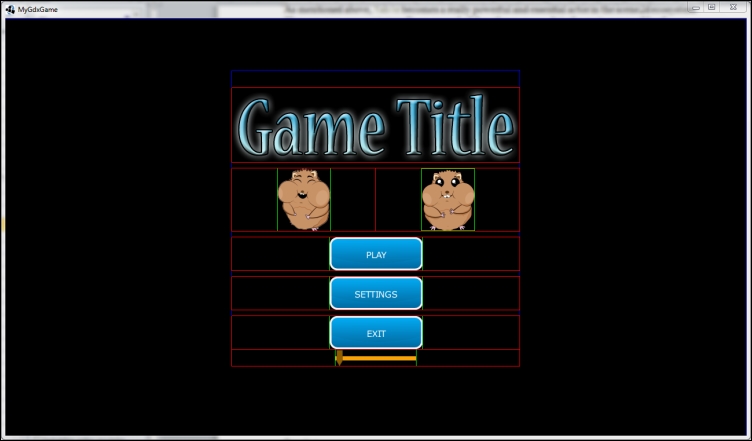
As you can see, the cells of the table are not expanded to the viewport limits but to the widest column, which is the one that contains the game title.
We might want the content of a cell to fill its parent so the buttons become bigger over the x axis, just like the following screenshot:
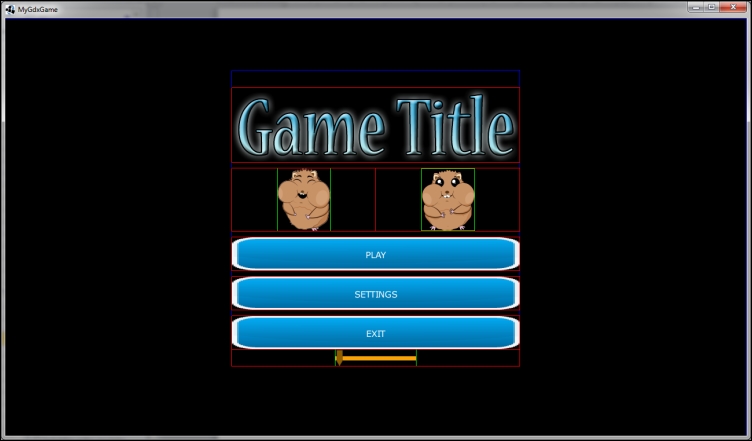
Similar to the expand action, we can achieve this through fill(), fillX(), and fillY().
In order to keep cells the same size, make use of the uniform() method. For instance, the two cells that contain a hamster image can be written as:
table.add(hamsty1).padTop(10f).expandY().uniform();
table.add(hamsty2).padTop(10f).expandY().uniform();
You can also change a cell's width through minWidth(), prefWidth(), and maxWidth(), whose combined effect can be achieved with the width() method.
By default, a table takes the preferred width of a widget. But if it does not fit to a cell bound, they are scaled down to a value between its preferred size and its minimum size. If the widget does not fit yet with its minimum size, it might overlap with some other elements of the scene.
A widget will never take up a bigger space than its maximum width, not even through fill methods. This is the same with the height. You can factor width and height functions with the size() method. Cells or parent widgets may determine the size of child widgets according to the available space.
Both padding and spacing allow the designer to insert extra space around the edges of a cell, but the particularity is that padding will join adjacent spaces while spacing will take the biggest value. The following diagram will help to make things clearer:
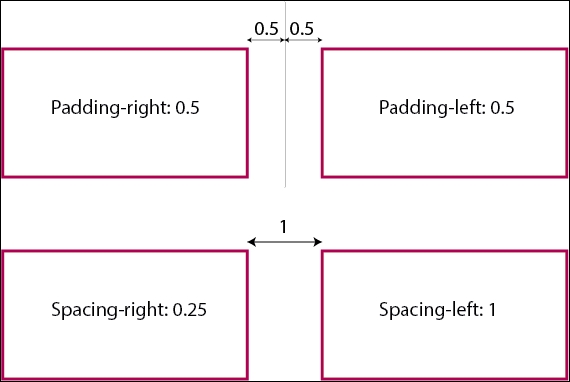
Some of the methods are space(), spaceTop(), padBottom(), padLeft(), and so on.
You can align a widget within the cell itself by calling the bottom(), right(), left(), and top() methods.
Whenever you want to have multiple columns, make use of the colspan() method. It receives the number of columns that a cell will take up as the argument.
The next screenshot shows a practical case:
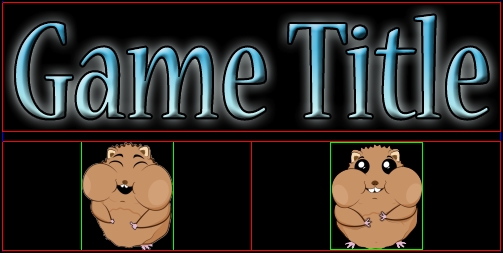
As you can see, each hamster's cell occupies one column, whereas the game title's cell occupies just one. However, the game title column takes up the space of two columns. So, all we have to do is order the game title cell to span two columns:
table.add(gameTitle).colspan(2);
The next step is to add a new row. This can be carried out through the row() method:
table.row();
Finally, set the hamsters' cells to span just one column:
table.add(hamsty1).colspan(1);
table.add(hamsty2).colspan(1);
Or simply, do not specify any colspan because it will take one column by default.
The Using ShapeRenderer for debug graphics recipe in Chapter 2, Working with 2D Graphics, explains some really powerful and useful debug tools. However, Scene2D comes with its own debug system that really helps to get the desired UI.
All you need to do is make use of the following function call after instantiating a Table instance:
table.debug(); //Enables debug
Apart from debug utilities, there are some more features to enrich your table and consequently your UI, so I recommend that you take a walk through the table API.