
Animation is not a new concept within our Libgdx set of cookbooks. Chapter 2, Working with 2D Graphics, guides you on how to manage sprite sheet-based animations, which is definitely the most common choice in general terms. However, it is not the only alternative, since there is commercial software that takes us through a more streamlined animation process, covering topics that range from the creation of animations to using them within your games.
This is the case of Spine, a popular skeletal animation editor created using Libgdx and offers runtimes for most of the programming languages in the market, adapting a lot of their variants to specific game engines/frameworks, where Libgdx is included too.
In Spine, you can create a hierarchy of bones you can animate using key frames and create interpolations between them. Textures can be attached to bones, resulting in smoothly animated characters. Spine also has a free license but doesn't allow exporting to .json or binary.
In this recipe, we will make an awesome hero come to life.
The code for this recipe is in the SpineSample.java file. It is important to have the following assets located:
data/spine/hero.json: This contains all the skeleton-related information, including bones, slots, skins, and animationsdata/spine/hero-1.png: This contains the graphics for the hero's default skindata/spine/hero.atlas: This splits the former file into atomic graphic elements such as arms, legs, and head
Do not forget to import the sample projects in order to run the Spine sample.
Before getting your hands dirty with code, we have to create our skeleton with the Spine editor. It includes a lot of options and, therefore, this single recipe would not be enough to provide a decent level of understanding over the tool. Fortunately, the official documentation at http://esotericsoftware.com/spine-documentation is rich and fulfills its duty beyond expectations.
It is divided into two big sections: editor and runtimes. The first one will teach you how to use the tool with text and videos. The second one shows you how to include your creations within your game.
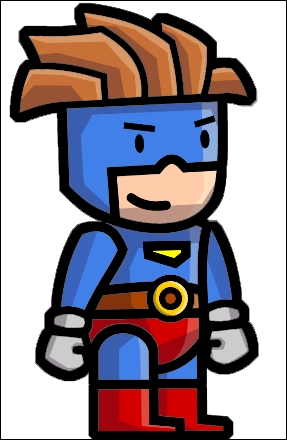
The following screenshot gives a face to our hero. Observe the supported animations on the right-hand side, and the ones worth being highlighted are idle, run, or punch as they will be mentioned later on.

- Once our artist's soul is reflected into several files, you can load your skeleton from a
.jsonor a binary file. We will work with the first of them because it is readable. This file will contain all the information related to bones, slots, skins, and animations. - Besides the
.jsonfile, we will need an.atlas(explained in Chapter 2, Working with 2D Graphics), so this is what we will begin with:void loadSkeleton (FileHandle skeletonFile) { String atlasFileName = skeletonFile.nameWithoutExtension(); FileHandle atlasFile = skeletonFile.sibling(atlasFileName + ".atlas"); TextureAtlasData data = new TextureAtlasData(atlasFile, atlasFile.parent(), false); TextureAtlas atlas = new TextureAtlas(data) { ... } SkeletonJson json = new SkeletonJson(atlas);The
SkeletonJsonclass will allow us to scale all the parts of our hero uniformly with the following method:json.setScale(.5f);
Then, the skeleton data is parsed from the
.jsonfile:SkeletonData skeletonData = json.readSkeletonData(skeletonFile);
- At this point, we have all input files under control, so we must feed other classes with them. First of all, let's create a
Skeletoninstance:Skeleton skeleton = new Skeleton(skeletonData);
Next, we can place it in a x, y position elsewhere in the screen, taking into account that we must project to screen coordinates just in case we are working with our own custom unit:
viewport.getCamera().project(point.set(SCENE_WIDTH * .5f, 0, 0));
skeleton.setX(point.x);
skeleton.setY(point.y);
After that, make sure to update the skeleton's transform component, which, in this step, refers only to its position:
skeleton.updateWorldTransform();
- To get a better idea about the current progress, let's just render it. First of all, declare and create an instance of
SkeletonRenderer:SkeletonRenderer renderer = new SkeletonRenderer();
Then, set one of the skins that you have previously created on the editor. For instance, the first one is as follows:
skeleton.setSkin(skeletonData.getSkins().first());
Finally, just draw it:
public void render() {
...
batch.begin();
renderer.draw(batch, skeleton);
batch.end();
The static hero will pose like this:
- The
skeletoninstance will internally hold animations that can be easily retrieved as follows:Animation idleAnimation = skeletonData.findAnimation("idle"); Animation runAnimation = skeletonData.findAnimation("run"); - However, handling animations individually is generally not the best approach. That is why an
AnimationStateinstance should be created:AnimationStateData stateData = = new AnimationStateData(skeletonData); AnimationState state = new AnimationState(stateData);
The
AnimationStateclass covers the concept of tracks, so animations are applied on top of each other according to its position.In this way, setting a specific animation becomes really simple; we just have to supply the number of the track, the animation name, and whether it should loop or not:
state.setAnimation(0, "idle", true);
This will require a string lookup. If you want to save it, just pass one of the previously created
Animationinstances, faster than a string lookup:state.setAnimation(0, idleAnimation, true);
In addition, animations can be queued so that they start when the end of the current one is reached:
state.addAnimation(0, "run", true);
It is necessary to update each
AnimationStateevery frame so it can keep track of the time:state.update(Gdx.graphics.getDeltaTime());
Then, apply such state to the skeleton and let it know that he should update its world transform since the scale, rotation, or translation of its bones might have changed:
state.apply(skeleton);
skeleton.updateWorldTransform();
- Spine also provides us with a powerful API to blend animations in order to get smooth transitions. All we have to do is specify how long it will take (in seconds) to finish the mixing between two animations:
stateData.setMix("run", "idle", 5f);Then, just set one after another and the transition will be magically made:
state.setAnimation(0, "run", true);
state.setAnimation(0, "idle", true);
- Be aware that sometimes you might want to clear all the tracks if you switch from a multiple-track action to a single-track one:
state.clearTracks();
In addition, you should bear in mind that whenever
Animationis set, bones' scale, rotation, or translation might change so the next one will start from that situation. If you want to reset the hero's position just write this:skeleton.setToSetupPose();
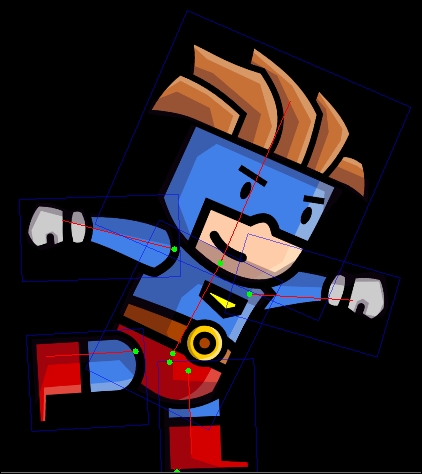
- Similar to Box2D library, you can visually highlight the bowels of Spine in your scene so that the debug process becomes quite easier. All you have to do is instantiate a debug renderer:
SkeletonRendererDebug debugRenderer = new SkeletonRendererDebug();
- Customize the visual information you want to receive:
debugRenderer.setBones(true);
debugRenderer.setRegionAttachments(true);
debugRenderer.setBoundingBoxes(true);
debugRenderer.setMeshHull(true);
debugRenderer.setMeshTriangles(true);
- Finally, draw it:
debugRenderer.draw(skeleton);
The resulting image will include all the debug information distinguished by different colors:
An overall explanation on how skeletal animations work is already given but analyzing the .json output of the Spine project can be of great help to get an in-depth idea.
As you would have expected, we will break down the hero.json file whose structure is divided into four big groups: bones, slots, skins, and animations.
The first of them looks like this:
{
"bones": [
   { "name": "root" },
   { "name": "hip", "parent": "root", "x": -14.77, "y": 219.55 },
   { "name": "torso", "parent": "hip", "length": 175.35, "x": 0.17, "y": 18.6, "scaleX": 1.228, "scaleY": 1.228, "rotation": 88.66 },
   ...
A quick look is enough to discover the importance of choosing a good self-explanatory name for each bone. In addition, some of them have a reference to another bone within its parent property. This means that any transformation performed over a bone will be inherited to its children, producing, in this way, a realistic response. In addition, some adjusts and constraints, such us rotation, length, scale or offset, are usually necessary so that the skeleton fits the target sprite perfectly.
The next section consists of slots and is basically in charge of linking a bone with a region from the atlas (attachment within this context). For instance, an arm or the torso:
"slots": [
   { "name": "left-arm", "bone": "left-arm", "attachment": "parts/left-arm" },
   { "name": "torso", "bone": "torso", "attachment": "parts/torso" },
...
The third group defines sets of visual appearance that fit the skeleton mechanics:
"skins": {
  "default": {
    "left-arm": {
      "parts/left-arm": { "x": 102.47, "y": 4.05, "scaleX": 0.813, "scaleY": 0.813, "rotation": 77.1, "width": 165, "height": 318 }
    },
  "torso": {
    "parts/torso": { "x": 49.59, "y": 5.11, "scaleX": 0.813, "scaleY": 0.813, "rotation": -88.66, "width": 276, "height": 333 }
    }
The name of the skin is default, and each inner entry refers to a previously defined slot. In this way, regions can take up the expected bone surrounding area.
Last but not least, a set of bone transformations composes the animations section:
"animations": {
  "run": {
    "bones": {
      "torso": {
        "rotate": [
         { "time": 0, "angle": -14.91 },
         { "time": 0.1333, "angle": -10.61 },
         { "time": 0.2666, "angle": -14.91 },
         { "time": 0.4, "angle": -10.61 },
         { "time": 0.5333, "angle": -14.91 }
    ],
      "translate": [
       { "time": 0, "x": -0.67, "y": -3.81, "curve": "stepped" },
       { "time": 0.2666, "x": -0.67, "y": -3.81, "curve": "stepped" },
       { "time": 0.5333, "x": -0.67, "y": -3.81 }
        ]
      }
...
As you can see, Spine stores bone transformations (rotations, translations, and scale) over time in order to join a group of them and create an animation.
The big advantage over traditional sprite sheet-based animations is that we are only storing a single image source file containing the graphics instead of the repetitive and massive amount of images to produce an animation.
The dirty work is made into a readable .json file with the necessary information to organize the former graphics into different animations.
We can even blend two animations so that the hero punches while running. This can be achieved by setting each animation to a different track number:
state.setAnimation(0, "run", true);
state.setAnimation(1, "punch", true);
This last feature can also be carried out by creating two AnimationState instances, setting each one to a different animation and applying them to the same Skeleton.