
Your current progress on the Scene2D topic allows you to develop a simple UI application without investing a huge effort. However, if you intend to program a more complex game with lots of UI shared assets, you will easily get yourself into a mess.
Skins are the wonderful solution to pack all your UI data into one simple JSON file adding to the aforementioned advantages of using an atlas.
As tends to happen with the data-driven approach, it requires an initial effort that turns into awesome commodities and facilities for the future.
The code for this recipe can be found in the SkinCustomizationSample class within the samples-core project. Please do not forget to visit it in order to run and play with the live example.
Skins can be created in two different ways, but both should make use of a TextureAtlas resource. The first one consists of loading a JSON file with the whole bulk of UI data. To help you to understand the process, an abstract syntax structure for this standard is shown here:
{
  Fully-qualified-Java-className: {
    Style-name: { Property-name: resource,
    …},
    …
  },
  …
}
Next is a real simple piece of an example JSON file:
{
  com.badlogic.gdx.scenes.scene2d.ui.TextButton$TextButtonStyle:{
    default:{
      down:default-round-down,up:default-round,font:default-font,fontColor:white},
    toggle:{
      down:default-round-down,up:default-round,checked:default-round-down,font:default-font,fontColor:white,downFontColor:red}
  },
  com.badlogic.gdx.scenes.scene2d.ui.Slider$SliderStyle:{
    default-horizontal:{
      background:default-slider,knob:default-slider-knob}
  },
  com.badlogic.gdx.scenes.scene2d.ui.CheckBox$CheckBoxStyle:{
    default:{
      checkboxOn:check-on,checkboxOff:check-off,font:default-font,fontColor:white}
  },
  …
}
As you can see, we are defining two different styles for TextButton with one of them named default, which means that if the style name is not specified in the code, this will be the default one. Unlike TextButtonStyle and CheckBoxStyle, SliderStyle is only defined for horizontal sliders.
It is not a coincidence that the properties of TextButtonStyle, for example, explicitly appear on the document. This is because Libgdx will build TextButtonStyle from those properties so that the style can be set to any TextButton. The same applies to any other type of widget.
If you want to familiarize yourself with the JSON skin definition, I highly recommend that you take a look at the uiskin.json file from the samples project. Be aware that such a file doesn't work on its own; it needs a uiskin.atlas, uiskin.png, and a .fnt file for each type of bitmap font defined. Here, you can see a Libgdx example uiskin.png file to make things clear:
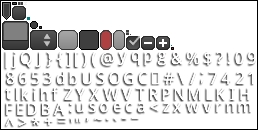
It contains all the necessary graphical data to cover the widgets' properties.
So, the process of creating, using, and disposing a skin through a JSON file is as follows:
- Create your
.jsonfile associating it to an atlas. - Instantiate a
skinclass in the code:skin = new Skin(Gdx.files.internal("data/uiskin.json")); - Pass that instance to the widgets' constructor:
titleLabel = new Label("Skin Customization", skin); button1 = new TextButton("SkinDefaultButton", skin); slider = new Slider(0f, 100f, 1f, false, skin); touchpad = new Touchpad(10f, skin); - Call the skin's
dispose()method:skin.dispose();
The preceding explanation is the most usual and recommended approach to deal with skins. However, you can still populate a skin programmatically by following these steps:
- Instantiate a skin through its no-parameters constructor:
skin = new Skin();
- Add regions from an atlas to your skin:
skin.addRegions(atlas);
- Generate a custom style for any widget:
TextButtonStyle textButtonStyle = new TextButtonStyle(); textButtonStyle.up = skin.getDrawable("white"); // Explained below textButtonStyle.down = skin.getDrawable("gray"); - Add it to your skin:
skin.add("myTextButtonStyle", textButtonStyle); - Use the custom style:
button2 = new TextButton("SkinTweakedButton", skin, " myTextButtonStyle "); - Call the skin's
dispose()method.
Now that you are almost in love with Skin, I will introduce you to its powerful and flexible methods to retrieve resources.
The first one is very similar to get() from AssetManager:
Texture icon = skin.get("icon", Texture.class);You can also make use of some methods to retrieve the built-in type objects:
TextureRegion region = skin.getRegion("caveman");
Sprite sprite = skin.getSprite("sprite1");
BitmapFont font = skin.getFont("arial");
Color blue = skin.getColor("blue");
NinePatch ninepatch = skin.getPatch("ninepatch1");
TiledDrawable tiledDraw = skin.getTiledDrawable("tiledDraw1");
Drawable drawable = skin.getDrawable("gun");
As you will have already realized, Drawable implementation types define all image properties belonging to styles (for example, the down property from TextButtonStyle), which gives the application the feature of using any region on any widget within the application.
Another advantage of skins is the facility to convert between Libgdx image formats. Consider the following code for example:
Drawable drawable = skin.getDrawable("caveman");
Texture texture = skin.get("caveman", Texture.class);
TextureRegon region = skin.getRegion("caveman");
// Same for the rest of types as detailed in the above example but with the caveman source fileThe Skin class doesn't waste your bytes by instantiating the same resource twice. On the contrary, the get() methods will just return a reference to the instance of the asset itself. This means that if you change any of its properties, the changes will become effective on the rest of the context where it is being used.
If you don't want to globally modify the style, make use of the newDrawable() method so you get a copy of the aforementioned instance. This function has a variant that allows you to color any image so that you can reuse it:
textButtonStyle.over = skin.newDrawable("white", Color.YELLOW);Imagine that you are developing a trilogy where different skins have been used for the first and second parts and you want to enrich your third and last one with a new skin made by combining the other two. It is as simple as the following code:
skin3.load(Gdx.files.internal("data/skin1"));
skin3.load(Gdx.files.internal("data/skin2"));
Another possibility covered here is removing a resource from the skin, which can be done as follows:
skin.remove("caveman", Texture.class);