Shaders can help us achieve a huge amount of visually interesting effects and give your games the extra something to impress users. This recipe will tackle a very basic implementation of a depth of field postprocessing effect, which will reinforce a cinematic feeling.
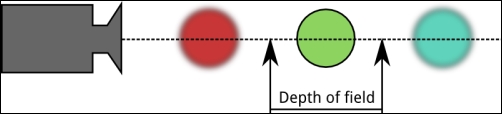
The term depth of field comes from film and photography and refers to the distance between the nearest and furthest objects in a scene that appear reasonably sharp. Lenses can focus at a single distance, and the sharpness of objects will decrease as they are positioned away from the point. The human eye itself also works in a similar manner, although it can dynamically adjust the focus point much more easily.
The following diagram illustrates the depth of field effect:
Computer graphics are not affected by this constraint, yet they constantly try to emulate it; why? The answer is rather simple; it gives the impression that a scene is being shown by a real-life camera lens rather than rendered as a computer simulation, which increases player immersion.
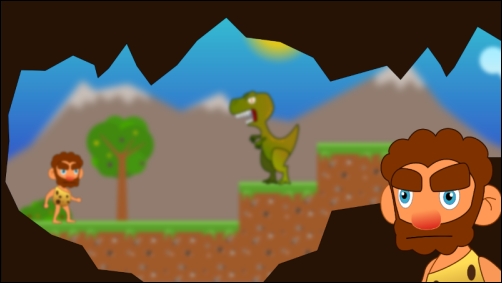
In this recipe, we will build a jungle scene where the camera focuses on a piece of the level and some characters. We will also have some blurred mountains in the distance and some blurred rocks right in front of the camera to give the impression that we are observing from inside a cave. A fragment shader implementing the Gaussian blur will be combined with frame buffers to create the effect. For further information, check http://en.wikipedia.org/wiki/Gaussian_blur.
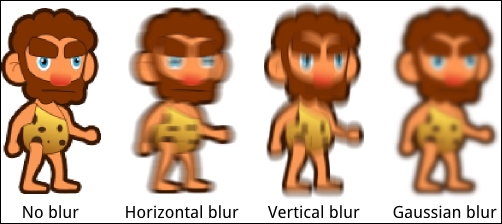
Quite a few concepts are needed to fully grasp the Gaussian blur. Long story short, a Gaussian blur can be achieved in two passes, a horizontal blur followed by a vertical blur. Find the process divided in the steps shown in the following diagram:
For the sake of simplicity, we will avoid using texture packing this time. All the PNGs needed to build the scene can be found in the [cookbook]/sample/sample-android/assets/data/blur folder. The two shader scripts used in this sample are:
[cookbook]/sample/sample-android/assets/data/shaders/blur.vert[cookbook]/sample/sample-android/assets/data/shaders/blur.frag
As usual, you need to import the sample projects into your Eclipse workspace.
Let's take a look at the blur.frag code as its vertex counterpart is exactly the same as in previous recipes, it just passes all the information with no modifications. First, we define varying variables for the color and texture coordinates that come from the vertex shader. Then, we add uniforms that will be set on Java's side. The texture to be used is set by Libgdx, but we also have the screen's resolution, radius of the blur effect in pixels, and dir (either horizontal or vertical):
varying vec4 v_color;
varying vec2 v_texCoord;

uniform sampler2D u_texture;
uniform float resolution;
uniform float radius;
uniform vec2 dir;
The main idea behind each fragment shader pass is to grab the current pixel along eight neighbors as far from the original pixel as the radius indicates, and mix them together using a set of predefined weights. The closer the neighbor is to the original pixel, the higher its impact is on the combined color.
The radius uniform comes in pixel units, but the texture2D() function uses values from 0.0 to 1.0, so we need to divide by resolution. The result is stored in the sum variable and finally assigned to gl_FragColor:
void main() {
  vec4 sum = vec4(0.0);
  vec2 tc = v_texCoord;

  // Number of pixels off the central pixel to sample from
  float blur = radius/resolution;
…
  // Blur direction
  float hstep = dir.x;
  float vstep = dir.y;
…
  // Apply blur using 9 samples and predefined gaussian weights
  sum += texture2D(u_texture, vec2(tc.x - 4.0*blur*hstep, tc.y - 4.0*blur*vstep)) * 0.006;
  sum += texture2D(u_texture, vec2(tc.x - 3.0*blur*hstep, tc.y - 3.0*blur*vstep)) * 0.044;
  sum += texture2D(u_texture, vec2(tc.x - 2.0*blur*hstep, tc.y - 2.0*blur*vstep)) * 0.121;
  sum += texture2D(u_texture, vec2(tc.x - 1.0*blur*hstep, tc.y - 1.0*blur*vstep)) * 0.194;

  sum += texture2D(u_texture, vec2(tc.x, tc.y)) * 0.27;

  sum += texture2D(u_texture, vec2(tc.x + 1.0*blur*hstep, tc.y + 1.0*blur*vstep)) * 0.194;
  sum += texture2D(u_texture, vec2(tc.x + 2.0*blur*hstep, tc.y + 2.0*blur*vstep)) * 0.121;
  sum += texture2D(u_texture, vec2(tc.x + 3.0*blur*hstep, tc.y + 3.0*blur*vstep)) * 0.044;
  sum += texture2D(u_texture, vec2(tc.x + 4.0*blur*hstep, tc.y + 4.0*blur*vstep)) * 0.006;

  gl_FragColor = sum;
}
The Java code lies within the BlurSample.java file. We have our typical camera, viewport, and batch accompanied by a bunch of Texture references to represent the objects in our scene.
To preserve alpha values, we blur out collections of objects that lie in a common plane rather than individual ones; so, we need to render them to FrameBuffer. Depth of field is achieved in two steps, and we cannot perform it directly onscreen as we might blur the wrong objects. This is why horizontal blur is performed on an additional offscreen buffer, and it goes through the vertical blur stage while being rendered onscreen:
private ShaderProgram shader;
private FrameBuffer fboA;
private FrameBuffer fboB;
The following diagram illustrates this process:

The create() method is used to instantiate all our members the way we have been doing, so check the sample code for specifics. However, take a look at how we initialize the uniforms in our shader between calls to its begin() and end() methods:
shader.begin();
shader.setUniformf("dir", 0.0f, 0.0f);
shader.setUniformf("resolution", VIRTUAL_WIDTH);
shader.setUniformf("radius", 0.0f);
shader.end();Remember to free all the allocated resources in the
dispose() method. This involves the sprite batch, both FBOs, the shader program, and all the textures.
The sky background will not be blurred, so it is rendered directly to the screen with the default shader. The mountain texture is the first layer that will be blurred, so we render it to fboA, and then call applyBlur(), which does the rest. The foreground and the characters are exactly what the camera is focusing on, so there is no need to blur them out. Finally, the cave is completely out of focus, so we repeat the same process we followed for the mountains:
public void render() {
…
  batch.begin();

  // Draw background as-is
  batch.setShader(null);
  drawTexture(background,  0.0f, 0.0f);
  batch.flush();

  // Draw blurred mountains
  fboA.begin();
  Gdx.gl.glClearColor(0.0f, 0.0f, 0.0f, 0.0f);
  Gdx.gl.glClear(GL20.GL_COLOR_BUFFER_BIT);
  batch.setShader(null);
  drawTexture(mountains, 0.0f, 0.0f);
  batch.flush();
  fboA.end();
  applyBlur(3.0f);

  // Draw foreground and characters without blur effect
  batch.setShader(null);
  drawTexture (foreground, 0.0f, 0.0f);
  drawTexture (caveman, 100.0f, 150.0f);
  drawTexture (dinosaur, 600.0f, 245.0f);
  batch.flush();

  // Draw blurred rock
  fboA.begin();
  Gdx.gl.glClearColor(0.0f, 0.0f, 0.0f, 0.0f);
  Gdx.gl.glClear(GL20.GL_COLOR_BUFFER_BIT);
  batch.setShader(null);
  drawTexture(rock, 0.0f, 0.0f);
  batch.flush();
  fboA.end();
  applyBlur(5.0f);

  batch.end();
}
The applyBlur() method takes the blur amount in pixels, and it applies the horizontal blur from fboA to fboB and the vertical blur from fboB to the screen. By now, you should be acquainted with how uniforms are set from the Java code using one of the setUniform() family methods:
private void applyBlur(float blur) {
  // Horizontal blur from FBO A to FBO B
  fboB.begin();
  batch.setShader(shader);
  shader.setUniformf("dir", 1.0f, 0.0f);
  shader.setUniformf("radius", blur);
  Gdx.gl.glClearColor(0.0f, 0.0f, 0.0f, 0.0f);
  Gdx.gl.glClear(GL20.GL_COLOR_BUFFER_BIT);
  drawTexture(fboA.getColorBufferTexture(),  0.0f, 0.0f);
  batch.flush();
  fboB.end();

  // Vertical blur from FBO B to the screen
  shader.setUniformf("dir", 0.0f, 1.0f);
  shader.setUniformf("radius", blur);
  drawTexture(fboB.getColorBufferTexture(), 0.0f, 0.0f);
  batch.flush();
}
When the same scene is rendered with a well-configured depth of field effect, the results are quite obvious and effective if the cinematic look and feel is what we pursue:
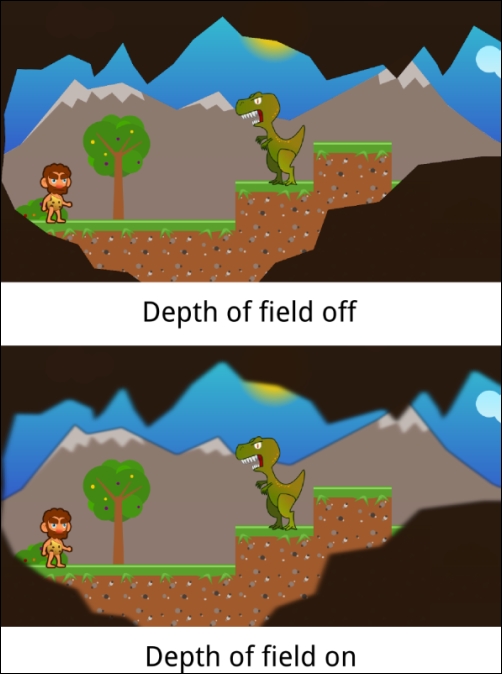
Truth be told, everything we have produced so far in this recipe can be obtained much more efficiently with pre-blurred textures. However, before you ask for your money back, give it some thought. Generating the depth of field effect as a postprocessing effect clearly has its perks because it enables us to change the plane the camera is focusing on whenever we please.
Taking the previous scene as an example; we can make the camera focus on the cave to show another caveman observing what is happening out there. Transitions between camera focus can be smoothed by interpolating the blur radius of each plane in the scene. This is a really powerful narrative tool, and tons of high-profile games, both 2D and 3D, make constant use of it.