
Shaders are small computer programs that give us more control over what is rendered by letting us communicate more closely with the GPU. This is a broad field and cannot be possibly covered in great detail within this book's scope, but nonetheless, it's absolutely essential to graphics programming. We will try to provide some introductory guidelines so as to start working with them; you can later check the several shader programming-specific books available.
Throughout this and the following recipes, we will dig into OpenGL Shading Language (GLSL). As a first contact, we will postprocess an image by adding the grayscale, sepia, and inverted color filters.
Once more, make sure the sample projects are ready to be used in your Eclipse workspace.
Shader scripts are loaded at runtime. For this recipe, you will need the following files:
[cookbook]/samples/samples-android/assets/data/shaders/grayscale.vert[cookbook]/samples/samples-android/assets/data/shaders/grayscale.frag[cookbook]/samples/samples-android/assets/data/shaders/sepia.vert[cookbook]/samples/samples-android/assets/data/shaders/sepia.frag[cookbook]/samples/samples-android/assets/data/shaders/inverted.vert[cookbook]/samples/samples-android/assets/data/shaders/inverted.frag
Here is what we will achieve in this recipe: kick off a Libgdx application that renders the jungle background we used in the past articles. As the user clicks or taps on the screen, we will cycle through a collection of shaders and apply them to the background. The example can be found in ShadersSample.java.
First, we define a constant containing the number of shaders:
private static final int NUM_SHADERS = 4;
At this point in time, rendering a simple texture should be straightforward. Precisely, we use the camera, viewport, batch, and background texture references. This time, we add an array of ShaderProgram references, a list of their names, and the index of the active shader in the array:
private ShaderProgram shaders[];
private String shaderNames[];
private int currentShader;
In the create() method, we construct and initialize our members. To create a ShaderProgram object, we need to pass in the file handles of the vertex shader and the fragment shader scripts. More details on these will follow. We do this for all our shaders, except for the first one, which we leave as null, which means no postprocessing will be done when this index is active.
Make sure you tell the input system to send input events to the main class with Gdx.input.setInputProcessor():
public void create() {
…

  shaders[1] = new ShaderProgram(Gdx.files.internal("data/shaders/grayscale.
vert"), Gdx.files.internal("data/shaders/grayscale.frag"));
  shaderNames[1] = "Grayscale";

…
}
ShaderProgram objects allocate resources that require to be freed once we stop needing them. In the dispose() method, we iterate the array, cleaning all the valid shaders:
public void dispose() {
  batch.dispose();
  background.dispose();

  for (ShaderProgram shader : shaders) {
    if (shader != null)
      shader.dispose();
  }
}
Our render method is exactly the same as the sprite batch example; we simply render our background normally.
The interesting bit comes in the touchDown() event because it's here that we set the active shader. Every time the user clicks on the mouse or touches the screen, we increment the currentShader index and call setShader() on batch. This tells the batch which ShaderProgram to use for rendering; the default is null:
public boolean touchDown (int screenX, int screenY, int pointer, int button) {
  currentShader = (currentShader + 1) % shaders.length;
  batch.setShader(shaders[currentShader]);

  Gdx.app.log("ShaderSample", "Switching to shader " + shaderNames[currentShader]);

  return true;
}Naturally, the interesting action takes place inside the shader scripts. Every ShaderProgram contains a vertex and a fragment shader, and each one of them must have a main() function.
- Vertex shaders: These operate on every vertex that is drawn. Each shader has associated extra information, such as a 3D point, color (RGBA), and a set of texture coordinates. Typically, they are more relevant in 3D applications, but they are also used in 2D, as mentioned in the Texture rendering with SpriteBatch recipe of Chapter 2, Working with 2D Graphics, to render images when we use quads (4-vertex polygons) with linked texture coordinates.
- Fragment shaders: These shaders are also known as pixel shaders because they operate on a per-pixel basis. After being run, they output an RGBA color.
The Libgdx default vertex shader projects the current vertex on the screen using the view matrix, while the default fragment shader uses the corresponding color from the bound texture for the current fragment.
The following diagram summarizes the basic shader pipeline:

The following code snippet corresponds to the grayscale vertex shader. As you can see, the syntax looks very much like that of C. Do not worry too much about the details as we will get into them later; just try to observe the code from an algorithmic point of view.
To summarize, the script takes the projection transform (u_projTrans), vertex position (a_position), texture coordinates (a_textCoord0), and color (a_color) as inputs, and it does calculations and passes the same parameters to the fragment shader.
The texture coordinates and color are passed along untampered. However, we need to transform the 2D space coordinates given by the batch to the 3D world space. This is why we apply the projection transform to obtain gl_Position:
uniform mat4 u_projTrans;

attribute vec4 a_position;
attribute vec2 a_texCoord0;
attribute vec4 a_color;

varying vec4 v_color;
varying vec2 v_texCoord;

void main() {
    gl_Position = u_projTrans * a_position;
    v_texCoord = a_texCoord0;
    v_color = a_color;
}
The fragment shader does a bit more work since it is the one that is actually responsible for transforming RGBA pixel colors into grayscale. It uses a texture sampler (u_texture), a color (v_color), and texture coordinates (v_texCoord) as inputs to produce the resulting pixel color (gl_FragColor).
Quite a few options are available when it comes to grayscale conversion. We can just take one of the RGB components or perform some blending between the three. Color perception and grayscale studies conclude that the best results are obtained when we blend and combine the components using the weights 0.299, 0.587, 0.114. The following image illustrates these three approaches:
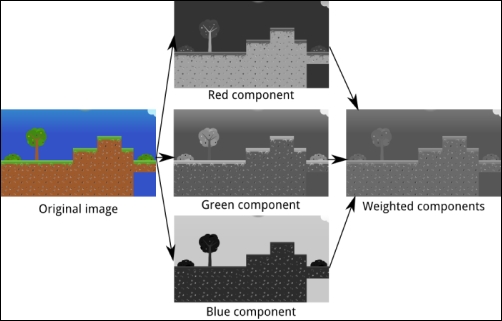
We define the weights in the grayScaleMultiplier three-element array constant and use the dot() function to combine it with texColor. As the name points out, the function calculates the dot product of two vectors. The result is a float value, which we set as the three components of the grayscale vector.
The color is obtained by calling texture2D() that takes the texture sampler and the coordinates and returns the corresponding pixel color. Finally, we set gl_FragColor as the RGB grayscale components and the alpha from the original pixel:
#ifdef GL_ES
precision mediump float;
precision mediump int;
#else
#define highp;
#endif

uniform sampler2D u_texture;

varying vec4 v_color;
varying vec2 v_texCoord;

const vec3 grayScaleMultiplier = vec3(0.299, 0.587, 0.114);

void main() {
  vec4 texColor = texture2D(u_texture, v_texCoord);
  vec3 gray = vec3(dot(texColor.rgb, grayScaleMultiplier));
  gl_FragColor = vec4(gray.r, gray.g, gray.b, texColor.a);
}Let's shed some light on the GLSL syntax and conventions so that it becomes a bit easier to understand simple scripts. For the complete language reference, refer to http://www.opengl.org/documentation/glsl.
Here is a list of the most essential data types used in GLSL:
float: The floating point valuevec2: This is a 2-component float array, typically used to represent 2D pointsvec3: This is a 3-component float array used to represent 3D points or RGB colorsvec4: This is a 4-component float array, typically used to store RGBA colorsint: The classic integervec2i,vec3i, andvec4i: These are the equivalents tovec2,vec3, andvec4, respectively, but they hold integers rather than float valuessampler2D: This is used to work with textures
There are several ways we can declare, initialize, and use variables of these types:
int a = 5;
float b = 5.5; // using 5 can result in a compile error
vec2 c = vec2(1.0, -4.4);
vec3 d = vec3(1.0, -4.4, 0.0);
vec3 e = vec3(c, 1.5); // from a vec2 and an additional component
vec4 f = vec4(1.0, 1.0, 1.0, 1.0);
vec4 f = vec4(e, 1.0); // from a vec3 and an additional component
vec4 g = vec4(1.0); // equivalent to vec4(1.0, 1.0, 1.0, 1.0);
Vectors are like low-level arrays, but can be accessed and assigned in interesting manners:
vec3 otherColor = color.rgb;
vec3 otherPosition = vector.xyz;
otherPosition.xy = otherPosition.yz; // swaps x and y components
vec2 texCoords = vector.st; // texture coordinates are given as stpq
float x = otherPosition.x;
float y = otherPosition[1];
The rgba, xyzw, and stpq accessors are always valid as long as they are not mixed up together.
Constants have to be declared using the const keyword before the data type; this works exactly as in other languages, such as C++.
Vertex attributes are read-only variables set by external systems to be used by the vertex shader. Keep in mind that they are provided on a per-vertex basis, not globally for all vertices. They are defined with the attribute keyword preceding the type.
Uniforms are read-only variables that are set from Java code and can be retrieved from either the vertex or the fragment shader, but not both. These are set globally and affect all vertices and fragments. To declare one, we just need to add the uniform keyword before the type. In our grayscale fragment shader, we have the u_projView uniform, which is set by the SpriteBatch and takes the value of its combined transformation matrix. Remember how we used to set it using the camera matrix?
This is a really powerful feature as we can dynamically modify the result of our shaders using application states such as user input and time, among many others.
Android, WebGL, and iOS use an OpenGL variant called OpenGL ES, which is aimed at embedded hardware. Most of the time, there is no need to worry about this, but shaders is one of the most sensitive topics.
OpenGL ES forces us to specify the precision of our float, int, and derived arrays in the fragment shader. The three different precision types that exist are lowp, mediump, and highp. Obviously, the greater the precision, the better the results for finely grained calculations, but at a significant computational cost. Some devices do not even support highp.
The classic OpenGL does not use precision qualifiers, but the syntax accepts them just to maintain compatibility with the mobile version. Therefore, we need to take special care of the desktop version. We can use preprocessor directives to tell the GLSL compiler which precision we want to use by default. Preprocessor directives, just like in C/C++, are resolved at compile time and can strip out code.
The following code snippet tells the compiler to use the mediump precision for both int and float types, when under OpenGL ES. If the shaders are being compiled under OpenGL, both lines will be completely taken out.
#ifdef GL_ES
precision mediump float;
precision mediump int;
#else
#define highp;
#endif
Check the official OpenGL ES documentation for further information at http://www.khronos.org/opengles.
Now that you have a better overview of the basics of shaders, you might want to take another look at the How to do it… section of this recipe.
Many interesting effects can be achieved just by tweaking the color components of a fragment with simple operations. In this section, we will cover two additional shader programs: a sepia filter and inverted colors.
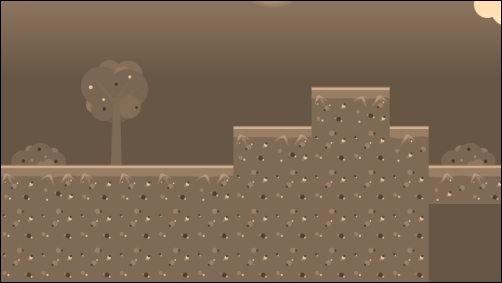
Sepia is a brownish color, represented in our script by the vec3(1.2, 1.0, 0.8) constant. We get the fragment color, convert it to grayscale, multiply it by sepia, and use it to set gl_FragColor. This can be used to give your game a vintage style:
uniform sampler2D u_texture;

varying highp vec4 v_color;
varying highp vec2 v_texCoord;

const vec3 grayScaleMultiplier = vec3(0.299, 0.587, 0.114);
const vec3 sepia = vec3(1.2, 1.0, 0.8);

void main() {
  vec4 texColor = texture2D(u_texture, v_texCoord);
  vec3 gray = vec3(dot(texColor.rgb, grayScaleMultiplier));
  gl_FragColor = vec4(gray * sepia, texColor.a);
}
After running it, you should see something similar to the following screenshot:
Inverting the colors of an image does not produce very pleasant results, but this might very well be your intent, depending on the situation. In this case, we grab the fragment color from the texture and calculate its inverse. Knowing that RGB components range from 0.0 to 1.0, we can do the following:
uniform sampler2D u_texture;

varying highp vec4 v_color;
varying highp vec2 v_texCoord;

void main() {
  vec4 texColor = texture2D(u_texture, v_texCoord);
  vec3 inverted = 1.0 - texColor.rgb;
  gl_FragColor = vec4(inverted.r, inverted.g, inverted.b, texColor.a);
}
Feel free to check how inverted colors can be painfully beautiful!
