
As your project grows in size and complexity, more bugs and glitches will appear. Regardless of how brilliant you are, this is inevitable. Traditional debugging techniques such as logging and stepping through code instructions are extremely helpful, but sometimes they are not the best when it comes to detecting issues in visually rich real-time applications, such as video games. This is especially true when you have many game objects on screen, which could lead to conditional breakpoints hell.
Sometimes it is a lot easier just to render some extra information on top of the game world. When you think your entities are not drawn at the right places, why not add a grid showing the world axis and units? Maybe adding circles at the agent's coordinates would help in narrowing the problem down. Imagine that the enemies in your top-down action game are moving in a strange way, why not draw their paths as line segments to find out whether the problem lies within the path finder or the path follower code?
Debug graphics can be a true life saver.
In this recipe, we will wield the tools Libgdx provides to add debug rendering in order to detect potential problems. The scope does not allow us to have a real-life game with debug graphics on. Instead, we will draw geometric shapes at arbitrary positions to illustrate how the system works. Later on, you can wire the procedure into your game to show useful information about your entities.
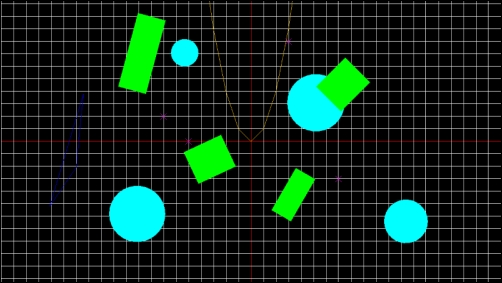
We will render the following:
- A grid showing the world axis
- Some circles, rectangles, and triangles
- The y = x2 function formed by line segments
- Arbitrary points
Obviously, you will not want to show all the available debug information at all times because it will clutter the screen rather quickly. In our example, the user will be able to toggle between several options to select what they want to display.
To follow this recipe, make sure the sample projects are already set in your Eclipse workspace.
For this recipe, you will find an example in the ShapeRendererSample.java file, which is nothing more than our classic ApplicationListener implementation.
First of all, we define some members that will help us with our debug graphics endeavor. We need OrthographicCamera, a viewport, and a ShapeRenderer object, which will actually do the heavy lifting:
private OrthographicCamera camera;
private Viewport viewport;
private ShapeRenderer shapeRenderer;
In order to enable rendering of different bits, we have a set of Booleans that will change the value on user key presses:
private boolean drawGrid = true;
private boolean drawFunction = true;
private boolean drawCircles = true;
private boolean drawRectangles = true;
private boolean drawPoints = true;
private boolean drawTriangles = true;
Finally, we have an array of floats that will contain the data for the y = x2 function. There is no need to allocate and calculate the array every time:
private float debugFunction[];
In the create() method, we instantiate our camera, viewport, and shapeRenderer objects.
We also create the array of floats and initialize its values. We are going to draw the function in the interval [-10, 10], and the required format asks for pairs of (x, y) values. That is why we need to allocate memory for 40 elements. The loop simply iterates the array inserting the function values.
Lastly, we set the camera position to be the origin, log the instructions to toggle the various options, and tell Libgdx we want ShapeRendererSample to capture input events through the Gdx.input.setInputProcessor() method:
public void create() {
   ...

   shapeRenderer = new ShapeRenderer();

   debugFunction = new float[40];

   for (int x = -10; x < 10; ++x) {
      int i = (x + 10) * 2;
      debugFunction[i] = x;
      debugFunction[i + 1] = x * x;
   }

   ...
}
The ShapeRenderer class implements the Disposable interface, and that hints that it requires us to do some cleanup when we stop needing it. In our case, we call its dispose() at the end of the application life cycle:
public void dispose() {
   shapeRenderer.dispose();
}
The actual debug rendering takes place in the drawDebugGraphics() function, which gets called from render. First, we inform our shapeRenderer about the camera projection matrix, so it knows how to transform the coordinates for the elements we pass in world space to screen space:
shapeRenderer.setProjectionMatrix(camera.combined);
The ShapeRenderer class works in a similar way to SpriteBatch, in that we need to enclose our render operations between calls to begin() and end(). However, now we also need to declare the ShapeType we are going to use when we begin the render process. It is possible to make ShapeRenderer use a specific color with the setColor() method.
First of all, we render our grid as long as drawGrid is set to True, for which we call begin() passing in the ShapeType.Line mode. The axis will be drawn in red while the rest of the lines will be drawn in white. For every line, we call the line() method, which takes four floats representing the two points needed to define a segment: x1, y1, x2 and y2. In the example source code, you will also find two for loops to render the horizontal and vertical lines of the grid:
if (drawGrid) {
   shapeRenderer.begin(ShapeType.Line);

   shapeRenderer.setColor(Color.RED);
   shapeRenderer.line(-SCENE_WIDTH, 0.0f, SCENE_WIDTH, 0.0f);
   shapeRenderer.line(0.0f, -SCENE_HEIGHT, 0.0f, SCENE_HEIGHT);

   ...

   shapeRenderer.end();
}
If drawFunction is True, we start a new draw operation with ShapeType.Line. We could have used the line() method in a loop again and manually sent the segments that conform the function. Luckily, we can just pass in an array of floats (with x, y pairs) to the polyline() method:
if (drawFunction) {
   shapeRenderer.begin(ShapeType.Line);
   shapeRenderer.setColor(Color.ORANGE);
   shapeRenderer.polyline(debugFunction);
   shapeRenderer.end();
}We continue by rendering a few circles at arbitrary places. This time, we use ShapeType.Filled in the begin() method to draw solid circles, not just the contours. Then, we call circle() passing the point (x, y), the radius, and the number of segments to approximate the circle shape:
if (drawCircles) {
   shapeRenderer.begin(ShapeType.Filled);
   shapeRenderer.setColor(Color.CYAN);
   shapeRenderer.circle(5.2f, 3.1f, 2.3f, 30);
   ...
   shapeRenderer.end();
}For the rectangles, we will also use ShapeType.Filled. The rect() method counts with several versions, but in our case, we pass the bottom-left corner of the rectangle (x, y), the dimensions (width, height), the origin in case we rotate it (x, y), and the rotation in degrees. The origin is relative to the bottom-left corner of the rectangle:
if (drawRectangles) {
   shapeRenderer.begin(ShapeType.Filled);
   shapeRenderer.setColor(Color.GREEN);
   shapeRenderer.rect(7.2f, 2.4f, 3.3f, 2.8f, 0.0f, 0.0f, 45.0f);
...
   shapeRenderer.end();
}The ShapeRenderer class also helps us visualize points with more than single pixels; you can use ShapeType.Line and the x() method to draw two crossing-line segments at the specified coordinates (x, y) with the given radius:
if (drawPoints) {
   shapeRenderer.begin(ShapeType.Line);
   shapeRenderer.setColor(Color.MAGENTA);
   shapeRenderer.x(-5.0f, 0.0f, 0.25f);
...
   shapeRenderer.end();
}Finally, we can also draw triangles. In this case, we only want the outline, so we use the ShapeType.Line mode. The triangle() function takes six arguments representing three points: x1, y1, x2, y2, x3, and y3:
if (drawTriangles) {
   shapeRenderer.begin(ShapeType.Line);
   shapeRenderer.setColor(Color.BLUE);
   shapeRenderer.triangle(-16.1f, -5.2f, -14.0f, -2.1f, -13.4f, 3.8f);
   shapeRenderer.end();
}The keyDown() method is called every time the user presses a key. Inside, we check whether keycode matches one of the keys we are interested in and change the value of the corresponding boolean:
public boolean keyDown (int keycode) {
   if (keycode == Keys.G) {
      drawGrid = !drawGrid;
   }
   else if (keycode == Keys.F) {
      drawFunction = !drawFunction;
   }
   else if (keycode == Keys.C) {
      drawCircles = !drawCircles;
   }
   else if (keycode == Keys.R) {
      drawRectangles = !drawRectangles;
   }
   else if (keycode == Keys.P) {
      drawPoints = !drawPoints;
   }
   else if (keycode == Keys.T) {
      drawTriangles = !drawTriangles;
   }

   return true;
}
The result is not pretty, but it will surely help you debug your games and live more comfortably:
The ShapeRenderer class draws shapes in batches to increase performance, very much like SpriteBatch. You can gather together all your shapes and send them all at once to the graphics card as long as you group them between the begin() and end() method invocations. Remember that it is significantly faster to send a lot of information to the GPU once rather than communicating many times with small sets of instructions.
In this case, it is not possible to bundle shapes using different draw methods: ShapeType.Line, ShapeType.Point, or ShapeType.Filled. This is because, internally, ShapeRenderer uses the OpenGL primitive draw methods, and these force you to send either points, segments, or triangle strips. The ShapeRenderer class is not extremely fast, but you should not worry because this is only intended to be used for debug graphics anyway. Ideally, debug graphics code should be disabled somehow or stripped away in release builds.
Other shapes are available from ShapeRenderer; the complete collection adds arcs, cones, ellipses, and polygons with an arbitrary number of vertices:
void arc(float x, float y, float radius, float start, float angle);
void cone(float x, float y, float z, float radius, float height);
void ellipse(float x, float y, float width, float height);
void polygon(float[] vertices);
- Logging and debugging an application in Eclipse are covered in the Understanding the project structure and application life cycle recipe in Chapter 1, Diving into Libgdx
- If you want to know more about what is going on under the hood, you may be interested in the Profiling your application using Visual VM recipe