
Creating Texture objects from different image files and rendering them with SpriteBatch is the most straightforward way of building scenes with Libgdx. However, it is far from being the most efficient one. Games are real-time, performance-critical applications, and writing efficient systems becomes even more important when dealing with resource-limited platforms such as tablets, phones, or browsers.
Surely drawing a handful of individual images is not going to make a massive impact when running the game on a high-end phone with a dedicated GPU. However, the landscape can rapidly change the second we add different backgrounds, dozens of different characters on screen, particle effects, and so on.
Luckily enough, it is fairly simple to set up our assets and rendering process so that it does the job amazingly fast. The key concept here is drawing thousands of little chunks from a massive texture is preferable than a few individual images. We will first pack all our game textures in a single big image so that we can then just draw portions of it.
The code for this recipe is in the TextureAtlasSample.java file within the [cookbook]/samples folder. Make sure you have imported all the projects contained within the aforementioned directory.
As part of the recipe, we are going to pack a collection of PNG images into a single one. The individual images can be found in the [cookbook]/samples/art/textureatlas folder. It contains a big background, our old friend the caveman, and a dangerous dinosaur.
Let's split the problem in two parts. First of all, we are going to pack our individual textures into a single one. These uber textures are better known as atlases and come with a text file to specify the rectangles that map to our old individual images. Secondly, we will show how to use SpriteBatch to render sections of an atlas (TextureRegion) rather than complete Texture objects.
Fortunately, there are quite a few options when it comes to packing textures. The most common ones are:
- texturepacker-gui: This option is written in Libgdx, which can be downloaded for free and is completely open source. It is available at https://code.google.com/p/libgdx-texturepacker-gui/downloads/list.
- TexturePacker: This option is commercially distributed but supports a wider variety of atlas file formats, so it can be used outside Libgdx. It is available at http://www.codeandweb.com/texturepacker.
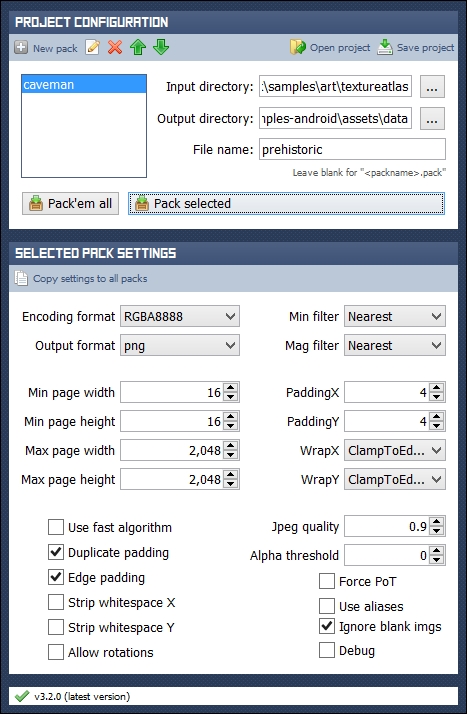
However, for availability reasons, we are going to use the first of the two as it is more than enough for our purposes. They are both very similar anyway. The next screenshot shows the texturepacker-gui interface:
The following steps will help you pack your textures into an atlas:
- Download the ZIP file, unpack it, and run the
gdx-texturepacker.jarfile. - Click on the New pack button and enter a name; for our example, we have used
caveman. - Select the Input directory where all the images are located.
- After that, proceed to select the Output directory where the uber texture and the atlas file will be saved. In our case, that is
[cookbook]/samples/samples-android/assets/data. Remember that internal assets need to be located under theassetsfolder in the Android project. - Finally, select the File name value. This affects both the texture and the atlas file, which will adopt the
name.atlasandname.png/name.jpgnames, respectively.The lower panel helps us configure the packing process.
- First of all, you can pick between PNG or JPG images with the Output format dropdown; although for 2D games, PNG compression offers better results most of the time.
- On the right, you can use the Min filter and Mag filter dropdowns to determine what filter will be applied to the uber texture once it has been loaded in Libgdx.
- Further down, you will find inputs to determine the allowed texture sizes. OpenGL 1 users need to tick the Force PoT checkbox. This is because, prior to OpenGL 2.0, every texture size needed to be a power of two (POT). Even though Libgdx now only runs on OpenGL 2.0 or later, it is still advisable to use POT textures, as some features require it.
- The PaddingX and PaddingY options establish the separation in pixels along the x and y axes between textures in the packed texture. When you also tick Duplicate padding and Edge padding, textures are extruded filling the separating space. This helps avoid rendering artifacts caused by interpolation issues.
- The Allow rotations option becomes very useful when you are trying to pack too many textures, and the available space starts running short. Rest assured, they are automatically rotated back at load time.
- Tick Debug if you want the software to render pink lines delimiting textures. This could be helpful to make sure the process has completed without any errors.
- Once you are done tweaking the options, click on the Pack'em all button and both the new texture and the atlas text file will appear in the selected output folder.
You should have obtained something like the following screenshot:

We are going to examine the TextureAtlasSample code to discover how to render atlases so as to achieve a much better performance.
Our TextureAtlasSample needs several members to make the atlas magic happen. You are already acquainted with the camera, viewport, and batch trio. We now introduce the TextureAtlas class, which is used to hold the master texture data along with all its metadata to identify its portions. Each one of the members of type TextureRegion will help us cache our original images to treat them individually:
private OrthographicCamera camera;
private Viewport viewport;
private SpriteBatch batch;
private TextureAtlas atlas;
private TextureRegion backgroundRegion;
private TextureRegion cavemanRegion;
private TextureRegion dinosaurRegion;
The create() method is the place to load our texture atlas and fetch the references to the regions we are interested in. The TextureAtlas class constructor is identical to the Texture one, except that we now pass the .atlas file the packer software we created rather than the path to the image file. To initialize our regions, we call the findRegion() method of the TextureAtlas class passing in the name of the original image without its extension:
public void create() {
   ...

   // Load atlas and find regions
   atlas = new TextureAtlas(Gdx.files.internal("data/prehistoric.atlas"));
   backgroundRegion = atlas.findRegion("background");
   cavemanRegion = atlas.findRegion("caveman");
   dinosaurRegion = atlas.findRegion("trex");
}
Atlases allocate memory to hold their associated texture data very much like Texture objects do. Therefore, it is polite to clean them up whenever we stop using them. Since we will render our images for as long as the example runs, we can only do this right before exiting, in the dispose() method:
public void dispose() {
   batch.dispose();
   atlas.dispose();
}
Finally, let's take a look at the pretty bit, the render() method. As in any classic Libgdx application, we clear the screen with a background color and set the camera combined matrix to SpriteBatch to appropriately transform our draw calls. To render the background centered on the screen, we first get its dimensions with the getRegionWidth() and getRegionHeight() methods. The camera is centered at (0, 0), so we need to render the background at negative half its width and negative half its height for it to also be centered.
The SpriteBatch class has quite a collection of overloaded draw() methods suitable for regions. In our case, we will go through the most complete one to illustrate all the possibilities. First of all, we pass in the region followed by its position in world units. Then, we indicate the local origin of the region starting from its bottom-left corner. Now, we need to specify the dimensions of the region and the scale along both its axes (remember that you need to convert from world units to screen units here). Finally, we pass in the rotation in degrees:
public void render() {
...
batch.begin();
float width = backgroundRegion.getRegionWidth();
float height = backgroundRegion.getRegionHeight();
float originX = width * 0.5f;
float originY = height * 0.5f;
batch.draw(backgroundRegion,
-originX, -originY,
originX, originY,
width, height,
WORLD_TO_SCREEN, WORLD_TO_SCREEN,
0.0f);
// Render caveman and dinosaur at different positions
...
batch.end();
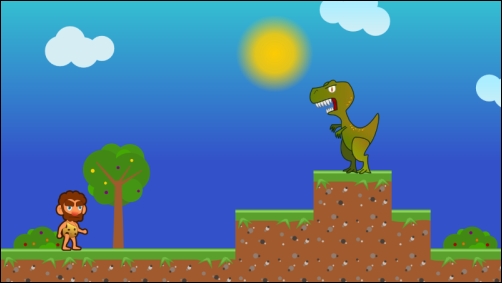
}The result, shown in the following screenshot, is a tricky situation for our caveman, since there is a dangerous-looking dinosaur staring right at him. As an exercise, you could render a crowded scene with both approaches, simple textures and atlases, measure the time it takes in each case, and see for yourself how much faster atlases are.
Now that we have tackled how to make rendering more efficient, we are going to look at some of the mechanisms behind the principles we have built upon. First of all, we will learn how atlas files are structured, then we will see why atlases help with performance, and finally, we will comment on some of the limitations the approach presents.
Take a look at this excerpt of the prehistoric.atlas file under the [cookbook]/sample/samples-android/assets folder:
prehistoric.png
format: RGBA8888
filter: Nearest,Nearest
repeat: none
caveman
  rotate: false
  xy: 1283, 320
  size: 83, 156
  orig: 83, 156
  offset: 0, 0
  index: -1
Nothing surprising, really; everything comes from what we established in the packer settings. The first line points to the master texture, which should be distributed along the atlas file. Then, the pixel format is specified; in this case, we tell Libgdx that the texture uses 8 bits per channel (red, green, blue, and alpha). Right after comes the filter to use when the image is downscaled and up-scaled respectively, and whether or not the texture should be repeated.
What follows is a list of the regions that compose the master texture. Every region starts with a name that is equal to that of the original texture minus the extension. Then, we can find parameters such as dimensions, position in the master texture, origin in the region local space, and offset between regions. Regions can be rotated to optimize space usage, which is also specified in the parameters.
The SpriteBatch class serves as an intermediary between your game code and the OpenGL API, which then communicates directly with the GPU. When you render a texture through a batch, the latter creates a quad and associates a set of texture coordinates to each one of the vertices that form the quad. As you keep rendering the same texture over and over again at different positions, the mesh of quads will grow. The moment you call the SpriteBatch end() method, the quads and their texture data are sent to OpenGL and, at last, rendered on the screen.
However, and here is the secret, every time you tell the batch to draw a different texture, it has to flush the previously built mesh to OpenGL and start from scratch. This is known as texture swapping and is a time-consuming operation. Now it becomes clearer how using a bigger texture and only drawing portions of it as we see fit can make such a great difference.
Imagine you have a background and 10 characters on screen. If each one of the entities has its own texture, the batch will need to swap textures nine times per frame and perform an additional flush operation after the call to end(). Nevertheless, if all those textures are packed, there will be exactly 0 texture swaps and only one draw call to OpenGL.
Note
We cannot forget that master textures take less disk space than individual images. While this may not be a huge deal on desktop, it becomes key for handheld devices. Bear in mind that phones tend to have less memory and download sizes are critical when not connected to a Wi-Fi network. Texture atlases are a win-win approach.
The biggest drawback of texture packing and atlases is that we cannot just sew all our game textures together regardless of the total size. The maximum supported texture size varies across devices and it can be queried using Gdx.gl20.GL_MAX_TEXTURE_SIZE:
int maxSize = Gdx.gl20.GL_MAX_TEXTURE_SIZE;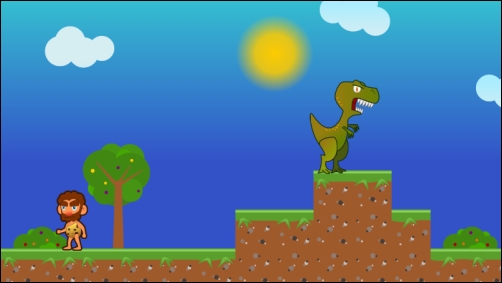
Gdx.app.log("TextureAtlasSample", "Max texture size: " + maxSize + "x" + maxSize);Remember how you can flip Texture objects when drawing through a SpriteBatch? You can also achieve the same effect with the TextureAtlas flip() method. It takes two Booleans, one per axis, horizontal and vertical respectively. Now add the following lines to our sample:
public void create() {
   ...

   // Flip caveman and dinosaur
   cavemanRegion.flip(true, false);
   dinosaurRegion.flip(true, false);
}
We would get the results shown in the following screenshot:
The SpriteBatch class also has several methods to draw TextureRegion objects; check the documentation at http://libgdx.badlogicgames.com/nightlies/docs/api/com/badlogic/gdx/graphics/g2d/SpriteBatch.html for the complete list.
Texture packing can be done programmatically with the gdx-tools extension. Every time we run our game, individual textures can be packed into atlases. This can streamline the content pipeline when developing a game, sparing us from having to manually generate the atlas. Read more about the TexturePacker class at the following URL: