
Once you go through this recipe, you will be able to enjoy Libgdx in all its glory and start developing games for all the supported platforms.
Let's begin with a short disclaimer. For the most part, Libgdx relies on open source software that is widely available at no cost. This means that anyone can target desktops, Android, and browsers using a Windows, Mac, or GNU/Linux distribution. The only restriction applies to iOS, for which you will specifically need a Mac. Moreover, if you wish to test your work on a real device, an Apple developer account is essential and further costs apply.
You need to be aware of the operating system version you will use to pick the right versions of the software packages we will install. The main explanation thread will focus on Windows 8 64-bit, but further comments will be provided whenever there are differences across systems.
Here is our little software shopping list:
- Java Development Kit
- Eclipse IDE
- The Gradle plugin for Eclipse
- Android SDK, only for those who want to target Android devices
- The RoboVM plugin for Eclipse, only if you want to target iOS
- XCode, only for Mac users that want to target iOS
Libgdx is based on Java, and therefore, Java Development Kit is a requirement. The installation step is as follows:
Go to Oracle's download site, http://www.oracle.com/technetwork/java/javase/downloads, and click on the latest release of Java SE Development Kit that corresponds to your operating system. Note that you need to differentiate between the x86 and x64 builds.
Perform the following installation steps:
- Run the installer and follow the provided instructions. The process is quite straightforward, but when using Windows, you will have to remember the destination folder you picked; the default folder is
C:Program FilesJavajdk_version. - You need to tell the system where the JDK is located.
- If you are under Windows, right-click on My Computer, click on System Properties, access the Advanced section, and click on Environment Variables. Select New, and enter
JAVA_HOMEas the name and your installation path as a value. In my case, the value isC:Program FilesJavajdk1.7.0_45. - Mac users will have to edit their
~/.bash_profilefile and add the following:export JAVA_HOME=`/usr/libexec/java_home –v 1.7`
Perform the following installation steps:
- Move the downloaded package to the desired installation folder and decompress it. You can do this from a desktop environment or the much more classic console. We will assume the file is
jdk-7u45-linux-x64.gz; it's in the~/Downloadsdirectory, and the installation folder is~/dev/jdk1.7.0_45:mkdir –p ~/dev/jdk cd ~/Downloads tar –xzvf jdk-17u45-linux-x64.gz mv jdk1.7.0_45 ~/dev rm jdk-7u45-linux-x64.gz
Tip
Downloading the example code
You can download the example code files for all Packt books you have purchased from your account at http://www.packtpub.com. If you purchased this book elsewhere, you can visit http://www.packtpub.com/support and register to have the files e-mailed directly to you. This book is full of rich working examples you can experiment with. Access the following link to download the most up-to-date version: https://github.com/siondream/libgdx-cookbook.
- In GNU/Linux, the system also needs to know where the JDK is. In order to do so, open the
~/.bashrcfile with your text editor of choice and add the following at the bottom:export JAVA_HOME=$HOME/dev/jdk1.7.0_45 export PATH=$PATH:$JAVA_HOME/bin
- Close the file, and run the following command to reload the user configuration:
source ~/.bashrc
Eclipse is the most popular IDE for Libgdx game development, and it is thus the one we will focus in this book. If it is not of your liking, you can use IntelliJ IDEA, Netbeans, or any editor along the command line. Perform the following installation steps:
- Go to the Eclipse downloads section at http://www.eclipse.org/downloads and select Eclipse Standard. The Eclipse 4 codename, Juno, is the minimum version needed to use the required plugins.
- Simply pick the right version for your operating system and wait for it to download; be wary that it is also 32/64-bit sensitive.
- Once this is complete, extract the compressed file where you want to use Eclipse from and you will be done.
- From a GNU/Linux system, you can do the following:
cd ~/Downloads
tar –xzvf eclipse-standard-kepler-SR1-linux-gtk-x86_64.tar.gz
mv eclipse ~/dev
rm eclipse-standard-kepler-SR1-linux-gtk-x86_64.tar.gz
Follow these instructions to install Android Development Kit, which is essential to target Android devices:
- Access the download page at http://developer.android.com/sdk.
- Scroll down and unfold the View all downloads and sizes section and, again, choose your operating system from the SDK Tools Only section. Google has an easy-to-use installer for Windows users, so if you want to be spared part of the hassle, use the installer.
- The installer is really simple. Limit yourself to follow the instructions, and if JDK is properly added to the environment variables, everything should be completely smooth. The installation folder does not really matter.
Unzip the package wherever you want, as long as you tell the system where it is. Again, this is done by editing the ~/.bash_profile file and adding something similar to this:
export PATH=$PATH:/dev/android-sdk-mac_x86_64/tools
export PATH=$PATH:/dev/android-sdk-mac_x86_64/platform-tools
Perform the following installation steps:
- Unzip the package, move it to the desired installation folder, and add the export location to the
PATHenvironment variable. The commands needed will be something similar to this:cd ~/Downloads tar –xzvf android-sdk.r22.2.1-linux.tgz mv android-sdk-linux ~/dev rm xzvf android-sdk.r22.2.1-linux.tgz
- Just like with JDK, edit the
~/.bashrcfile and add the following lines at the end:export PATH=$PATH:~/dev/android-sdk-linux/tools export PATH=$PATH:~/dev/android-sdk-linux/platform-tools
- Again, close the file and reload the
~/.bashrcfile:source ~/.bashrc - After this, go to to the Android SDK folder and run SDK Manager, which will help us install specific packages. On GNU/Linux, you first need to give execution permissions to the user on the SDK folder:
cd ~/dev/android-sdk-linux
chmod –R 744 *
Perform the following steps:
- Create an
ANDROID_HOMEenvironment variable pointing to the root of Android SDK. This is done the same way as we did with theJAVA_HOMEvariable in the previous section. - Run SDK Manager found in the
toolsfolder. GNU/Linux users need to run an Android executable. - Several Android SDK tools will appear selected by default; leave them selected. The Google USB driver is not compatible with GNU/Linux, but you should select it if you can.
- The SDK tool corresponding to the latest Android version available will be ticked as well. Feel free to choose whichever SDK you prefer, but keep in mind that Libgdx requires Android 2.2 or later.
- Regardless of the Android version you pick, it is always advisable to consider backwards compatibility so as to reach as wide an audience as possible. As a developer, you will want to be thorough when it comes to testing on multiple devices.
- Having said this, select Install packages and accept the licenses.
Getting tired? Worry no more, we are getting close to the finish line! We are about to install several plugins that will allow us to manage our build process and target iOS devices:
A course on how to use an IDE is out of the scope of this book. However, pertinent explanations will be provided when having to deal with Eclipse-specific issues. The installation steps are as follows:
- Run Eclipse and create a new workspace to import your recipe's code into. Just so we are all on the same page, let's name it
libgdx-cookbook.Once you see the welcome panel, close it and select Help | Install New Software. The Android Developer Tools and the Google Web Toolkit plugins can be found at http://dl.google.com/eclipse/plugin/4.3.
Note
Be aware that this will only work with Eclipse 4.3 Kepler. If you use a different Eclipse release, use the matching version number. Google has this URL available on its developers help guide for Eclipse at https://developers.google.com/eclipse/docs/getting_started.
- Select Developer Tools, Google Plugin for Eclipse, and Google Web Toolkit SDK, and proceed with the installation. A modal dialog will warn you about installing unsigned content because there is always an inherent risk when installing plugins. Rest assured Google's tools are safe. Upon completion, Eclipse will need to restart, and you will be prompted to enter the Android SDK location.
- Now, follow the same process for the RoboVM plugin; you will find it at http://download.robovm.org/eclipse.
- There is only one option within the repository, so select it, carry on with the installation, and restart Eclipse once again.
Gradle is an open source build automation system. It will gracefully handle all the dependencies of our projects, doing most of the cumbersome heavy lifting. Perform the following steps:
- Once again, go to the Install new software option in Eclipse and introduce the URL http://dist.springsource.com/release/TOOLS/gradle.
- Install the Gradle IDE entry and restart Eclipse for the last time.
Great! One more task can be crossed out from our shopping list.
XCode is the Apple IDE required to develop for their platforms. Mac users who want to target iOS can get hold of XCode free of charge from Apple Store.
Eclipse has the impolite practice of not using UTF-8 encoding and Unix line endings if you are under a Microsoft operating system. While this will not affect you initially, it will prove to be a huge pain when it comes to using other peers' code as many conflicts will appear to ruin the party. Perform the following steps:
- Character encoding is applied on a per-workspace basis, and to fix it, you need to access the
libgdx-cookbookworkspace you just created. - Click on Window, select Preferences | General, then select Workspace, and make sure UTF-8 encoding and Unix line endings are your choices.
The time of truth has come as we are about to import a Libgdx project to our workspace for the first time and see whether we have made any mistakes along the way. This is the most basic Libgdx project you can possibly make if you want to target all platforms. Use the source code provided with this book. Perform the following steps:
- Once you have Eclipse open in front of you, right-click on Package Explorer, select Import, and choose Gradle project inside the Gradle node.
- Select the
[cookbook]/environmentfolder, and click on Build Model. - Make sure you select all listed projects, and click on Finish to start importing the projects. Gradle will now download all the dependencies, which may take a while.
- As long as everything goes according to plan, the only error you might see on the Problems pane will be in the Android project. This is because it is set to use an Android SDK different from the one you installed. In such a case, right-click on
environment-test-android, go to Properties, and tick your installed Android SDK under the Android tab. You can also install the missing SDK if you prefer to do so. - All the assets are located inside the
environment-test-androidproject and will be shared across all platforms. - We now need to tell the desktop project where the assets are located. Right-click on the desktop project (
environment-test-desktop), select Properties | Run/Debug Settings, select DesktopLauncher, and click on Edit. - Open the Arguments tab and select Other as the working directory.
- Now enter this in the input box:
${workspace_loc:environment-test-android/assets}
As long as you followed this recipe correctly, there should be no errors hanging around; so, it is time to run the project on every platform as a final test.
First, let's try the desktop project, which is the easiest of all.
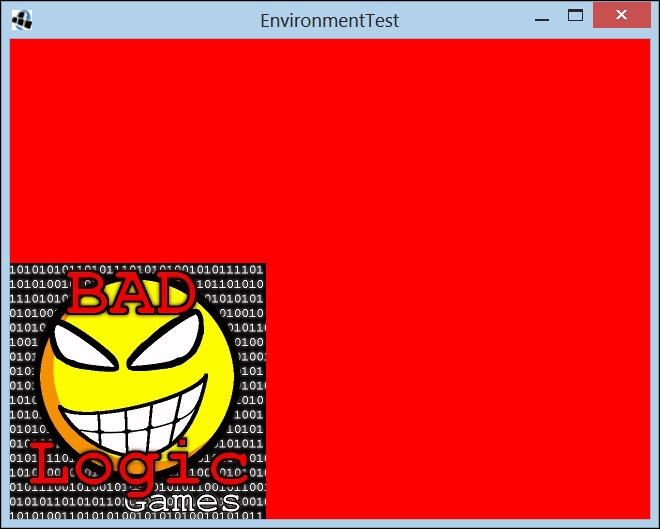
Right-click on it, select Run As followed by Java application, and then choose the entry point (DesktopLauncher). You will see the following window:
Android is next in the queue.
To pair your Android device, be it a phone or tablet, you need to enable USB debugging on your Android device, which can be a little obscure in later versions. Perform the following steps:
- On the device, go to Settings, enter About Phone, and tap the Build Number block seven times to enable developer options. Yes, do not ask why.
- Once you get a message saying you just became a developer, you can go to Settings | Developer options and enable USB debugging.
- Now, you can run the environment test on your device by right-clicking on the Android project, entering the Run As menu, and selecting Android Application. Finally, choose your device from the list.
Let's try the HTML project now. Perform the following steps:
- Right-click on the
environment-test-gwtproject and select Run As Gradle build…. - On the next window, type Ctrl + Space, and scroll down and double-click on the gwtSuperDev task. Click on Apply followed by Run.
- The first time you do this, it will take quite a while. Under the hood, the build process will launch a Jetty web server on your computer.
- After a while, you will be able to access it through the following URL:
http://localhost:8080/gwt - A background code server will accept build requests from the browser, so no manual full compilation is needed once you kick it off. You will notice a particular message in the compiler output:
The code server is ready. Next, visit http://localhost:9876/ - Access the URL and drag the Dev Mode On bookmarklet onto the browser's bar. You will never need to do this again.
- Back on your running environment test tab, click on the newly added bookmarklet, and select compile. Any change to the game code will be recompiled and reinjected in the web server.
- After a short time, the page will refresh and you can run the most recent version of your code.
Additionally, Mac users can run the iOS project by right-clicking on environment-test-ios and going to the Run As menu. Inside, you will find three options of interest:
- iOS Device App: This requires you to have an actual connected device and an Apple developer subscription
- iOS Simulator App (iPad)
- iOS Simulator App (iPhone)
Pretty much like the HTML5 project, the first build will take a long time; it should be fine after this.
Congratulations! Now, you can run your Libgdx projects on all targetable platforms.
The Libgdx development environment installation process is pretty much self-explanatory. However, it is worth mentioning a few details of how it is designed to facilitate cross-platform development and what technologies it relies on. You will at least know why you just installed so many things!
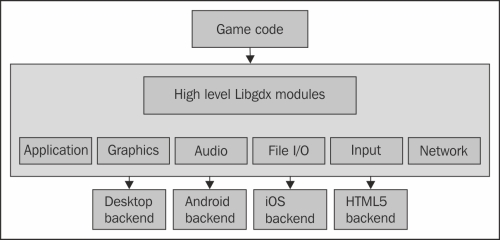
Libgdx has a multiplatform API that allows users to write platform-agnostic Java code once and deploy it on all the supported platforms, while achieving the same behavior. Every platform has a backend that implements low-level subsystems: Application, Graphics, Audio, Input, Files, and Network.
This way, we can happily request to draw a sprite onscreen, play some background music, or read a text file through the common graphics, audio, and file interfaces, respectively, and it will run everywhere. Magic!
Deployment on platforms such as Android, iOS, or HTML5 might not be the fastest process ever, but this is usually mitigated by the ability of the desktop backend to serve as a debugging platform. Remember that this will become increasingly important as you and Libgdx become friends.
The desktop backend mostly relies on LWJGL (Light Weight Java Game Library). At the same time, LWJGL is built on top of the magnanimous OpenGL (Open Graphics Library). A fun fact is that Minecraft was created using LWJGL.
For Android development, Libgdx finds its resources on the official Android SDK as well as the embedded system-specific version of OpenGL, which is called OpenGL ES.
This gets a lot trickier when it comes to HTML5 support because the technologies are quite different. HTML5 can display incredibly visually rich applications through WebGL and JavaScript, but unfortunately, this has little to do with the Libgdx toolchain. Compatibility with browsers is achieved through Google Web Toolkit (GWT), which compiles Java code into optimized JavaScript code, thanks to, what I like to call, black magic.
Last but not least, we have iOS support that relies on RoboVM. This magnificent piece of open source software eats Java code for breakfast and spits out native ARM or x86 code. It also provides full access to Cocoa Touch API, allowing us to deploy on iOS devices, as long as we have a Mac.
There are quite a few more technologies involved to make this happen, but this serves as a broad overview of what goes on under the hood.
You can use Android SDK Manager to gain access to more Android APIs such as Google Play Game services, advertisement platforms, or Intel Hardware Accelerated Execution Manager (HAXM). HAXM is an alternative Android emulator, much faster than the default one. Feel free to explore!
- In the next recipe, you will learn how to create brand new Libgdx-based cross-platform projects. Let the fun begin!
- For instructions on how to deploy your Libgdx applications, go to the first four recipes in Chapter 13, Giving Back.