
A texture is a bitmap image that gets applied to a surface through mapping. Rendering textures on the screen will be our first step in getting to know the Libgdx 2D graphics API. Once you learn a few simple operations with textures, you will be able to build relatively complex scenes for your games.
To illustrate the procedure, we are going to make use of a friendly caveman, who we will show at different positions, sizes, and orientations.
You need the samples projects to follow this recipe, so make sure you already have them in your Eclipse workspace. You will find the caveman texture in data/caveman.png, inside the data folder in the Android project.
The code for this recipe is hosted in the SpriteBatchSample class, which has the classic methods of an ApplicationListener interface implementation. Note that only the most relevant pieces of code are shown in this recipe as snippets; you can, however, study the full source. First of all, we are going to add a few static final fields to store configuration values for cleanliness:
private static final Color BACKGROUND_COLOR = new Color(0.39f, 0.58f, 0.92f, 1.0f);
private static final float WORLD_TO_SCREEN = 1.0f / 100.0f;
private static final float SCENE_WIDTH = 12.80f;
private static final float SCENE_HEIGHT = 7.20f;
The BACKGROUND_COLOR object is an object of the Color class, which is initialized with its RGBA components as float values ranging from 0.0 to 1.0. RGBA stands for red, green, blue, and alpha (transparency). In this case, we will be using light blue for the background. The WORLD_TO_SCREEN object will help us transform measures from world to screen and vice versa. The SCENE_WIDTH and SCENE_HEIGHT objects define the dimensions in world units of our scene. The scene dimensions refer to the space the camera will be able to focus on at one time.
Right after, we have some members that will actually do the scene composing and rendering jobs:
private OrthographicCamera camera;
private Viewport viewport;
private SpriteBatch batch;
private Texture cavemanTexture;
The camera member will help us define what portion of the world will be seen on the screen using an orthographic projection. As we will see later, the concept of a camera is pretty much parallel to that of the movies. For our resolution handling mechanism, we need a Viewport object. Render calls will be issued through SpriteBatch, which provides a simple mechanism to draw quads associated to textures with extreme efficiency. Finally, the crucial piece of this sample, we will use cavemanTexture to hold the image data of our little caveman.
Take a look at the create() method, where we construct a new OrthographicCamera object. Then, we proceed to create a new Viewport object with our scene dimensions, passing in the camera it will need to manage. We also instantiate a new SpriteBatch object. In the next step, we create a new Texture object using an internal handle pointing to the file data/caveman.png. Finally, we set the Nearest filter for our newly created texture, resulting in a pixelated effect when scaled. The code is as follows:
public void create() {
camera = new OrthographicCamera();
viewport = new FitViewport(SCENE_WIDTH, SCENE_HEIGHT, camera);
batch = new SpriteBatch();

cavemanTexture = new Texture(Gdx.files.internal("data/caveman.png"));
cavemanTexture.setFilter(TextureFilter.Nearest, TextureFilter.Nearest);
}
Note
File handles will be covered in depth in Chapter 5, Audio and File I/O. We will take a look at texture filters later in this recipe.
The Texture and SpriteBatch objects allocate resources that need to be freed up so as to avoid nasty memory leaks. A very appropriate moment to do so is inside the dispose() method, because it is called right before the application instance is destroyed.
Note
More details on texture handling and other assets can be found in Chapter 7, Asset Management.
public void dispose() {
batch.dispose();
cavemanTexture.dispose();
}Now, let's take a look at the render() method, where the bulk of the action takes place:
public void render() { ... }Every frame, we clear the screen with a background color and render our game scene from scratch. We can achieve that in two steps. First, we set the background color through the glClearColor() OpenGL function and then call the glClear() method to actually clear the render surface with the color we previously set:
Gdx.gl.glClearColor(BACKGROUND_COLOR.r, BACKGROUND_COLOR.g, BACKGROUND_COLOR.b, BACKGROUND_COLOR.a);
Gdx.gl.glClear(GL20.GL_COLOR_BUFFER_BIT);
Note
In the good old days, computing power was extremely limited, and game developers could not afford to render the whole scene every frame. Those Spartan heroes would keep track of the elements that had moved from the previous frame. Then, they rendered the background on top of the element's old location and rendered it again where it was supposed to be.
Do not worry too much about camera operations just yet as they have their own recipe later in this chapter. Through the setProjectionMatrix() method, we tell the batch about the camera location, rotation, and zoom levels. This is done so it can properly transform the coordinates we pass during draw calls to actually draw elements according to what the camera is looking at:
batch.setProjectionMatrix(camera.combined);
The SpriteBatch class optimizes our render requests to achieve high performance even on mobile devices. In order for it to do its job, we are required to call its begin() method before any draw calls and its end() method once we are done. Please keep in mind that if we do not abide by this rule, a java.lang.IllegalStateException will be thrown:
batch.begin();
// draw scene
batch.end();
At last! we have now done all the necessary preparations to tell Libgdx to draw our friendly caveman on the screen. All drawing operations are done through one of the many versions of the draw() method in the SpriteBatch class. For educational purposes, we are going to use the most complete method.
For convenience, and to avoid repeating computations, we get the dimensions in pixels of the texture using the getWidth() and getHeight() methods. We also figure out the center of the texture counting from its bottom-left corner; this means the center would be at (width / 2.0f, height / 2.0f):
int width = cavemanTexture.getWidth();
int height = cavemanTexture.getHeight();
float originX = width * 0.5f;
float originY = height * 0.5f;
The first parameter we pass to draw() is the texture itself. Then, we pass in the world space coordinates where we want to draw. Considering the camera is centered at (0, 0) by default, we need to position our caveman at (-originX, -originY) starting from its center for it to appear right in the middle. The next parameters are the coordinates in pixels of our texture that we consider to be the origin starting from the bottom-left corner. As we said earlier, in our case, we want the origin to be the center of the texture. Then, we pass the dimensions of our texture and the scale along both axes (x and y).
A scale of 1.0f indicates that we want to keep its size, 0.5f would mean half the size, 2.0f means double, and so on. However, we need to multiply our desired scale by WORLD_TO_SCREEN to transform our caveman from pixel units to world units. Next comes the rotation; note that the unit used is degrees and not radians. The parameters srcX, srcY, srcWidth, and srcHeight allow us to select a limited portion of the texture to be drawn; however, we want to show all of it. Finally, we can use two Booleans to flip the texture around its x or y axes:
// Render caveman centered on the screen
batch.draw(cavemanTexture,  // Texture
           -originX, -originY,  // x, y
            originX, originY,  // originX, originY
            width, height,  // width, height
            WORLD_TO_SCREEN, WORLD_TO_SCREEN,  // scaleX, scaleY
            0.0f,  // rot (degrees)
            0, 0,  // srcX, srcY
            width, height,  // srcWidth, srcHeight
            false, false);  // flipX, flipY
Inside SpriteBatchSample, we have four additional draw calls achieved with the same mechanism. However, these make modifications to our caveman by scaling him up/down, rotating him and flipping him around the x and y axes. Note that rotations are applied around the origin of the texture; in our case, it is the center, but it could very well be a corner or an arbitrary point.
The following screenshot shows the result of our demo:

Congratulations! Now you know how to use textures and manipulate them to build a scene.
The Libgdx classes involved in rendering are pretty straightforward to use as you just saw. However, what happens under the hood is not quite as simple. We are now going to take a look at some of the basic concepts Libgdx uses, so you have a better understanding.
Libgdx makes use of OpenGL, the well-known open source 3D graphics library. How come we use it for 2D applications too? Well, as a matter of fact, every Libgdx render operation takes place in 3D space. Three-dimensional vertices are sent to the graphics card regardless of whether we are working with 3D models or 2D textures. In our 2D context, SpriteBatch serves as an intermediary between our game logic and the rendering layer. It is responsible for sending quads with associated texture data to the graphics card. The vertices SpriteBatch sends to the GPU are laid on the same plane and rendered using an orthographic projection. This helps to make our scenes look bi-dimensional.
A perspective projection can also be used to render SpriteBatch objects, although the 2D effect would be lost.
The following figure illustrates how texture data is mapped to a tri-dimensional mesh that is rendered using an orthogonal projection:

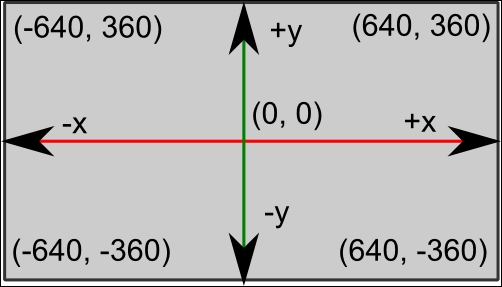
Knowing the coordinate system you are working with is paramount when modeling your game worlds. By default, Libgdx uses a y-up system. Looking at your screen, this means that positive y faces upwards and positive x grows to the right. When working with a batch, textures also have their origin at the bottom-left corner, with y facing upwards.
Interestingly enough, most 2D game libraries use a y-down approach, and you might feel a bit uncomfortable initially. Despite that, Libgdx lets you configure it to use a y-down approach; I would personally advise against this as it is the default in many subsystems. As much as you may be inclined to think otherwise, it is easier to adapt your brain to work with a y-up system; after all, it is how we all learned math.
When an OrthographicCamera is created, its origin, (0, 0), is located at the center of the screen. The viewport in our example was 12.80 world units wide by 7.20 units high. This means that the four corners of the screen are located at (6.40, 3.60), (6.40, -3.60), (-6.40, -3.60), and (-6.40, 3.60) if we enumerate them in clockwise order. Take a look at the following diagram for more clarity:
Let's go back to the following line:
cavemanTexture = new Texture(Gdx.files.internal("data/caveman.png"));The Gdx.files.internal() method returns a handle to a file that is expected to be found within the application bundle, as opposed to an arbitrary folder. Internal files need to be stored under the assets folder within the Android project. We already saw this in the previous chapter.
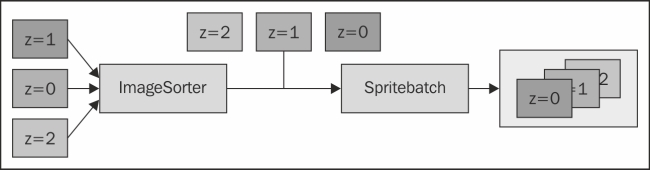
Note that we do not send any depth values to SpriteBatch when rendering 2D images. There is no built-in depth sorting of sprites in Libgdx. Instead, elements are drawn on top of each other, according to the order they were asked to be drawn. This implies that if your gameplay needs to overlay entities according to their distance to the camera, you need to make sure you draw them first, so those that are closer stay on top.
You can easily achieve that by having some sort of rendering queue you push to from your game logic. Later on, the system sorts the queue using a z component you should have facilitated earlier and, ultimately, renders the images through SpriteBatch. The following diagram illustrates the process, assuming the bigger the entity z component is, the further away it is located:
Right after we created our cavemanTexture object, we wrote the following line:
cavemanTexture.setFilter(TextureFilter.Nearest, TextureFilter.Nearest);
Texture filters determine how image pixels are interpolated when scaled down or up. When a texture size is manipulated for rendering purposes, the system needs a way of reorganizing all its pixels, filling in the gaps when increasing size or erasing pixels when shrinking it. The setFilter() method precisely receives two parameters: upscale and downscale strategy respectively. The most common filters are as follows:
The following cavemen portraits illustrate the differences between the Nearest and Linear filters, respectively. The first style usually works for 2D pixel art games while the latter is more common in textures for 3D games:
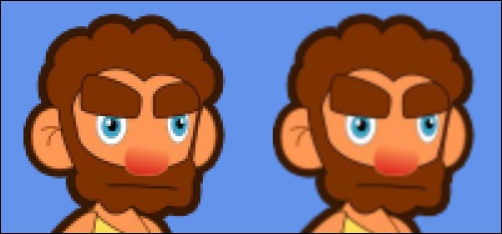
This image is purposely scaled up to show the difference between filters
The SpriteBatch class also allows the user to set a tint color that will affect what the textures look like when rendered. This is done through the
setColor() method and it affects all the following draw() operations. In the following example, we render our caveman with a cyan tone; but in order not to mess up our batch, we save its initial color with getColor() and restore it later when we are done:
oldColor.set(batch.getColor());
batch.setColor(Color.CYAN);
batch.draw(cavemanTexture, -200 - originX, -originY, originX, originY, width, height, 1.0f, 1.0f, 0.0f, 0, 0, width, height, false, false);
batch.setColor(oldColor);
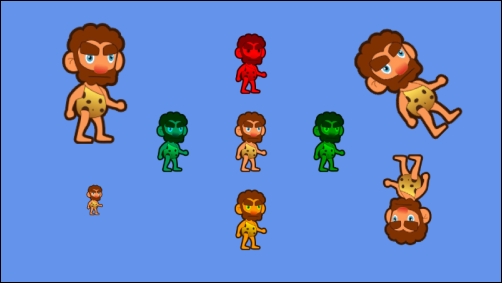
The result, while not spectacular, adds a little more variety to our scene. Color tints have multiple uses depending on your creativity. You could make a damage effect very easily by applying a red tint with variable alpha values over time on the character that is taking damage. Also, why not have enemies with different color tints to express different levels of power? Many games have done this in the past so as to avoid having to produce additional assets. Note that blending tints with images works better when the latter is grayscale. As you can see in the following figure, we added four new cavemen to SpriteBatchSample, tinted in cyan, red, green, and yellow:
You may have noticed in the previous snippet how we can use predefined color values. The Color class counts with multiple public final static fields to make life easier for us. Rather than defining a Color object and manually setting RGBA values, you can just type Color.CYAN. You can find the full list of predefined colors in the official API documentation at http://libgdx.badlogicgames.com/nightlies/docs/api/com/badlogic/gdx/graphics/Color.html.
The SpriteBatch draw() method has many versions we can use depending on our needs. Some of them are a lot simpler than the one we showed because they adopt default values for the missing parameters. The documentation can be found at http://libgdx.badlogicgames.com/nightlies/docs/api/com/badlogic/gdx/graphics/g2d/SpriteBatch.html.