
Very much like in films, Libgdx uses the concept of a camera as a tool to visualize the world. Throughout this recipe, we will learn how to wield the features of orthographic cameras, which make 2D scene rendering a much more enjoyable endeavor.
Among the topics shown, we can highlight camera sizes, movement, and zooming. This time around, in our example, we will load a massive texture and allow the user to move around, zooming in and out with both keyboard and touch controls. Naturally, in a real-life situation, you would have a level made out of chunks rather than a big texture.
To start working with orthographic cameras, please open the OrthographicCameraSample.java file, which contains an implementation of our familiar friend, the ApplicationListener interface.
First of all, we define constants for the camera movement speed, area of the screen that will be touchable, zoom change speed, and zoom limits:
private static final float CAMERA_SPEED = 2.0f;
private static final float CAMERA_ZOOM_SPEED = 2.0f;
private static final float CAMERA_ZOOM_MAX = 1.0f;
private static final float CAMERA_ZOOM_MIN = 0.01f;
private static final float CAMERA_MOVE_EDGE = 0.2f;
For our example, we will use OrthographicCamera and SpriteBatch objects to render the 2D scene. The levelTexture object will reference our big texture data and, as in previous recipes, viewport will be used to define the drawable area of the screen. The Vector3 object will represent the touch coordinates of the user interacting with the screen:
private OrthographicCamera camera;
private Viewport viewport;
private SpriteBatch batch;
private Texture levelTexture;
private Vector3 touch;
Within the create() method, we build new instances for our member variables. We use the default camera constructor since we are going to let Viewport handle its size. Viewport takes the camera dimensions in world units and the camera it will manage. In our case, a world unit equals 100 screen units, as indicated by the WORLD_TO_SCREEN constant. We also create objects for Viewport and SpriteBatch.
The next step is to load the data/jungle-level.png texture into a Texture object and apply the Nearest filter so it does not become blurry when zooming in. Note that this is just a matter of personal taste; you might want to use Linear if you prefer the results it offers.
Our image will be rendered at (0.0f, 0.0f) with its bottom-left corner as its local origin. For us to avoid showing black areas, we need to position the camera correctly. A camera's local origin is always its center, so we need to make it half its size. The code is as follows:
public void create() {
   camera = new OrthographicCamera();
   viewport = new FitViewport(SCENE_WIDTH, SCENE_HEIGHT, camera);
   batch = new SpriteBatch();
   touch = new Vector3();

   levelTexture = new Texture(Gdx.files.internal("data/jungle-level.png"));
   levelTexture.setFilter(TextureFilter.Nearest, TextureFilter.Nearest);

   camera.position.x = SCENE_WIDTH * 0.5f;
   camera.position.y = SCENE_HEIGHT * 0.5f;
}
Just before exiting, we need to get rid of the resources used by the sprite batch and the texture using their dispose() methods:
public void dispose() {
   batch.dispose();
   levelTexture.dispose();
}
Now, let's take a look at the render() method, where the bulk of the action takes place. The first step is to clear the background color. This time we select a solid black for the background; it is not going to be shown anyway. We are going to manipulate our camera over time using the Libgdx input system. To achieve a uniform effect, we need to consider the time between frames. The Gdx.graphics.getDeltaTime() method returns the time in seconds that has passed since the last frame:
float deltaTime = Gdx.graphics.getDeltaTime();
The following code detects whether the arrow keys are pressed and moves the camera along its x and y axis at CAMERA_SPEED pixels per second when appropriate. Gdx.input.isKeyPressed() receives a key value and returns a Boolean indicating the state of such a key:
if (Gdx.input.isKeyPressed(Keys.LEFT)) {
   camera.position.x -= CAMERA_SPEED * deltaTime;
}
else if (Gdx.input.isKeyPressed(Keys.RIGHT)) {
   camera.position.x += CAMERA_SPEED * deltaTime;
}

if (Gdx.input.isKeyPressed(Keys.UP)) {
   camera.position.y += CAMERA_SPEED * deltaTime;
}
else if (Gdx.input.isKeyPressed(Keys.DOWN)) {
   camera.position.y -= CAMERA_SPEED * deltaTime;
}
Neither phones nor tablets have keyboards, which means that if we are to support them, we need to consider touchscreens. The following fragment of code detects whether or not the user is touching the screen. If so, we get the touch point coordinates in screen pixel units with Gdx.input.getX() and Gdx.input.getY(). The unproject() method of the OrthographicCamera class takes touch coordinates and converts them to world coordinates using the camera transform. Touch coordinates are y-down, with the origin located at the top left of the screen. We will only move the camera in a certain direction when the user has touched the screen close to the edges:
if (Gdx.input.isTouched()) {
   touch.set(Gdx.input.getX(), Gdx.input.getY(), 0.0f);
   camera.unproject(touch);

   if (touch.x > VIRTUAL_WIDTH * (1.0f - CAMERA_MOVE_EDGE)) {
      camera.position.x += CAMERA_SPEED * deltaTime;
   }
   else if (touch.x < VIRTUAL_WIDTH * CAMERA_MOVE_EDGE) {
      camera.position.x -= CAMERA_SPEED * deltaTime;
   }

   if (touch.y > VIRTUAL_HEIGHT * (1.0f - CAMERA_MOVE_EDGE)) {
      camera.position.y += CAMERA_SPEED * deltaTime;
   }
   else if (touch.y < VIRTUAL_HEIGHT * CAMERA_MOVE_EDGE) {
      camera.position.y -= CAMERA_SPEED * deltaTime;
   }
}
Later, we check the state of the keys Page Up and Page Down and make the camera zoom in or out respectively:
if (Gdx.input.isKeyPressed(Keys.PAGE_UP)) {
   camera.zoom -= CAMERA_ZOOM_SPEED * deltaTime;
}
else if (Gdx.input.isKeyPressed(Keys.PAGE_DOWN)) {
   camera.zoom += CAMERA_ZOOM_SPEED * deltaTime;
}
We do not want the camera to move too far away so as to avoid running out of texture. This means we are forced to clamp its position:
MathUtils.clamp(value, min, max);
This utility function comes in very handy. We pass in a value and the bounds (min, max) we want to constraint said value to. The return value will be min or max if the original number was out of bounds or the value itself if it falls between min and max.
The maximum camera position will be the size of the texture in world units minus half the size of the camera. This works for both the x and y axes with its width and height, respectively. The minimum position will be half the camera size. Anything beyond those limits would show black areas. Note that we multiply by the zoom level as this affects how much we can see:
float halfWidth = VIRTUAL_WIDTH * 0.5f;
float halfHeight = VIRTUAL_HEIGHT * 0.5f;

camera.position.x = MathUtils.clamp(camera.position.x, halfWidth * camera.zoom, levelTexture.getWidth() * WORLD_TO_SCREEN - halfWidth * camera.zoom);
camera.position.y = MathUtils.clamp(camera.position.y, halfHeight * camera.zoom, levelTexture.getHeight() * WORLD_TO_SCREEN - halfHeight * camera.zoom);
The next step is to do the same thing with the zoom level. We want to limit it so we cannot zoom out too much that we can see black areas, nor zoom in too much that we invert the image:
camera.zoom = MathUtils.clamp(camera.zoom, CAMERA_ZOOM_MIN, CAMERA_ZOOM_MAX);
Once we have finished manipulating the camera, we need to call its update() method. This triggers a recalculation of its projection and view matrices and the frustum planes. All those fancy terms basically mathematically define the state of the camera so the renderer knows how things would look through its eyes.
Then, we call setProjectionMatrix() on the batch passing the combined camera matrix. This makes the batch aware of the camera configuration, so it can transform the geometry we send accordingly:
camera.update();
batch.setProjectionMatrix(camera.combined);
Finally, we begin the sprite batch render process, draw the texture at the origin, and end the batch:
batch.begin();
batch.draw(levelTexture, 0.0f, 0.0f);
batch.end();
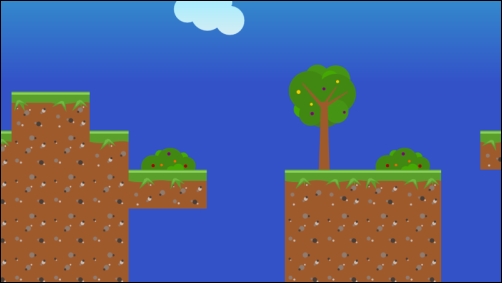
When running the sample, you should see something similar to the following screenshot:
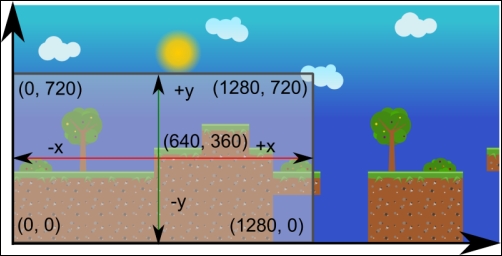
The following diagram illustrates in a very straightforward manner the setup we put together in the previous example. The big arrows represent the world axis. You can observe the texture with its bottom-left corner at (0, 0). The camera uses the scene dimensions 12.8 x 7.2 and we position it at half its width and height to avoid showing nontextured areas. Increasing the x component of the camera position moves it to the right, while doing the same with its y component moves it upwards. We have added coordinates for all the camera view plane corners in world units for clarity:
We have seen how to create, move, and zoom cameras to control what can be seen in our scene. Cameras give us great power, which can be used to achieve a couple of tricks such as rendering UI on top of the game world or implementing split screen modes.
Our camera moves around constantly, and so do other camera systems in most games. However, we often need to draw static elements on top of the game world that should stay where they are at all times. The HUD (heads up display) could be the most glaring example. Health bars, current score, or power meters should not be part of the world and hence should be left behind as we move.
A perfectly valid and simple solution is to have two OrthographicCamera objects. The first one could use world units and helps us render the scene and characters while the other one may use virtual pixel units and will serve us to render UI elements. Each camera would have a matching viewport.
The following code fragment illustrates the process of creation and usage of two cameras, one to render the game world and the other to do the same with the UI:
// create()
camera = new OrthographicCamera();
cameraHUD = new OrthographicCamera();

viewport = new FillViewport(SCENE_WIDTH, SCENE_HEIGHT, camera);
viewportHUD = new FillViewport(VIRTUAL_WIDTH, VIRTUAL_HEIGHT, cameraHUD);

// render()

// Render game scene
camera.update();
batch.setProjectionMatrix(camera.combined);
batch.begin();
// ...
batch.end();

// Render UI elements
cameraHUD.update();
batch.setProjectionMatrix(cameraHUD.combined);
batch.begin();
// ...
batch.end();
Note
When modeling a game world, it is a lot easier to work in real units such as meters. Physics libraries, for instance, tend to work with the international metric system (although this can be adjusted). However, for UI-related work, we are much better off using pixels. We can also make the UI independent from asset sizes by scaling them to fit some given virtual dimensions.
Many PC and console games split the screen to allow two or more players locally when the game characters are too far away to have just one camera. Shooters and racing games are genres that have made extensive use of this technique, especially before the online gaming boom.
The following diagram shows how two viewports are used to achieve split screen gameplay:
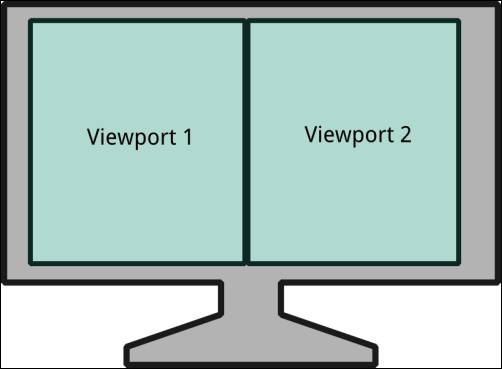
Split screen mode is achieved by having more than one viewport. That is, the available screen space is divided between the players and rectangles are created to model the dimensions and positions of each one of them. Several cameras are in place looking at different areas of the game world.
In a situation where we need to deal with two players, we would need two Rectangle objects, viewport1 and viewport2, as well as camera1 and camera2 objects. We may also have a camHUD object. Every frame, if a camera has changed, we will update the cameras to show their associated player's perspective. In the render() method, we render the full scene twice.
When the application calls resize(), we need to make sure we update the viewport with half the width to leave room for both the viewports at the same time. We also need to position them correctly:
public void render() {
   // Player 1
   camera1.update();
   batch.setProjectionMatrix(camera1.combined);
   batch.begin();
   ...
   batch.end();

   // Player 2
   camera2.update();
   batch.setProjectionMatrix(camera2.combined);
   batch.begin();
   ...
   batch.end();

   // HUD
   cameraHUD.update();
   batch.setProjectionMatrix(cameraHUD.combined);
   batch.begin();
   ...
   batch.end();
}
Needless to say, this practice is computationally expensive since it renders the whole scene once per player. Some games are used to lower the rendering quality to allow multiple players in their local split screen modes.