
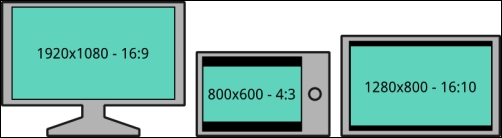
The diversity of devices users play games on is vast and overwhelming, especially when targeting different platforms including phones, tablets, and browsers. This presents a lot of challenges for developers. Hundreds of different specs, processing power, screen sizes, APIs... It is a real mess. When it comes to games, it is not only the programmers who are affected, but designers, animators, and artists are also affected. The same level may not look the same on two devices and both level layout and assets need to cater for that.
Nowadays, it is not rare at all to find a situation like the one shown in the following figure:
There is a range of strategies to tackle the varying screen resolution and different aspect ratios problem. Unsurprisingly, Libgdx has an out-of-the-box solution for this covering a subset of these strategies. Fortunately enough, its flexibility lets you implement your own in case your requirements are special.
These strategies involve adjusting the portion of the screen we render to as well as manipulating the resulting image to make it fit. Throughout this recipe, we will give you the tools to handle multiple aspect ratios, and it is up to you to decide which method suits you best, as each one of them has both perks and drawbacks.
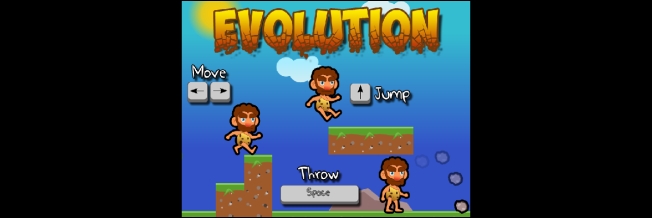
The example for this recipe only consists of rendering a simple background texture that covers the entirety of our camera plane while offering Libgdx's strategies to handle multiple aspect ratios. The user can tap the screen or click the mouse to cycle through them and observe how the different approaches affect the end result.
Handling multiple screen sizes can be a pain, but you would be surprised how easy Libgdx makes the whole process.
The sample projects are required to follow this recipe. We will be working with the ViewportSample.java file.
Even though every recipe so far uses this approach to handle multiple screen sizes, we have not gone into a lot of detail about how it works until now. Feel free to dig into any of those ApplicationListener implementations; for simplicity, SpriteBatchSample might be a good choice.
You already know that game worlds are typically modeled using world units. When working with user interfaces and screen sizes, an option is to assume the screen to have a set of specific dimensions in virtual screen units. The aspect ratio strategy will then work out how to map the virtual-screen-sized image to the actual screen.
Let's start off with some static constants that define the screen dimensions we want to support:
private static final float MIN_SCENE_WIDTH = 800.0f;
private static final float MIN_SCENE_HEIGHT = 600.0f;
private static final float MAX_SCENE_WIDTH = 1280.0f;
private static final float MAX_SCENE_HEIGHT = 720.0f;
The Viewport class is the base class from which the different resolution handling strategies inherit. Since we want the user to cycle the basic ones, Let's add an ArrayMap of String and Viewport pairs, so we can associate each viewport with its name. We also need the current viewport index, a camera, a batch, and a texture object:
private ArrayMap<String, Viewport> viewports;
private int currentViewport;
The create() method contains no magic; we instantiate our camera, batch, and texture and call the createViewport() and selectNextViewport() methods. Remember to dispose of the batch and texture once you are done, in the dispose() method:
@Override
public void create() {

   ...

   createViewports();
   selectNextViewport();

...
}
The
createViewports() method populates the associative array. Here you will find the list of built-in Libgdx Viewport implementations, which, like we said, are the ones responsible for handling multiple resolutions. Their constructors typically take scene dimensions in world units and the camera instance they are supposed to work with. Finally, we initialize our currentViewport index to -1:
private void createViewports() {
   viewports = new ArrayMap<String, Viewport>();
   viewports.put("StretchViewport", new StretchViewport(MIN_SCENE_WIDTH, MIN_SCENE_HEIGHT, camera));
   viewports.put("FitViewport", new FitViewport(MIN_SCENE_WIDTH, MIN_SCENE_HEIGHT, camera));
   viewports.put("FillViewport", new FillViewport(MIN_SCENE_WIDTH, MIN_SCENE_HEIGHT, camera));
   viewports.put("ScreenViewport", new ScreenViewport(camera));
   viewports.put("ExtendViewport (no max)", new ExtendViewport(MIN_SCENE_WIDTH, MIN_SCENE_HEIGHT, camera));
   viewports.put("ExtendViewport (max)", new ExtendViewport(MIN_SCENE_WIDTH, MIN_SCENE_HEIGHT, MAX_SCENE_HEIGHT, MAX_SCENE_WIDTH, camera));

   currentViewport = -1;
}
The render() method contains no secrets either. We simply render our texture centered on the screen as one would normally do:
@Override
public void render() {
   ...

   batch.setProjectionMatrix(camera.combined);
   batch.begin();
   batch.draw(background, -background.getWidth() * 0.5f, -background.getHeight() * 0.5f);
   batch.end();
}
Every time the actual screen dimensions change, the resize() method is called with the new size in pixel units. The current viewport needs to be notified of such an event to recalculate its strategy. Remember that resize() also gets called right after create():
@Override
public void resize(int width, int height) {
   viewports.getValueAt(currentViewport).update(width, height);
}
In order to cycle through our collection of viewports whenever the user taps the screen or clicks the mouse, we need to override the touchDown event and call the selectNextViewport() method:
@Override
public boolean touchDown (int screenX, int screenY, int pointer, int button) {
   selectNextViewport();
   return true;
}
The selectNextViewport() function simply increments the currentViewport index, being careful not to escape the bounds of the viewport's ArrayMap. It needs to call an update on the newly selected viewport so as to let it adjust its strategy for the actual screen dimensions. Finally, it outputs the name of the viewport:
private void selectNextViewport() {
   currentViewport = (currentViewport + 1) % viewports.size;
viewports.getValueAt(currentViewport).update(Gdx.graphics.getWidth(), Gdx.graphics.getHeight());
   Gdx.app.log(TAG, "selected " + viewports.getKeyAt(currentViewport));
}
That is all! Feel free to launch the application on your desktop and resize the window with different viewports selected. This way, you will yourself experience how they behave. Nevertheless, we will cover them in great detail soon.
Allow us to go through the list of built-in Viewport implementation describing their behavior.
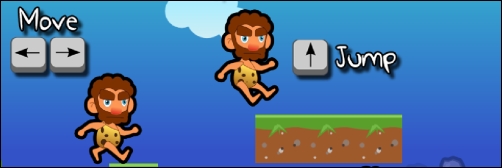
The StretchViewport class takes a virtual screen's dimensions and always stretches them to fit the screen. The plus side is that you will not find any black bars, but if the virtual ratio significantly differs from the one on the screen, the image can potentially appear greatly distorted, as shown in the following screenshot:

The FitViewport class will scale the image to fit the screen while maintaining the virtual aspect ratio. Even though the image will not be distorted, black bars will appear if both aspect ratios do not match. Our rendered result will always be centered on the screen, as shown in the following screenshot:
The FillViewport class keeps the aspect ratio, just like FitViewport. However, it does not introduce black bars, which means parts of the resulting image will end up being cut off, as shown in the following screenshot. Depending on the type of application you are working on, this may or may not be acceptable:
The ScreenViewport class will always match the actual screen dimensions, so no scaling is applied and you will not see any black bars at all, as shown in the following screenshot. Similar to FillViewport, this may affect gameplay since players with different screen sizes will see different portions of the world:

The ExtendViewport class is possibly the most complete and flexible solution. It keeps the provided aspect ratio without introducing black bars by extending the visible portion of the world in one direction. When a maximum set of dimensions is provided to the ExtendViewport dimensions, black bars will be added when the screen aspect ratio falls out of the supported range, as shown in the following screenshot:

Internally, the Viewport class calls glViewport() inside its update() method. This is a direct OpenGL call that defines the drawable area of the screen in screen pixel units.
We have already seen how cool Viewport is, but there is more to it. Here we are going to take a look at some of the additional functionality you can get out of it.
Sometimes, a viewport can map the camera to the screen in such a way that black bars or gutters appear. We can get the view positioning information as well as the virtual sizes through the following methods:
int getViewportHeight()
int getViewportWidth()
int getViewportX()
int getViewportY()
float getWorldHeight()
float getWorldWidth()
The Viewport class provides access to the camera it manages with getCamera(). However, we can directly call some camera operations such as projecting a world point onto the screen and unprojecting a screen point to the world. These are extremely useful to work out the world coordinates that correspond to a tap event, so the user can interact with the world elements, for instance:
Vector2 project(Vector2 worldCoords)
Vector3 project(Vector3 worldCoords)
Vector2 unproject(Vector2 screenCoords)
Vector3 unproject(Vector3 screenCoords)
For further details on the Viewport API, please check the official documentation at http://libgdx.badlogicgames.com/nightlies/docs/api/com/badlogic/gdx/utils/viewport/Viewport.html.
Most games render a world through a dynamic camera that moves around and, on top of that, some static elements such as buttons, labels, and icons. These are typically known as the HUD (heads up display). The world camera works with world units while the HUD uses virtual screen units.
This is usually achieved through the use of a pair of two cameras and viewports, as we saw in the Understanding orthographic cameras recipe.
However, there is an important "gotcha". Viewport calls the OpenGL glViewport() function that establishes the area of the screen we render to, potentially leaving black bars. What happens when we have two viewports with different world units? Let's say meters for the simulation and pixels for the UI. Every time we update the second viewport on the resize method, it will stomp the previous setting, causing very ugly rendering problems.
To solve it, you have to update your viewports every frame in the render() method in the following way:
- Update world viewport
- Render world
- Update UI viewport
- Render UI
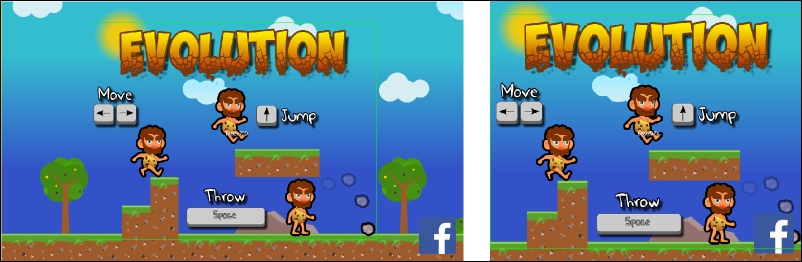
Strategies such as ExtendViewport are great because they look good across a bigger set of devices. However, you cannot predict which portion of the screen is going to be shown to the end user. We do not generally care about background elements, but we need to make sure the essential ones, such as buttons, are well positioned.
Imagine we need to add a Facebook icon to our background scene. If we place it in one of the texture corners, it may be hidden on 4:3 screens. We cannot put it closer to the center as it would look really odd on 16:9 devices. What we really want is to dynamically position certain elements depending on the viewport configuration and the actual screen size, just as shown in the following figure:
Assuming the UI camera has its bottom-left corner at (0, 0) and that it uses pixel units, the code to position the icon would be something like this:
icon.setPosition(viewport.getViewportWidth() - 20.0f, 20.0f);
Now, you can dynamically position floating elements to make your game look good everywhere without too much hassle.
Libgdx offers a limited set of strategies to deal with multiple screen sizes and ratios. In the vast majority of cases, you will have more than enough with one of the previously mentioned viewport implementations. However, it may be possible that you want a different behavior. That is easy enough with Libgdx!
You need to create a new class that extends Viewport and override its calculateViewport(width, height) method. It takes the actual screen width and height in pixels and is responsible for updating its internal state.
Again, it is highly unlikely you will find yourself needing to do this. If you do and think someone else could benefit from it, contribute back to the community!
- This recipe covers all the built-in strategies to handle multiple resolutions, and you should be fairly comfortable with them now. This means you can move on to more entertaining things like Chapter 3, Advanced 2D Graphics.