
During our first contact with the Libgdx maps API, we will create a simple level with the Tiled map editor, load it into our game, and render it as part of our game loop. Tiled is a very popular, cross-platform, freely available, open source tile-based editor.
There is not much you need to know to start working with Tiled maps in your game. You will soon realize how extremely simple the process is, as Libgdx, very kindly, does all the hard work for you!
Download and install the latest version of Tiled for your operating system from http://www.mapeditor.org/download.html.
We are going to use the Base tileset pack created by Kenney and available under the Creative Commons Zero license at http://www.kenney.nl/assets.
Make sure the samples projects are in your Eclipse workspace.
During the first part of this section we will briefly cover how you can create simple maps with Tiled and then we will move on to the basics of the Libgdx maps API.
Perform the following steps:
- Open Tiled and click on File and New Map.
- We are going to work with Orthogonal maps although Tiled and Libgdx also support Isometric ones.
- Our tileset is made out of
21x21pixel blocks, so introduce those values in the Tile size panel. - Now, select Map size in tiles, in our case, we have chosen
30x12. Do not worry, you can change it later if you need to. Click on the OK button when you are done. - You cannot go much further without an imported tileset. Click on Map | New tileset and select
data/maps/tileset.png. The Tile size is21x21and in this case we have1 pxfor Margin and another one for Spacing. Click on OK when you are done. - Repeat the same process with
data/maps/backgrounds.png. - Maps are organized in layers that are rendered from bottom to top. In the Layers panel, you can create, delete, rename, and rearrange layers. For our setup, we will be using three: background, terrain, and foreground.
- To place tiles onto the map, make sure you are in the correct layer, select a tile from the Tilesets panel and pick the Stamp brush tool. Now you can "stamp" tiles onto the map.
- The Bucket Fill tool will cover the isolated island with the selected tile.
- For convenience, it is also possible to select several tiles from the set and stamp them all at once.
- Play around with Tiled for a while and save the map when you are happy with it by clicking on File and then on Save. Our saved map will be located at
data/maps/tiled.tmx.
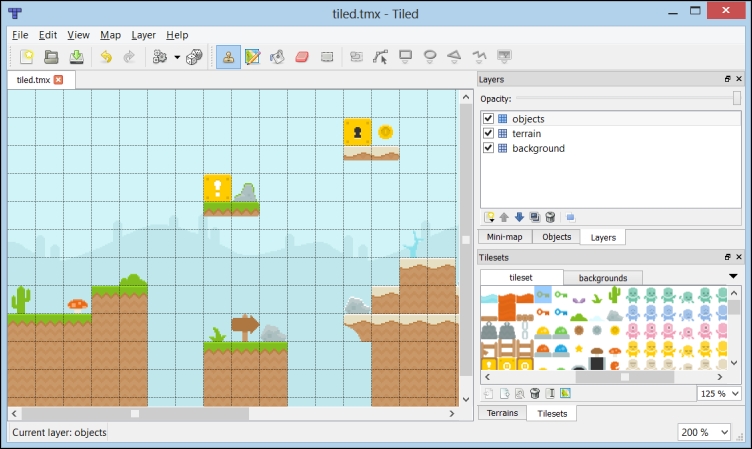
The Tiled interface can be seen in the following screenshot:
The code for this sample is in the TiledMapSample.java file. Follow these steps:
- First of all, we define our viewport size using world units:
private static final float VIRTUAL_WIDTH = 384.0f;
private static final float VIRTUAL_HEIGHT = 216.0f;
- To move the camera around, we will use the following constant, expressed in world units per second:
private static final float CAMERA_SPEED = 5.0f;
- We add a
TiledMapobject to carry all the information of our level. TheTmxMapLoaderclass knows how to parse.tmxlevel files, which is the format used by Tiled. Additionally, we will useOrthogonalTiledMapRendererto draw ourTiledMapinstance on the screen. Finally, we have adirectionvector to control camera movement as well as a viewport and a camera:private TiledMap map; private TmxMapLoader loader; private OrthogonalTiledMapRenderer renderer; private Vector2 direction;
- In the
create()method, we instantiate the loader and call itsload()method with our recently created map to obtain aTiledMapobject. The renderer constructor takes a map and, optionally, a batch and the conversion scale from pixel to world units. When no batch is supplied, the renderer will create one of its own. You need to remember to dispose of both the map and the renderer whenever you stop needing them to avoid memory leaks:public void create() { ... loader = new TmxMapLoader(); map = loader.load("data/maps/tiled.tmx"); renderer = new OrthogonalTiledMapRenderer(map); direction = new Vector2(); } - The
render()method illustrates how simple it is to draw our map on the screen. First, we update the position of the camera according to the user's input. Then, we callsetView()on the renderer passing in the camera so the renderer knows which section of the map the camera is looking at. Finally, we simply call the renderer function,render():public void render() { Gdx.gl.glClearColor(0.8f, 0.8f, 0.8f, 1.0f); Gdx.gl.glClear(GL20.GL_COLOR_BUFFER_BIT); updateCamera(); renderer.setView(camera); renderer.render(); }Note
The
render()method will go over all visible tile layers, drawing them from bottom to top. If you only want to render specific layers, you can use thevoid render(int[] layers)method, which takes an array of layer indices. This could be helpful when you want to render the level, your characters, and some overlay on top of them, such as fog or clouds. - The
updateCamera()function is actually quite simple. First, we set the direction vector to zero (0, 0) and set it depending on whether the arrow keys are pressed or the user is touching near the edges of the screen. We then normalize the vector, which basically means scale it proportionally so its length equals1. Finally, we scale it by the camera speed times the delta time and add it to the camera position:direction.set(0.0f, 0.0f); int mouseX = Gdx.input.getX(); int mouseY = Gdx.input.getY(); int width = Gdx.graphics.getWidth(); int height = Gdx.graphics.getHeight(); if (Gdx.input.isKeyPressed(Keys.LEFT) || (Gdx.input.isTouched() && mouseX < width * 0.25f)) { direction.x = -1; } else if (Gdx.input.isKeyPressed(Keys.RIGHT) || (Gdx.input.isTouched() && mouseX > width * 0.75f)) { direction.x = 1; } if (Gdx.input.isKeyPressed(Keys.UP) || (Gdx.input.isTouched() && mouseY < height * 0.25f)) { direction.y = 1; } else if (Gdx.input.isKeyPressed(Keys.DOWN) || (Gdx.input.isTouched() && mouseY > height * 0.75f)) { direction.y = -1; } direction.nor().scl(CAMERA_SPEED * Gdx.graphics.getDeltaTime()); camera.position.x += direction.x; camera.position.y += direction.y; - We do not want the user to be able to scroll past the map limits, so we need to clamp the camera position accordingly. We can access the array of layers with
getLayers()and then query the dimensions in tiles and size of each tile rather easily. The layer with index0corresponds to the bottom layer (background in our case):TiledMapTileLayer layer = (TiledMapTileLayer)map.getLayers().get(0); float cameraMinX = viewport.getWorldWidth() * 0.5f; float cameraMinY = viewport.getWorldHeight() * 0.5f; float cameraMaxX = layer.getWidth() * layer.getTileWidth() - cameraMinX; float cameraMaxY = layer.getHeight() * layer.getTileHeight() - cameraMinY; camera.position.x = MathUtils.clamp(camera.position.x, cameraMinX, cameraMaxX); camera.position.y= MathUtils.clamp(camera.position.y, cameraMinY, cameraMaxY); camera.update();
That is all! Now you can work with Tiled maps from Libgdx. The following screenshot shows what you should be seeing on your screen. Magic!

You may observe some rendering artifacts when moving around. These are produced by imprecisions when dealing with the limits of each region in the atlas. Sometimes, showing a region might cause the edge of a neighboring region to appear. In order to solve the issue, you need to generate a tileset with Edge padding, as we have seen in the More effective rendering with regions and atlases recipe in Chapter 2, Working with 2D Graphics.
It is possible to load Tiled maps asynchronously with AssetManager. Please refer to Chapter 7, Asset Management, for more information on the subject:
assetManager.setLoader(TiledMap.class, new TmxMapLoader(new InternalFileHandleResolver());
assetManager.load("data/maps/tiled.tmx", TiledMap.class);
...
map = assetManager.get("data/maps/tiled.tmx", TiledMap.class);The Libgdx 2D maps API is format-agnostic. Editor-specific systems can reuse and extend the classes provided by the API. Take a look at the base model in the following UML diagram:

Here is a brief description of each class:
MapRenderer: This is the base to renderMapobjectsMap: This is the main class that contains a set of layers and propertiesMapProperties: This is a collection of key-value pairs to allow setting on different objectsMapLayer: This is a collection of objectsMapObject: This base map object has a name, opacity, visibility, and a collection of properties
Do not worry about all these classes just yet. Layers, objects, and properties will be covered in the next recipe. The com.badlogic.gdx.maps.tiled Libgdx package located at http://libgdx.badlogicgames.com/nightlies/docs/api/com/badlogic/gdx/maps/tiled/package-frame.html contains all the specialized classes to handle Tiled maps.
Tiled exports maps to .tmx files, but they are nothing more than easily readable plain old XML. As you can see, it contains all the information about tile sizes, dimensions, and layers. To save up space, layer data is represented in Base64, which the loader handles effortlessly:
<map version="1.0" orientation="orthogonal" width="30" height="12" tilewidth="21" tileheight="21">
 <tileset firstgid="1" name="tileset" tilewidth="21" tileheight="21" spacing="2" margin="2">
  <image source="tileset.png" trans="5e81a2" width="692" height="692"/>
 </tileset>
 <tileset firstgid="901" name="backgrounds" tilewidth="21" tileheight="21">
  <image source="backgrounds.png" trans="5e81a2" width="231" height="189"/>
 </tileset>
 <layer name="background" width="30" height="12">
  <data encoding="base64">...</data>
 </layer>
...
</map>
Note
To change the layer format in Tiled, click on Map and then on Map Properties and expand the list. You can pick from XML, CSV, as well as Base 64, both compressed and uncompressed. Base 64 encoding is good because it considerably reduces the size of the file but it makes it less readable, so it is up to you to decide. Libgdx supports Base 64 and XML.
The OrthogonalTiledMapRenderer class is so awesome; you only need to supply the camera and it will handle everything else. Moreover, it is also really efficient as it will cull away tiles that wouldn't end up on the screen. Naturally, you still need to take a couple of details into consideration:
Although we truly believe Tiled is a fantastic piece of software that will meet the need of the vast majority of 2D game developers, it just might not be what you feel comfortable with. Luckily enough, Libgdx comes with built-in support for an alternative: tIDE Tile Map Editor, an open source Windows-only solution. Feel free to take a look at http://tide.codeplex.com/.
Libgdx also provides multiple renderers for Tiled maps; each one of them presents different features, advantages, and disadvantages. It is really up to you to decide which one to go for. They are as follows:
HexagonalTiledMapRenderer: This is the render you should be using when working with hexagonal maps.IsometricTiledMapRenderer: This is ideal for regular isometric maps.IsometricStaggeredTiledMapRenderer: This is the appropriate solution when rendering staggered Tiled maps.OrthoCachedTiledMapRenderer: This is the alternative renderer for orthogonal maps. It uses a cached texture to avoid rendering large amounts of tiles every frame. However, it is very inefficient if the tiles change often as the cache needs to be rebuilt.