
The shaders we have seen so far simply apply a non-configurable filter to a texture, and nothing more. You will most likely want to have richer effects in your applications, some that change over time and others that take into account external factors such as user input. This recipe is all about uniforms, which let us send parameters from the Java code into the vertex and fragment shader scripts.
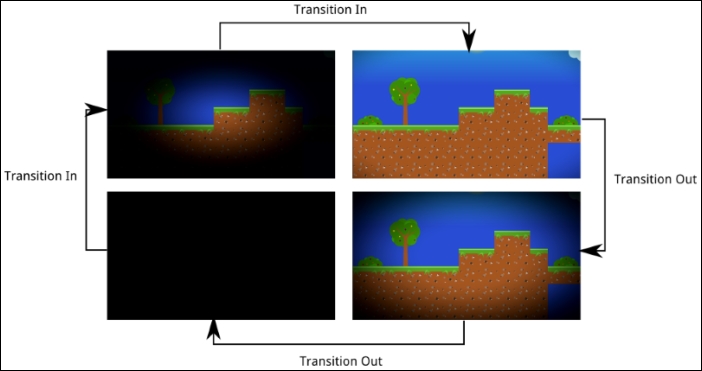
We will add a vignette effect to our classic jungle background. The shader will create a circle in the center of the screen and darken everything that falls out of it. From the code, we will increase and decrease the circle's radius so that it looks like a scene transition. Refer to the following diagram for further clarity:

This recipe requires you to import the sample projects into your Eclipse workspace.
The code for the vignette shader is located in the following paths:
[cookbook]/samples/samples-android/assets/data/shaders/vignette.vert[cookbook]/samples/samples-android/assets/data/shaders/vignette.frag
First, let's take a look at the vignette shader program. The vertex shader is exactly identical to the ones we have seen in the Welcome to the world of shaders recipe, so we will move on to the fragment shader, where the actual work takes place.
Two uniforms, resolution and radius, are defined, and we expect the values to be set from the Java code. The first uniform informs us about the current dimensions of the screen, and the second uniform establishes the radius of the vignette effect. You will also find two constants, SOFTNESS and VIGNETTE_OPACITY; the former is used to define the transition from dark to bright areas while the latter specifies how dark the areas outside of radius become:
uniform sampler2D u_texture;

varying vec4 v_color;
varying vec2 v_texCoord;

uniform vec2 resolution;
uniform float radius;

const float SOFTNESS = 0.1;
const float VIGNETTE_OPACITY = 0.9;
Take a look at the main() function. To create the circle, we need to figure out how far the current fragment is from the center of the screen and apply some kind of threshold, using the radius to decide whether it needs to be darkened.
We will work with positions ranging from 0.0 to 1.0, using the center of the screen as the origin, hence (gl_FragCoord.xy / resolution.xy) - vec2(0.5). We multiply the x component of the position by the aspect ratio to avoid having a squashed circle. The length() GLSL function returns the length of a vector, which, in our case, is the distance in relative terms (0.0 to 1.0) from the current fragment to the center of the screen.
The smoothstep(low, high, value) function returns 0.0 if the value is less than low, and 1.0 if it is greater than high. When it is somewhere in between, it uses the Hermite cubic interpolation function to return a value between 0.0 and 1.0. We can also use step(threshold, value), with either 0.0 or 1.0, depending on whether value is less than or greater than threshold. However, we will have a very rough-edged circle in the end.
Finally, we take the color of the current pixel according to the texture sampler and the texture coordinates. The mix(x, y, a) function takes x, and y, and linear interpolates between the two, using a (ranging between 0.0 and 1.0). gl_FragColor receives the resulting RGB color with the original alpha of the fragment:
void main() {
  vec2 position = (gl_FragCoord.xy / resolution.xy) - vec2(0.5);
  position.x *= resolution.x / resolution.y;
  float len = length(position);
  float vignette = smoothstep(radius, radius+SOFTNESS, len);
  vec4 texColor = texture2D(u_texture, v_texCoord);
  texColor.rgb = mix(texColor.rgb, texColor.rgb * vignette, VIGNETTE_OPACITY);
  gl_FragColor = vec4(texColor.r, texColor.g, texColor.b, texColor.a);
}
The Java code for this recipe is hosted in the ShaderUniformSample.java file, which contains a classic ApplicationListener implementation. To represent the different phases our application can go through, we define a State enum with the values TransitionIn, TransitionOut, and Picture:
private enum State {
  TransitionIn,
  TransitionOut,
  Picture,
}
Three constants are added to specify the duration of each state: a second to transition into the picture, half a second to transition out, and two seconds showing either the picture or a black screen:
private static final float TRANSITION_IN_TIME = 1.0f;
private static final float TRANSITION_OUT_TIME = 0.5f;
private static final float PICTURE_TIME = 2.0f;
The next step is to add our members. To render our background, we need a camera, a viewport, a batch, and the background Texture reference. To apply the effect, we also count with ShaderProgram, the current transition state and the time value we spent in the current state. Finally, we need to cache the current resolution in an array (to avoid runtime allocations) and the current radius of the vignette:
private Texture background;
private ShaderProgram shader;
private State state;
private float time;
private float resolution[];
private float radius;
Inside create(), we proceed to instantiate our camera, viewport, batch, background, and shader. For the latter, the vignette.vert and vignette.frag scripts are used. We then create the resolution array, set the sprite batch to use the vignette shader, and initialize the state and time variables:
public void create() {
…
  background = new Texture(Gdx.files.internal("data/jungle-level.png"));
  shader = new ShaderProgram(Gdx.files.internal("data/shaders/
vignette.vert"),
Gdx.files.internal("data/shaders/vignette.frag"));
  resolution = new float[2]
  camera.position.set(VIRTUAL_WIDTH * 0.5f, VIRTUAL_HEIGHT * 0.5f, 0.0f);
  batch.setShader(shader);
  state = State.TransitionIn;
  time = 0.0f;
}
As is customary, we get rid of the resources allocated by batch, background, and shader in the dispose() method:
public void dispose() {
  batch.dispose();
  background.dispose();
  shader.dispose();
}
Inside the resize() method, we update our viewport and resolution array with the current viewport dimensions.
The next step is to update state. For the transition states, we update the vignette radius using linear interpolation. The radius goes from 0.0f (all black) to 1.0f (all clear), so we only need to divide time over the corresponding transition duration so as to know how far through it we stand. For the outro, we go from a big radius to a small one, hence 1.0f – time / TRANSITION_OUT_TIME.
Each state needs to check whether it is time to change to the next one, in which case we assign the new state to the state variable and reset time. Finally, we make sure radius is within our limits to avoid artifacts in the shader using MathUtils.clamp(), and we update time according to Gdx.graphics.getDeltaTime():
switch(state) {
case TransitionIn:
  radius = time / TRANSITION_IN_TIME;

  if (time > TRANSITION_IN_TIME) {
    time = 0.0f;
    state = State.Picture;
  }

  break;
case TransitionOut:
  radius = 1.0f - time / TRANSITION_OUT_TIME;

  if (time > TRANSITION_OUT_TIME) {
    time = 0.0f;
    state = State.Picture;
  }

  break;
case Picture:
  if (time > PICTURE_TIME) {
    time = 0.0f;
    state = radius == 0.0f ? State.TransitionIn : State.TransitionOut;
  }
  break;
}

radius = MathUtils.clamp(radius, 0.0f, 1.0f);
time += Gdx.graphics.getDeltaTime();
The actual rendering is quite simple; nothing new on this aspect, except that this time, we need to pass resolution and radius through to the shader. This is achieved through the setUniform2fv() and setUniformf() methods in the ShaderProgram class. The first method is used for the vec2 objects, while the second is needed for float uniforms:
viewport.update(Gdx.graphics.getWidth(), Gdx.graphics.getHeight());
camera.update();
batch.setProjectionMatrix(camera.combined);
batch.begin();
shader.setUniform2fv("resolution", resolution, 0, 2);
shader.setUniformf("radius", radius);
…
batch.end();
The following diagram illustrates all the transitions our sample goes through:
The essence of this recipe is the uniform shader variables and how we set them from the Java code. So far, we have seen just two ShaderProgram methods available to do this. However, there are many other variants we must use, depending on the uniform type. For a complete list, check the official documentation at http://libgdx.badlogicgames.com/nightlies/docs/api/com/badlogic/gdx/graphics/glutils/ShaderProgram.html.
As you can see, they basically take the name of the uniform and a series of values, either of type float or int. This maps them directly to individual variables or arrays in GLSL. Notice how some other convenience methods are added to pass in Vector2, Vector3, or Color objects, which makes for more readable code:
void setUniformf(java.lang.String name, Vector3 values)
As additional points of interest, we will learn how to detect shader compile errors and pass uniforms to the shader in a more efficient way.
Making mistakes is only human; everyone writes bad syntax at some point. Luckily enough, we have compilers that are sufficiently smart to tell us we have missed a semicolon or misspelled a variable name. Shader programs are compiled at creation time and, obviously, might contain these kinds of errors. However, if we do not explicitly check for the errors, our program will terminate with an exception the first time we try to render using the shader.
Libgdx provides an API that allows us to ask whether a shader was successfully compiled and, if there was a problem, to ask why. At least during development, it is highly recommended to do this on a per-shader basis. The isCompiled() method returns whether the compilation has been carried out with success, while getLog() gives us more information about the process:
if (!shader.isCompiled()) {
  Gdx.app.error("Shader", shader.getLog());
}If we remove the SOFTNESS constant definition from our vignette.frag script as an example, and try to run the sample, we will get the following error:
Shader: Fragment shader failed to compile with the following errors:
ERROR: 0:15: error(#143) Undeclared identifier SOFTNESS
ERROR: error(#273) 1 compilation errors.  No code generated
Every shader uniform has a location represented by an integer value, and this can be retrieved with:
int getUniformLocation(java.lang.String name)
ShaderProgram features equivalent setUniform() methods that accept a uniform location instead of a string with the name. This results in a performance improvement that might not be huge, but it does not cost us much to achieve. It is as simple as caching the locations of the uniforms we want to set at the same time we instantiate the shader.