
Modern games do not simply play sounds and forget about them; they usually feature a full-blown spatial audio system.
Effects have a position in the game, which makes them play differently depending on the camera position. The further away the camera moves from the source, the fainter the effect will be perceived. Moreover, they usually take into account the angle between the camera and the effect so as to produce a stereo effect. Some engines implement really complicated sound models to produce the most realistic results possible.
Not only do these systems play an important role in immersion, they also greatly contribute to gameplay in many occasions. In a stealth game, for instance, it is crucial to know where a sound is coming from as it may hint the position of nearby enemies. You can surely come up with many other examples where sound positioning is relevant to gameplay.
In this recipe, we will cover the full implementation of a simple 2D spatial sound system as well as its usage. Keep in mind that this will be a rather simplistic approach; however, the results are pretty decent, extensible, and ready to be used in your games.
Make sure the sample projects are in your Eclipse workspace to follow this recipe. We will also reuse some of the sound effects from the Playing short sound effects recipe.
First, we will cover the spatial sound system classes and see how they fit together, and then move on to an example. For space reasons, implementation details will be omitted, unless they are not trivial, in which case they will be accompanied with appropriate explanations.
Find the spatial audio system classes under the com.cookbook.audio package.
The Listener class holds information about the entity that receives the sounds. For now, we need position and direction as well as getters and setters for them:
public class Listener {
  private Vector2 position = new Vector2();
  private Vector2 direction = new Vector2();

  public Listener();
  public Vector2 getPosition();
  public Vector2 getDirection();
  public void update(Vector2 position, Vector2 direction);
}
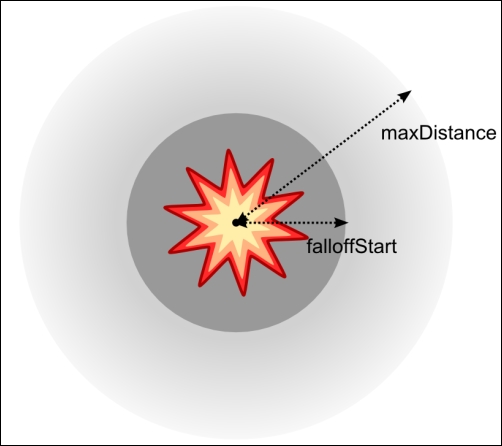
SoundData models a sound effect archetype; it holds a reference to the sound, its duration in seconds, the distance in world units at which it starts fading out, and the maximum distance at which it can be heard. The getter methods are self-explanatory.
The following illustration shows the aforementioned SoundData properties:
Here is the code:
public class SoundData {
  private Sound sound;
  private float duration;
  private float falloffStart;
  private float maxDistance;

  public SoundData(Sound sound, float duration, float falloffStart, float maxDistance);
  public Sound getSound();
  public float getDuration();
  public float getFalloffStart();
  public float getMaxDistance();
}Playing effects are represented by the SoundInstance class. It contains a reference to the SoundData instance it belongs to, the id of the SFX instance, its current position, and the time it started playing, so we can figure out whether it is complete:
public class SoundInstance {
  private SoundData data;
  private long id;
  private Vector2 position;
  private long startTime;
  private Vector2 tmp;

  public SoundInstance(SoundData data);
  public Vector2 getPosition();
  public void setPosition(Vector2 position);
  public boolean update(Listener listener);
  public boolean isFinished();
  private void play();
}
SoundInstance objects play their referenced effect at creation time by internally calling the private play() method. It simply calls play() on the Sound object, caching off the resulting id and recording the current time in milliseconds:
private void play() {
  id = data.getSound().play();
  startTime = TimeUtils.millis();
}
The update() method takes a Listener instance and is responsible for updating the effect's volume and panning. It returns a Boolean value indicating whether the instance has finished playing, so we check this first:
if (isFinished()) {
  return true;
}
The first step to calculate the correct panning for the playing sound is to get the normalized direction from the listener to the source positions:
Vector2 listenerPos = listener.getPosition();
Vector2 listenerDir = listener.getDirection();

tmp.set(position).sub(listenerPos).nor();
Then, we get the angle between the listener direction and the direction from the listener to the source. We need to know whether the source is on the right or the left of the listener, for which we check the sign of the cross-product between the two vectors:
float angle = Math.abs(listenerDir.getAngleRad() - tmp.getAngleRad());
boolean isRight = tmp.crs(listenerDir) > 0.0f;
The next step is to use linear interpolation and the angle to get the right pan value. Remember that a pan of -1.0 indicates the sound is on the left, while 1.0 means it is on the right:
float pan = 0.0f;
if (angle > MathUtils.PI * 0.5f) {
angle -= MathUtils.PI * 0.5f;
pan = Interpolation.linear.apply(isRight ? 1.0f : -1.0f, 0.0f, angle / (MathUtils.PI * 0.5f));
}
else {
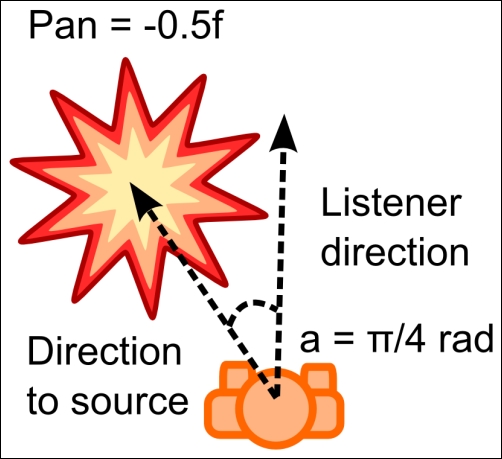
pan = Interpolation.linear.apply(0.0f, isRight ? 1.0f : -1.0f, angle / (MathUtils.PI * 0.5f));
}See the following diagram to understand how this calculation works:
Obtaining the right volume is a lot simpler. The first volume calculation gives us a value between 0.0 and 1.0 as long as the distance falls within falloffStart and maxDistance. We need to clamp it to make sure this remains in the domain:
float distance = position.dst(listenerPos);
float falloffStart = data.getFalloffStart();
float volume = 1.0f - (distance - falloffStart) / (data.getMaxDistance() – falloffStart);
float volume = MathUtils.clamp(volume, 0.0f, 1.0f);
To apply the results, we call the setPan() method using id as well as the resulting pan and volume:
data.getSound().setPan(id, pan, volume);
return false;
We can instantiate SoundData objects manually and give them properties from the Java code. However, it is a lot cleaner to keep logic and data separate. This way, we can reuse the system for different projects without tampering with the code. In this case, the list of SoundData definitions is in the data/sfx/spatial-audio.json file:
[ { name : "data/sfx/sfx_01.wav", duration : 4, falloffStart : 1, maxDistance : 10 } ... ]The SoundManager class orchestrates the whole process. It loads the JSON file with the collection of sound definitions we can choose from and keeps track of the active sound instances. The play() method takes the sound's filename and returns the instance upon success, which is useful to update the source positions if they are not static. The updateListener() method takes the new listener location and direction so that it can make accurate calculations on the following update. The update() method iterates over the collection of playing sounds, calling their update() function and removing them from the collection when done:
public class SoundManager implements Disposable {

  private Listener listener;
  private Array<SoundInstance> sounds;
  private ObjectMap<String, SoundData> soundsData;

  public SoundManager(FileHandle handle);
  public void dispose();

  public SoundInstance play(String soundName) {
    SoundData data = soundsData.get(soundName);

    if (data != null) {
      SoundInstance instance = new SoundInstance(data);
      instance.update(listener);
      sounds.add(instance);
      return instance;
    }

    return null;
  }
  public void updateListener(Vector2 position, Vector2 direction);

  public void update() {
    for (int i = 0; i < sounds.size; ) {
      SoundInstance instance = sounds.get(i);

      if (instance.update(listener)) {
        sounds.removeIndex(i);
      }
      else {
        ++i;
      }
    }
  }

  private void loadSoundData(FileHandle handle);
}The
SpatialAudioSample class makes use of our newly created 2D audio system. We will create several sound emitters represented by small circles and a user-controlled entity to be the listener. The W, A, S, and D keys control the circles' motion, while the mouse pointer determines their direction.
This is what you will be creating:
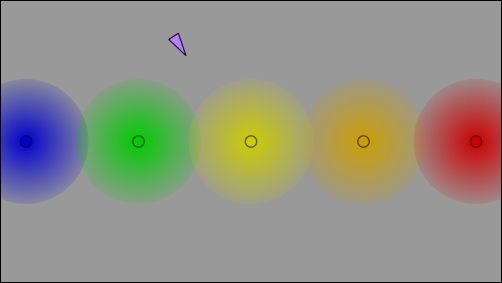
Our sample will then have a SoundManager, a collection of SoundEmitter objects, and a player:
private SoundManager soundManager;
private TextureRegion emitterTexture;
private TextureRegion playerTexture;
private Player player;
private Array<SoundEmitter> emitters;
In the create() method, soundManager is passed our spatial-audio.json file; we load the textures and instantiate all the emitters as well as the user-controlled entity:
public void create() {
  …
  soundManager = new SoundManager(Gdx.files.internal("data/sfx/spatial-audio.json"));
  emitterTexture = new TextureRegion(new Texture(Gdx.files.internal("data/sfx/emitter.png")));
  playerTexture = new TextureRegion(new Texture(Gdx.files.internal("data/sfx/player.png")));
  player = new Player();
  createSoundEmitters();
}
We need to remember to dispose all our resources, including soundManager:
public void dispose() {
  soundManager.dispose();
  batch.dispose();
  emitterTexture.getTexture().dispose();
  playerTexture.getTexture().dispose();
}
The SoundEmitter inner class is fairly simple; it contains the name of the sound it plays, a position, a color, and its corresponding sound instance. It simply keeps playing the same sound in a loop:
private class SoundEmitter {
  String name = new String();
  Vector2 position = new Vector2();
  Color color = new Color(Color.WHITE);
  SoundInstance soundInstance;

  public void update() {
    if (soundInstance == null || soundInstance.isFinished()) {
      soundInstance = soundManager.play(name);
    }
    soundInstance.setPosition(position);
  }
}
The
createSoundEmitters() method is self-explanatory; it creates the emitters array and populates it with a few manually configured emitters:
private void createSoundEmitters() {
  emitters = new Array<SoundEmitter>();

  SoundEmitter emitter = new SoundEmitter();
  emitter.name = "data/sfx/sfx_01.wav";
  emitter.position.set(-18.0f, 0.0f);
  emitter.color = Color.BLUE;
  emitters.add(emitter);

  …
}
The Player inner class is responsible for keeping track of and updating the user-controlled entity according to the inputs:
private class Player {
  final float speed = 10.0f;
  Vector2 position =  new Vector2();
  Vector2 direction = new Vector2(1.0f, 0.0f);
  Vector2 movement = new Vector2();
  Vector2 mousePos = new Vector2();

  public void update(float delta);
}
Finally, the render() method updates the manager, the player, and all the emitters. It also draws all the elements onscreen, using their corresponding texture region, current position, and direction:
public void render() {
  …
  soundManager.updateListener(player.position, player.direction);
  soundManager.update();

  player.update(Gdx.graphics.getDeltaTime());

  for (SoundEmitter emitter : emitters) {
    emitter.update();
  }

  …
}
Experiment with how some sounds fade out while others can be heard with more intensity as you move around. Now, you can add this feature to your next game!
This is not required to be explained for this recipe as the system we implemented is explained thoroughly in the previous section.
The spatial audio system you just implemented can be expanded in several interesting ways.
You can research sound propagation here, introduce a more realistic model for intensity decay, and introduce phenomena such as the Doppler effect. Compare the results, play around with both approaches in your game, and decide which one feels better. At the end of the day, games are not about simulating real life, but providing a good experience.
Additionally, you can extend the system to support 3D coordinates instead of just 2D ones. The necessary changes are straightforward, and it will still be usable for bidimensional games.
Finally, if you want to save some CPU time, it is not necessary to call the update() method for every frame.
- As far as our cookbook is concerned, we are done with the Libgdx sound system. If you think you did not understand all the concepts well, we invite you to review the recipes and play around with the samples as an exercise. Otherwise, feel free to move on to the I/O system with the The first approach to file handling in Libgdx recipe.