
Before getting your hands dirty, it becomes absolutely necessary to clear up some key concepts:
- Actor: This represents a node within the scene graph and its default properties are position, size, origin, scale, rotation, Z-index, and color. In the context of this chapter, a node can contain a widget or a group of them taking into account that it will work in its local coordinate system, which means that transformations are performed relative to its current coordinate frame's origin and axes. Apart from that, it knows how to draw itself.
Scene2D actors can serve as any type of game element. However, they are often used for UI purposes (buttons, labels, checkboxes, and so on).
- Action: This consists of a progressive or immediate transformation to perform over an actor, for example, rotating a button or coloring an image.
- Event: This is launched when the user interacts with the Scene2D interface, for instance, by clicking/touching a widget. Actors will include listeners in order to handle them. There are plenty of event types that can be easily grouped into three self-explanatory names:
ChangeEvent: This is fired when something has changed in an actor. This change is subject to the peculiarity of the actor itself, for instance, clicking a button or changing aSelectBoxselection. It is specific to Scene2D and it is the most common within this context.FocusEvent: As its name suggests, this is fired when keyboard or scroll focus is gained or lost.InputEvent: This covers all input events from touch, mouse, keyboard, and scrolling. Some good examples might be a key press or a finger touch moving over an actor.
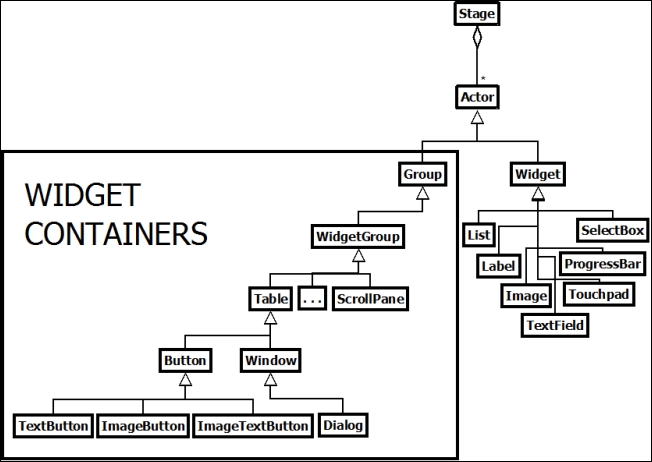
Scene2D tree nature diagram
Scene2D relies on a hierarchical organization of groupable actors that endows it with the following features:
- Action system: This feature makes things simple and empowers your application with parallel or chained effects over the actors.
- Descendant transformations: Any transformation applied to a group will affect all its children.
- Flexible event handling: Actors can handle events before or after their parents do it through the two-step propagation phases: capture and regular, respectively.
- Individual simplified drawing: Your sprite will be drawn in its local coordinate system whether it is rotated or scaled. Group drawing will render all the visible children.
As a consequence of the model, a group is also an actor.
Almost every Scene2D UI is managed by a Stage instance. This class is in charge of receiving input events and firing them to the appropriate actors, generating the chance of handling them before their targets. You will get a better overview of this as you advance through this chapter.
The sample projects are required to follow this recipe, so make sure you already have them in your Eclipse workspace. Right-click on the Package Explorer panel, select Import, and then click on Gradle Project. They are located at [cookbook]/samples. In case you If you have any difficulty with this, feel free to re-read Chapter 1, Diving into Libgdx.
Once you finish this recipe, don't forget to visit the ActorSample.java source file, which contains a representative sample of a typical actor's life cycle with a wide range of manipulation options.
There are a lot of default actors that we will cover later on, but first we will create, manipulate, and render our own one.
Please follow these steps to create your Actor:
- First of all, define your custom actor class by extending the Libgdx one. Also, make it implement the
Disposableinterface to free the memory allocated by the texture:public class MyActor extends Actor implements Disposable { TextureRegion region = new TextureRegion( new Texture(Gdx.files.internal("data/myactor.png")) ); public MyActor() { setPosition(SCENE_WIDTH * .5f,SCENE_HEIGHT * .5f); setWidth(1.61f); setHeight(0.58f); } public void dispose() { region.getTexture().dispose(); } } - Even though it isn't mandatory, having
Stageallows us to encapsulate the camera, manage event handling, and get a default root group. For this first recipe, we will not cover event listening onstagebecause we will just set our sample asInputListener, but remember from Chapter 4, Detecting User Input, that if you want to keep multiple input processors, you must go forInputMultiplexer. In this specific scenario, let's just initialize it; we will go beyond later on:Stage stage = new Stage(viewport, batch);
- Initialize
myactortoo with its previously defined constructor:MyActor myactor = new MyActor();
- Next, add your actor to the stage:
stage.addActor(myactor);
- Note that the stage has to be disposed:
public void dispose() {
  batch.dispose();
  stage.dispose();
}
Render your actor as follows:
- Override the
drawmethod of your actor class to render the region, for example. Note that a long version of thedrawmethod from theSpritebatchclass is used. Otherwise, upcoming actions, such as rotating or scaling, will not be reflected at rendering:public void draw(Batch batch, float alpha) { Color color = getColor(); // Combine actor's transparency with parent's transparency batch.setColor(color.r, color.g, color.b, color.a * alpha); // Draw according to actors data model batch.draw(region, getX(), getY(), getOriginX(), getOriginY(), getWidth(), getHeight(), getScaleX(), getScaleY(), getRotation()); } - As a consequence of using
stage, rendering becomes really simple, no matter the amount of actors that it contains. Just update each actor ofstageand draw it:public void render () { Gdx.gl.glClearColor(0, 0, 0, 1); Gdx.gl.glClear(GL20.GL_COLOR_BUFFER_BIT); stage.act(Gdx.graphics.getDeltaTime()); stage.draw(); // This will call myactor's draw method }
On the one hand, immediate transformations can be performed over actors with the following methods:
|
Transformation |
Methods |
|---|---|
|
Rotation |
|
|
Translation |
|
|
Scale |
|
|
Size |
|
Parallel to these methods, you can retrieve data with getRotation(), getX(), getY(), getWidth(), getHeight(), getScaleX(), and getScaleY().
Note that you cannot transform a Group by default. To enable it, you must call its setTransform(true) method so that SpriteBatch is transformed and children are drawn in their parents' coordinate system.
On the other hand, Libgdx provides you with actions. Here we will cover the principal built-in Action types, without digging into their variants (don't hesitate to visit the official API doc to get the complete picture), and how you can combine them.
In order to use these default actions, you can just instantiate them, giving values to their properties by calling their setters and finally adding it to the actor. The expected behavior will take place within the game render loop as shown in the following example code:
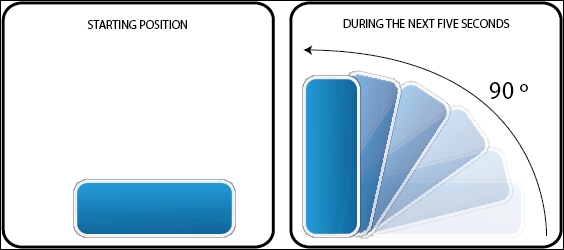
RotateByAction action = new RotateByAction();
action.setRotation(90f);
action.setDuration(5f);
myactor.addAction(action);
The next screenshot represents the preceding code so you can see what is really happening. The first box shows the actor before the action occurs. The second one covers the five-second process where the actor rotates by 90 degrees:
Nevertheless, this approach has a notable drawback consisting of allocating a new RotateToAction instance every time you need to perform it. Libgdx provides you with a Pool class to reuse objects:
Pool<RotateToAction> pool = new Pool<RotateToAction>() {
  protected RotateToAction newObject () {
    return new RotateToAction();
  }
};
RotateToAction action = pool.obtain();
action.setPool(pool);
… //Same as above
Actions can be divided into simple and complex.
Simple actions are atomic ones. An example of each type is described here:
- A typical transformation is rotation. We can rotate our actor 90 degrees over five seconds, which can be achieved using the following code:
myactor.addAction(rotateBy(90f, 5f));
- You can get really cool effects using alpha actions. In this case, just make the actor appear in the scene smoothly:
myactor.addAction(fadeIn(5f));
- In order to translate your actor along the scene to a certain coordinate, let's use the following code:
myactor.addAction(MoveTo(100f, 100f, 5f));
- You can also specify the exact size of your actor by passing the desired width and height:
myactor.addAction(sizeTo(100f, 33f, 5f));
- Don't forget about the possibility of scaling your actor in both axes:
myactor.addAction(scaleTo(2f, 2f, 5f));
- If your purpose is to hide your actor, you can use any of the following lines of code:
myactor.addAction(hide());
myactor.addAction(visible(false));
- Or maybe you want to do the opposite:
myactor.addAction(show());
myactor.addAction(visible(false));
- Another option is to remove your actor:
myactor.addAction(removeActor());
You can also schedule a set of actions:
- You can chain one action after another as a sequence, for instance, moving your actor and, once it is finished, rotating it by 90 degrees:
myactor.addAction(sequence(moveTo(100f, 100f, 5f), rotateBy(90f, 5f)));
- Repeating some task(s) a certain number of times is also possible:
myactor.addAction(repeat(3, rotateBy(90f, 5f)));
- To repeat it forever, you just have to write the following:
myactor.addAction(forever(rotateBy(90f, 5f)));
- As there is strength in numbers, performing actions parallely produces natural and dynamic effects that might catch the user's eye. Carrying this out is as simple as follows:
myactor.addAction(parallel(moveTo(-200f, myactor.getY(), 1.5f), fadeIn(1.75f)));
- What if you want to execute one action only after the queued ones (at the moment
after()is called) are done? A practical usage can be blocking a sequence:myactor.addAction(sequence(fadeOut(5f), fadeIn(5f), rotateBy(-90f,5f), after(fadeIn(10f)), fadeOut(5f)));
- It might happen that you cache your configured action into a variable that you just add to several actors, but the time taken to apply the action varies depending on the actor according to a timescale factor:
myactor.addAction(timescale(1.5f, rotateBy(90f, 5f)));
- Finally, using the same scenario as before, let's say you want the same action to start at different times on different actors, in other words, you want a delay:
myactor.addAction(delay(5f, rotateBy(90f, 5f)));
Behind the simplicity and practicality of the action usage approach, there is a background class, given it could not be any other way, named Action. This abstract class provides the skeleton for other intermediary to enclose the desired functionality or even for end actions. It relies on the setters of Actor to perform manipulations.
The spinal column is the act method, which supplies to subclasses a way to update the action based on time. Some of the main intermediate classes are:
DelegateActionEventActionParallelActionTemporalAction
As you can imagine through the self-explanatory names, they encompass some of the actions that have been already illustrated with examples in the previous section.
Undoubtedly, this wide hierarchy of action classes instigates flexibility and encourages the user to create its own ones either by extending or instantiating. If you still feel indecisive, a simple idea can be a sequence that flows into the switching of the screen. The following lines will generate a simple effect for transitions:
myactor.addAction(sequence(delay(0.5),parallel(fadeIn(2),rotateBy(360,1)),
  delay(0.5f), new Action() {
  @Override
  public boolean act(float delta) {
    myGdxSample.setScreen(new GameScreen());
    return true;
  }
}));
You might also have observed that you can pool any Action; this is because they implement the Pool.Poolable interface. This is a feature that you can apply to any class in your application that you want to reset for reuse, and in this way, you can avoid new allocations.
At this point, you will have a good understanding of the Actor and Action APIs, but we can still go beyond on the second parcel.
If you have already visited the ActorSample.java code, you would have realized that I make use of clearActions() calls. This is a useful function to stop an action in process and empty the queue, keeping the actor as it is at that moment.
Diving into action types, you will also find RunnableAction, which allows you to execute some custom code once the action is finished:
actor.addAction(sequence(fadeOut(3), run(new Runnable() {
  public void run () {
    //Custom code
  }
})));
TemporalAction can also be tweaked in terms of interpolation, which defines the change rate of an action over time. It will use linear interpolation but it may not fit your needs appropriately. It means that, for example, in a 90 degrees over five seconds RotateBy action, you can have most of the time being spent on the first 70 degrees of rotation, slowing it down and then speeding up the rest of the rotation.
Libgdx provides you with an abstract base class, Interpolation, to extend in order to facilitate the creation of new ones. Apart from this, the following out-of-the-box implementations are also supplied:
Bounce,BounceIn,BounceOutElastic,ElasticIn,ElasticOutExp,ExpIn,ExpOutPow,PowIn,PowOutSwing,SwingIn,SwingOut
In the following picture, you can see some example function curves for the preceding Interpolation classes:

Classes ending with in make the interpolation faster at the beginning and decelerate as it progresses. There is an opposite effect with classes ending with out. You can put this into practice in the following way:
actor.addAction(fadeIn(4f, swingIn));
I highly recommend that you play around with them in order to familiarize yourself with their particular behavior because they really make applications look more professional.
- Apart from Scene2D, you can also find some similar external libraries such as GridBagLayout, PageLayout, PnutsLayout, UIHierarchy, RiverLayout, FormLayout, MIGLayout, and DesignGridLayout.
- Once you understand the basis of the
Actorclass and how to interact with it, please continue to the Widget collection overview recipe to learn how to use the Libgdx built-in widgets.