
Box2D is a physics engine that simulates realistic physical interactions between the bodies in your scene and allows you to interact with the objects by applying forces too. It was originally written in C++, but the Libgdx team made a thin Java wrapper which makes calls to the underlying C++ code.
Box2D's strengths have not gone unnoticed and hence it has a favorable reputation within the industry. Important physics-based games such as Angry Birds make use of this framework. Its author is Erin Catto who has worked in projects as renowned as Diablo 3.
This recipe is necessary to avoid putting the cart before the horse, so foundations are laid and we can focus on useful real-life physics situations along with the upcoming recipes.
You must add Box2D to your project as an extension in order to make use of its API. The process is described in the Updating and managing project dependencies recipe from Chapter 1, Diving into Libgdx. In your root folder where your projects are contained, make sure you add the dependencies to the build.gradle file.
As usual, remember that you will need to import the sample projects into your Eclipse workspace.
To whet your appetite, we will implement a really simple physics simulation where boxes and balls fall from the cursor/touch location to the ground. At the end of this recipe, do not forget to run and view the source code of the Box2DSimpleSample.java file. I recommend that you become familiar with this recipe before going ahead in this chapter because the basics will be omitted in the upcoming recipes for space and simplicity reasons.
The next screenshot introduces some basic concepts that you need to know through a typical scene from an adventure game:
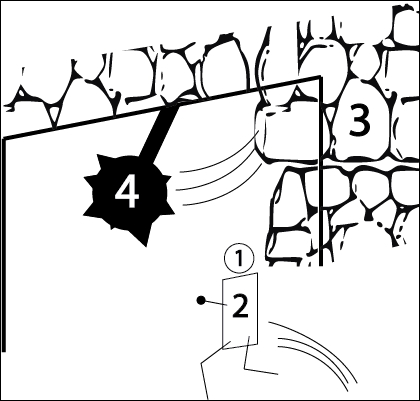
The intrepid hero's dynamic body is in the form of two fixtures. The first of them (1) has a circular shape while the second (2) is rectangular. The stone wall (3) is a static body and the mace (4) is implemented by constraining two bodies (the stick and the sharp sphere) with a joint. However, it is also interesting to read the How it works… section of this recipe in order to find a proper definition for each of these concepts.
We typically consider Box2D to use the metric system. Consequently, we should take it into account for our game world.
- To start with, let's define the visible width and height of the world:
private static final float SCENE_WIDTH = 12.8f; // 13 metres wide
private static final float SCENE_HEIGHT = 7.2f; // 7 metres high
- As a common factor for this chapter, declare the Box2D
Worldclass and theBox2DDebugRenderer, which is in charge of drawing lines to represent your fixtures and joints:World world; Box2DDebugRenderer debugRenderer;
- We will generate a dynamic body, either a ball or a box, on every mouse click, so we will cache shapes, fixture properties, and the final body definition. This information about fixtures and bodies is specified through a
BodyDefor aFixtureDefobject, respectively:BodyDef defaultDynamicBodyDef; // Box FixtureDef boxFixtureDef; PolygonShape square; // Ball CircleShape circle; FixtureDef circleFixtureDef;
- The current step and the next six steps take place in the
create()method, so after instantiating the classic viewport, we translate the camera to the initial top-right corner:// Center camera to get (0,0) as the origin of the Box2D world viewport.update(WORLD_WIDTH, WORLD_HEIGHT, true);
- The mandatory condition is to instantiate the physics world, setting its gravity and flag to indicate whether Box2D bodies are allowed to sleep and consequently are not simulated:
world = new World(new Vector2(0,-9.8f), true);
- Instantiate
Box2DDebugRenderertoo as follows:debugRenderer = new Box2DDebugRenderer();
Note
Box2DDebugRendereris an awesome tool to display the desired debug information about physics objects. The existing options to draw are active bodies, inactive bodies, Axis-aligned bounding box (AABB), velocities, and contact points between two shapes and joints.AABB is the minimum axis-aligned square that contains all the shapes from a body.
- Set the common body definition for the falling objects:
defaultDynamicBodyDef = new BodyDef();
defaultDynamicBodyDef.type = BodyType.DynamicBody;
- Cache the shape and the physical properties of the boxes:
// Shape for boxes
square = new PolygonShape();
// 1 meter-sided square (0.5f is half-width/height)
square.setAsBox(0.5f, 0.5f);

// Fixture definition for boxes
boxFixtureDef = new FixtureDef();
boxFixtureDef.shape = square;
boxFixtureDef.density = 0.8f;
boxFixtureDef.friction = 0.8f;
boxFixtureDef.restitution = 0.15f;
- Repeat the last step for the balls:
// Shape for circles
circle = new CircleShape();
// 0.5 metres for radius
circle.setRadius(0.5f);

// Fixture definition for our shapes
circleFixtureDef = new FixtureDef();
circleFixtureDef.shape = circle;
circleFixtureDef.density = 0.5f;
circleFixtureDef.friction = 0.4f;
circleFixtureDef.restitution = 0.6f;
- Do not forget to listen for user clicks:
Gdx.input.setInputProcessor(this);
Now, override the
touchDownmethod as explained in Chapter 4, Detecting User Input. Its mission will be to alternate between body creation function calls depending on a Boolean variable namedboxMode. It is important to point out that touch coordinates have their origin in the upper-left corner and they grow as they advance to the lower-right corner. It is necessary to unproject touch coordinates to transform them into world units:@Override public boolean touchDown (int screenX, int screenY, int pointer, int button) { if (button == Input.Buttons.LEFT) { //Translate screen coordinates into world units viewport.getCamera().unproject(point.set(screenX, screenY, 0)); if(boxMode) createSquare(point.x, point.y); else // Ball mode createCircle(point.x, point.y); boxMode = !boxMode; return true; } return false; } - I bet you want to know the content of those
createfunctions. The next code snippet shows the box creation. For balls, simply create the fixture with the previously definedcircleFixtureDef:private void createSquare(float x, float y) { defaultDynamicBodyDef.position.set(x,y); Body body = world.createBody(defaultDynamicBodyDef); body.createFixture(boxFixtureDef); } - For every frame, we will update our physics world in a certain amount of time, commonly known as a timestep. This is a delicate matter that will be discussed in the final recipe of this chapter. For now, let's advance by 1/60 seconds on every iteration of the
render()method. The other two parameters in the following method refer to velocity iterations and position iterations respectively. The higher they are, the most realistic simulation you will get in exchange for a performance cost:world.step(1/60f, 6, 2);
Note
Box2D caps the maximum speed of bodies to n*2, where timestep is 1/n. In this way, the limit for the previous code is 120 meters per second (or 432 kilometers per hour) as 60 * 2 = 120. As you can see, it is a very high value, and it is necessary to have such a limit in order to avoid numerical problems.
- Ask the
Box2DDebugRendererto draw the existing bodies using the matrix projection that has been already extracted from our viewport:debugRenderer.render(world, viewport.getCamera().combined);
- Last but not least, free up the memory:
public void dispose() { batch.dispose(); square.dispose(); circle.dispose(); world.dispose(); } - After some clicks or touches, you will get something like this:
As you can see, building a realistic physics environment is quite easy, but in order to understand the bowels of the current and upcoming demos, make sure you get fluent with the following Box2D base concepts:
- Fixture: This is a container that holds a shape, custom user data, physics properties such as density, friction, and restitution, and also whether it will physically react to collisions. Their mass (how heavy it is) is calculated by multiplying its area by its density.
- Density: This is the amount of mass per unit volume. The possible value ranges from zero to any positive number. For instance, air is less dense than sand.
- Friction: This allows bodies to slide over other bodies when colliding. The minimal value is 0, which means no friction, and a positive value indicates friction; the higher it is, the more the friction will be.
- Restitution: This property will make your body able to bounce. The value 0 means no bounce, while 1 will keep the body bouncing forever with the same height. Higher values get higher height.
- Bodies: These are the main actors in the physics play; they can carry zero or more fixtures that will never collide between themselves. A body's total mass is the sum of all its fixtures. The way in which a body interacts with its environment directly depends on its type:
- Static body: These are nonmoving objects internally treated as zero mass bodies.
- Kinematic body: Opposite to the previous one, a kinematic body moves under simulation according to its velocity but it is not affected by forces. However, it is still stored as a zero mass body. In addition, it will not collide with other kinematic or static bodies.
Because of these characteristics, it is ideal for being manually moved by the user.
- Dynamic body: It will interact with its entire environment, colliding with any other type of body and its velocity will be modified by forces.
- Joints: They are intended to constrain bodies to the world or to each other. Some typical usages are vehicles, ropes, chains, or rag dolls.
- World: All the simulated bodies will live in it, interacting between themselves just as defined and updating their physical properties according to a certain amount of time. The
Worldclass comes with tools to synchronously query as well as create and destroy bodies.
The Box2D API for bodies this goes beyond and gives you many more possibilities to get your desired behavior.
Some bodies, such us dead ones, should not interact in certain moments of the simulation. This is very simple to set:
body.setActive(false);
When we instantiate our World class, we could specify whether we want to allow Box2D to sleep instead of simulating nonmoving bodies, which gives us a performance gain. Now, you can also decide this for each individual body as follows:
bodyDef.allowSleep = true;
If the body in question receives a collision from another body, the sleeping one will change its status and react with the expected behavior. Alternatively, you can force the body to wake up manually:
body.setAwake(true);
Other interesting properties are linearVelocity and angularVelocity, which allow you to change the uniform speed of a body for each axis or its angular displacement respectively. The pack also comes with linearDamping and AngularDamping to reduce the effect of the first two attributes. In other words, damping represents how much velocity will be lost over time. It can be a good way to fake air resistance or a body moving through water.
body.setLinearVelocity(20f, 0f);
body.setLinearDamping(.5f);
Position and rotation can also be explicitly set with position and angle properties. Rotation can even be fixed:
bodyDef.position.set(4f,2.4f);
bodyDef.angle = 45 * MathUtils.degreesToRadians;
bodyDef.fixedRotation = true;
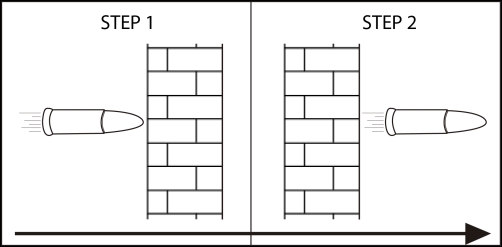
Sometimes, the velocity of a body is so high that collisions are not processed, commonly known as tunneling, just like it happens in the following situation where the bullet does not collide with the wall image:
Being aware of the extra CPU usage, you can set the following flag to get continuous collision detection:
bodyDef.bullet = true;
Finally, you can scale the effect of gravity for some particular body as follows:
bodyDef.gravityScale = .5f;