
Rendering is the most essential operation within a video game. However, it is not a cheap process, as it requires sending data from memory to the GPU as well as a sequence of steps within your GPU to transform the input data into the final 2D image.
This input data consists of vertices that are no more than points with extra attached information, such as texture coordinates. They will serve as a base for constructing basic shapes.
The following is a summarized and simplified screenshot about this process:
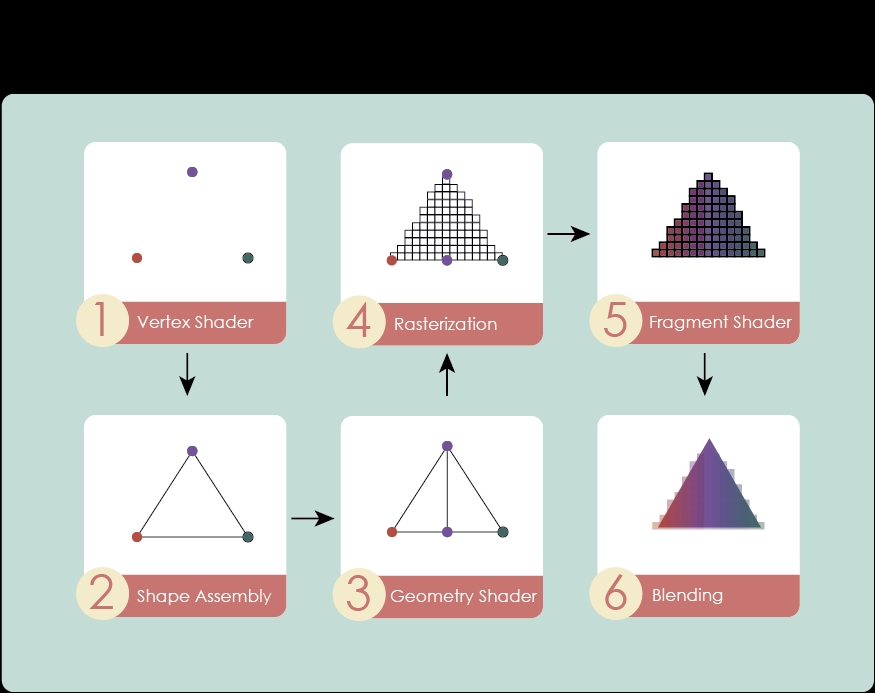
Here is a brief but concise explanation:
- Vertex shader: The main goal of this option is processing the aforementioned vertices. Additionally, it works as a walkway for later steps to receive important attributes such as color and texture coordinates.
- Shape assembly: This option joins those vertices in order to form primitive shapes.
- Geometry shader: This option evaluates the primitives passed from the previous step, and modifies them if necessary.
- Rasterization: This option is in charge of translating the visible parts of the former shapes into pixel-sized fragments that still contain interpolated values of the attached attributes.
- Fragment shader: This option allows each fragment to receive a color that can be determined by textures, lights, shadows, special effects, or simply a plain color.
- Tests and blending: This option produces the final output by blending all fragments and accepting/discarding some of them.
Some game scenes can be crowded with game entities that swallow the precious system resources. Rendering time is an important portion of this cake and reducing it to the minimum is the goal of this recipe.
As usual, we will focus on 2D graphics but it is easily adaptable to 3D.
The code for this recipe lives in the FrustumCullingSample.java file within the samples-core project that comes together with this book.
Right after running this sample, 20 game entities will be instantiated on the screen in front of a black background that can be freely explored by the user's taps/clicks. As the camera moves and loses the track of an entity, a text label, placed on the top of the window, will display the updated number of entities that are being rendered.
In order to determine whether an entity is within the camera range and thus render it, it is necessary to know its position, dimensions, and scale. Additionally, the Entity class will contain TextureRegion to draw as well as a rotation:
public class Entity {
public Vector2 position;
public Vector2 dimensions;
public Vector2 scale;
public float rotation;
public TextureRegion region;
   ...
The Entity constructor will initialize those fields, whereas two separate functions will be in charge of checking whether the entity must be visible or not and render it. As this functionality might vary from one entity type to another, there will be abstract methods pending to be implemented by the extender class:
public Entity(TextureRegion region, float x, float y, float width, float height, float rotation, Vector2 scale) {
   this.dimensions = new Vector2(width, height);
   this.position = new Vector2(x + (width*.5f), y + (height*.5f));
   this.region = region;
   this.rotation = rotation;
   this.scale = new Vector2(scale);
}
We will store the central position as the entity's position. It is calculated from the original bottom-left position plus half of each dimension.
The nub of the issue comes with a method to determine whether the entity is visible or not. This is where Libgdx helps us with a single rescuer function. However, a camera must be passed in order to know the exact space that is under its range. We will adapt the 2D entity's position to 3D through two cached com.badlogic.gdx.math.Vector3 called point1 and point2:
public boolean isVisible(Camera cam) {
return cam.frustum.boundsInFrustum(point1.set(position, 0), point2.set(dimensions,0));
}
The bounds of the entity are calculated thanks to the position and dimensions fields that we stored previously. Nevertheless, we might have some other entities allowed to rotate. This feature would ruin our former strategy because the calculated bounds would not fit the rotated object. Manually rotating coordinates is a laborious option. A simple and effective approach would be thinking of it as a sphere because it covers all the possible rotations, just as shown in the following screenshot:

Consequently, the Caveman class must store an extra variable called diagonal. The next screenshot shows what it consists of and how to calculate it:
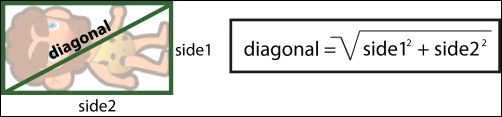
In code terms, this would be translated to the following:
this.diagonal = (float) Math.sqrt(Math.pow(width*scale.x, 2f) + Math.pow(height*scale.y, 2f));
The isVisible() method will change slightly. In this case, we must apply the half diagonal of the entity rectangle as the sphere radius:
public boolean isVisible(Camera cam) {
return cam.frustum.sphereInFrustum(point1.set(position, 0), diagonal * 5f);
}
Finally, the render() function will just draw the TextureRegion on the screen according to the other stored attributes:
public void render(final SpriteBatch batch) {
batch.draw(
region,
position.x-dimensions.x*.5f, position.y-dimensions.y*.5f,
position.x, position.y,
dimensions.x, dimensions.y,
scale.x, scale.y,
rotation);
 }
Once the Entity class is implemented, we will create a good amount of instances by calling its constructor repeatedly. We will store all instances within Array<Entity> called entities in order to have them all localized, just as follows:
Vector2 scale = new Vector2(1f,1f);
entities.add(new Entity(cavemanTextureRegion, point2.set(x, y), 0.4f, 0.75f, 0f, scale));
With the same goal as point3, point2 is a cached Vector2.
When rendering your scene, your code will be really simple:
for(Entity entity : entities) {
if(entity.isVisible(camera)) {
entity.render(batch);
renderCount++;
   }
}
The renderCount variable will store the updated number of entities that are within the camera's frustum.
The way that Libgdx determines whether an entity is within the camera's viewport might seem magic but you should already have a vague idea after reading Chapter 2, Working with 2D Graphics. The answer is included in the title of this recipe: frustum.
A frustum is the pyramid of vision of a camera and, as its shape determines, it is formed of six planes. Once more, our brave caveman friend will try to make things clear, as shown in the following screenshot:
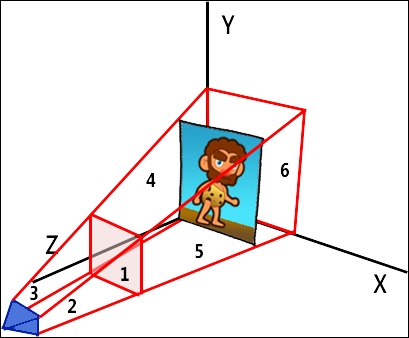
The top (4), left (3), bottom (2), and right (5) planes define the bounds of the pyramid whereas near (1) and far (6) planes cut the frustum perpendicular to the viewing direction so the shape becomes closed.
In this way, Libgdx's functions just check whether the received sphere/bounds are within the frustum.
Some games organize their entities in a hierarchical way, so the visibility testing is performed recursively. This can save you a lot of time but requires more dedication to construct the scene tree.
In addition to frustum culling, you can save some milliseconds not rendering entities that are occluded by others. This is known as occlusion culling and it is very common in 3D games.
To avoid rendering some entities of your game can save precious time but what if you could get rid of unnecessary frames? Of course, it does not apply to all kind of games. However, card, sudokus, or riddle games can probably benefit from this optimization.
Libgdx comes with the feature of disabling continuous rendering. All you have to do is write this line of code within the create() method of your ApplicationListener:
Gdx.graphics.setContinousRendering(false);
From now, in advance, you will have to request for rendering manually through the following method:
Gdx.graphics.requestRendering();
Apart from the previous case, render() will also go into scene if an input event is triggered or Gdx.app.postRunnable() is called.