So far, you have learned what type of user information Moodle holds and how to extend the information that is stored in each profile. Now, it is time to work with existing users on your system.
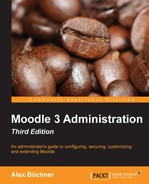
The quickest way to get access to your Moodle users is by navigating to Users | Accounts | Browse list of users. Initially, a list of users is displayed, ordered by First name. Thirty users are shown at a time and, if applicable, you can navigate via the (Next) and (Previous) links or jump directly to another page by selecting a number. Each column can be sorted in ascending or descending order by clicking on the column header.
You can view an individual's profile information by clicking on a user's name in the first column. Here, you are looking at your own (admin) profile and not the profile of another user:

The profile provides detailed information on the user. Hyperlinks are provided to e-mail, web pages, and some messaging services. For instance, in the preceding screenshot, a link is provided to launch Skype, indicating that the user is currently unavailable. Additionally, you can see information about First access to site, Last access to site, and Last IP address took place from.
You can specify which identity information (ID number, e-mail, phone, cell/mobile phone, department, or institution) about the users is shown in this list as well as other places. Go to Users | Permissions | User policies and select the fields that should be shown in the Show user identity list. This only applies to users who have the moodle/site:viewuseridentity capability roles.
When you look at the profile of another user account, you will see a Login as link in the Administration pane, which lets you masquerade as another user. This is useful when tracking down issues, which you cannot locate as an administrator. To view all the user profile fields of a user or modify any of them, as discussed earlier, click on the Edit profile link. To modify any of the user's preference, select the respective link.
To delete a user, go back to the user list and click on the Delete icon in the right-most column. A confirmation screen has to be answered before the user is irreversibly removed. Actually, the user is irreversibly removed only from Moodle's user interface. Internally, the user is still retained in the database with the deleted flag turned on. This is necessary so that certain contributions of this user don't disappear, for instance, forum posts. Technically, a user can be reinstated by changing the delete flag manually in the database; the Moodle distribution Totara makes use of this functionality that offers a recycling function. Totara also supports the full deletion of users, which is very useful indeed.
Very often, we may be required to search for a particular user or for a number of users. Moodle provides a very powerful and flexible filtering mechanism to narrow down the list of displayed users. In the basic mode, you can filter by the full name of a user, that is, the first name and last name combined. The following filter operations are available, all of which are case-insensitive:
|
Filter operation |
Description |
|---|---|
|
contains |
The provided text has to be contained in the field |
|
doesn't contain |
This is the opposite of contains |
|
is equal to |
The provided text has to be the same as the value of the field |
|
starts with |
The field has to begin with the provided text |
|
ends with |
The field has to end with the provided text |
|
is empty |
The field has to be empty |
For example, when adding a filter, such as First name starts with "chr", all users whose first name begins with chr are displayed. Take a look at the following screenshot:

You can see that the added filter is now active at the top of the menu. This becomes more useful once multiple filters have been added, which is done in the advanced mode (via the Show more… link). Now, we have the ability to apply filters to a wide range of fields:

For instance, in the preceding screenshot, we look for all users whose username starts with 07 (our naming scheme starts with the year of entry) and who haven't accessed the system before December 2015. Using this mechanism, it is possible to add as many filters as required.
Every time a filter is added, it will be shown in the Active filters frame and be applied to the user data in Moodle.

Here, three self-explanatory filters have been added. It is now possible to either delete individual filters (check the filter and click on the Remove selected button) or Remove all filters.
The filter criteria for text fields has been described earlier in this section. Depending on the field type, there are a number of additional operations that can be used, as listed in the following table:
|
Filter operation |
Field type |
Description |
|---|---|---|
|
is any value |
Lists |
All values are acceptable; the filter is disabled |
|
is equal to |
Lists |
The list value has to be the same as the one that's been selected |
|
isn't equal to |
Lists |
This is the opposite of is equal to |
|
any value |
Yes/no |
The value can be either Yes or No; the filter is disabled |
|
Yes |
Yes/no |
The value has to be Yes |
|
No |
Yes/no |
The value has to be No |
|
is defined |
Profile fields |
The field has to be defined for the user |
|
isn't defined |
Profile fields |
This is the opposite of is defined |
|
is after |
Date |
This contains all dates after the specified day, month, and year |
|
is before |
Date |
This contains all dates before the specified day, month, and year |
The Authentication criterion offers a selection of all the authentication methods that are supported. We will deal with these later in the chapter. MNet ID provider will be dealt with in Chapter 16, Moodle Networking.
If user profile fields have been specified, an additional User profile fields criterion is shown, offering a choice of all the user-defined fields (as specified earlier).
The current filter settings are saved and can be used the next time you log in. Not only that, they are also saved for bulk uploading, which is covered in the next section.
There are several actions that Moodle allows, which include taking on many users at a time; for example, forcing a password to change or simply sending a message. As an administrator, you can apply these operations, which Moodle calls bulk user actions. They are accessed by going to Users | Accounts | Bulk user actions.

The screen contains two main parts. The first part is the familiar filter and is identical to the one in the Browse list of users submenu. Interestingly, filters that are already created will also show up in this screen since they have been saved.
The second part displays the users that match the specified filter criteria in the Available list. Before you can do anything with the users, you have to move them to the Selected list using the Add to selection button. In the preceding screenshot, all five users have been moved across. To move them back to the Available list, select the users and click on the Remove from selection button. Two shortcut buttons exist, which allow you to Add all users from the Available list to the Selected list and Remove all users (move them in the opposite direction).
The advantage of this approach is that you can apply a number of filters in succession and select the respective users. For example, in our setting, if we wish to select all the users from two entry years, we can create a User full name starts with 07 filter for all usernames that start with 07 and select all the users that show up in the results. You can then delete the filter and create another one for all usernames that start with 08.
When the Go button for the With selected users... drop-down menu is clicked on, the operation selected will be performed on the users from the Selected list. The available operations are shown in the following table:
Now that we know how to deal with existing users, let's have a look how they are added to the system.