Is there anything better than seeing your work printed in a book or magazine? I don't think so! Whether it's a full graphic novel or just a few printed illustrations, seeing your hard work on paper is one of the great things about being a digital artist. With these directions, you'll learn how to export pages to get a nice print, whether you're making them at home or sending them to a printer.
Tip
When sending your work to a print shop to be printed, make sure that you research what file formats and resolution they accept as well as any restrictions that they may have. Adjust the steps in this recipe to fit them. Sending a batch of .jpg files to a printer that only accepts .png files will only waste time and cause headaches all around!
You will need a file open to export. In order for your illustrations to look good in print, they must have a resolution of at least 300 dpi. Anything lower than this may look pixelated or blurry when printed.
The following steps will walk us through the process of exporting a page for print:
- Click on File, and then scroll down to Export (Layered) or Export. For this recipe, we will be exporting using a Layered option and saving as a
.psdfile.Note
You should choose Layered or Single Layer based on your needs for the page after it has been exported. If you will be opening the image in another graphics program and will need to edit layers, then choose one of the Layered options. If you will simply be sending it to a printer or laying it out as a book in a layout design program, then one of the Single Layer options will likely work. When sending to an outsourced printer, remember to check out their guidelines for file formats.
- Choose the desired file extension from the menu under the Export (Layered) or Export (Single Layer) option and click on it.
- Name your file and choose where to save it. Then, click on Save.
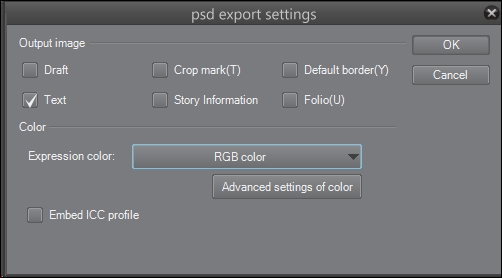
- The Export options for the file format that you're saving the file in will appear. The following are the options for saving it as a
.psdfile:
- Check the boxes next to any of the options that you'd like to export. For example, if you need the crop marks or the default border to be shown, click on the boxes next to them to select them and they will be included in your export.
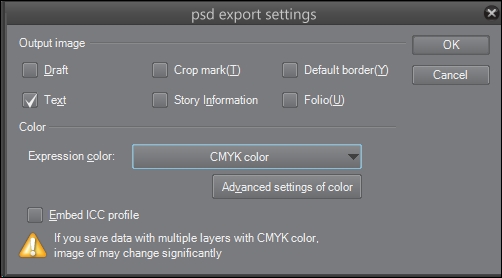
- Choose the Expression color from the drop-down menu. Since we are sending this to be printed, we will choose the CMYK color mode. Manga Studio gives us a warning about saving layered files in CMYK mode, which is shown in the following screenshot:

- Once your options have been set, click on OK to complete the export.
