
Now you'll learn how to modify and adjust vector lines. Using control points, we can refine the vector to achieve the exact shape we want.
You will need a file open, with at least one vector layer and one line created on that vector layer. It can be created using a brush tool or one of the Direct draw tools.
The following steps will walk us through adjusting lines made with vectors:
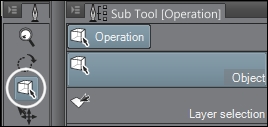
- Select the Operation tool, circled in the following screenshot, and make sure that the Object subtool is selected. In the Tool property palette, make sure that the Operation option is set to Control point and Scale/Rotate.
- Click on the vector line that needs to be adjusted. You will see a red line down the center, yellow boxes at each control point, and a bounding box surrounding the line, as shown in this screenshot:
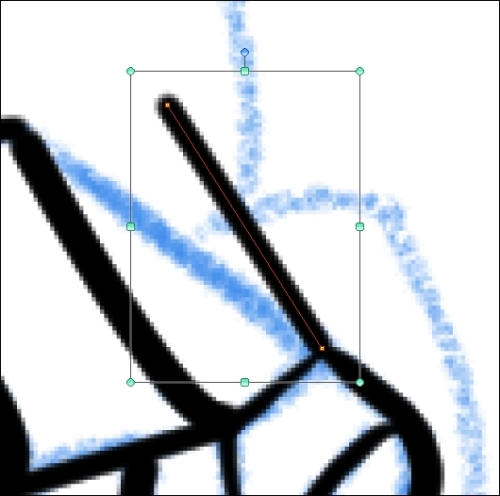
- Determine what adjustment needs to be made. In this example, the top control point (the yellow box) needs to be moved to the left to match the sketch lines more closely. Click on the yellow control point to select it. The selected control point will turn red.
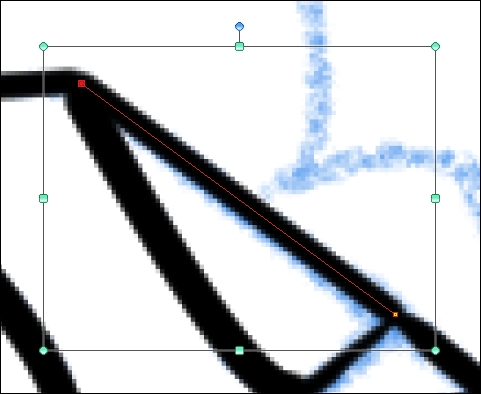
- Click and hold with the left mouse button on the selected control point. While still holding down the mouse button, drag the control point to the new location. Then release the mouse button. The following screenshot shows the vector line in its new position:
Control points are the anchors of the vector line. By adjusting the anchors, we can change the look of the line or the entire flow of the drawing without having to redraw the line. Any control point can be moved and manipulated, including the control points that make up curves.
Let's discover how to adjust vector curves in this next set of instructions:
- Using the Object selection tool, select a curved vector line.
- On curve vectors, there will be control points that have handles coming off them. The look of the handle depends on the setting used while drawing with the curve tool. To change the setting of Curve, open the Sub Tool Detail panel by clicking on the wrench icon at the bottom of the Tool property palette. This screenshot shows the location of this setting:

- To adjust the start and end points of the curve, follow the preceding instructions.
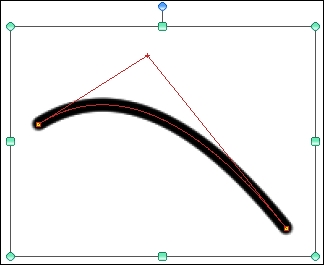
- To adjust the curvature of the line, select the handle coming off the control point by clicking on it. Then hold down the left mouse button and drag to adjust the curve. In the following screenshot, the handle for adjusting the curve is the intersection of the two lines above the curve. They form a 90-degree angle with one another.
- Once the curve is adjusted to the new position, release the mouse button.
The type of preceding curve shown is called a Quadratic Bézier. The other option for curves in Manga Studio 5 is the Cubic Bézier.
A Quadratic Bézier is created by clicking and dragging a straight line. Then, after releasing the mouse button, we drag out in one direction or the other to create a single curve between the start and end of the line. Quadratic Bézier curves will create one curve no matter what the distance between the two anchor points of the line is.
A Cubic Bézier is created by dragging out a straight line between the start and end. After releasing the mouse button, one curve can be dragged out. After the mouse button is pressed again, a second curve can be added for further refinement.
The line shown in the next screenshot is a Cubic Bézier. Note how it has two separate handles emanating from the control points, instead of just one as in the Quadratic Bézier. One handle goes toward the right, creating the start of the curve. The other handle goes toward the left, making the line slightly curve back again.

To adjust a Quadratic Bézier curve, select one of the two handles and drag it with the mouse as needed.