
Hatching is the term used to describe the shading of a drawing achieved using groups of parallel lines. Cross-hatching is a group of parallel lines crossed by another group of parallel lines moving in another direction. Hatching and cross-hatching can give a lovely look of depth and texture to monochromatic illustrations. Let's explore how to create a brush to make our hatching and cross-hatching go a little faster than doing it completely by hand!
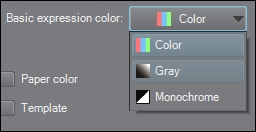
To start off, open a new blank canvas of at least 300 dpi resolution. We will use this canvas to draw our new brush tip shape in order to make our cracks. Make sure that Basic expression color is set to Gray and not Color.
Refer to the screenshot given here to understand where to change this option while creating your new canvas:
These steps will walk you through the rest of the brush creation process:
- Select the Figure tool and then the Ruler subtool.
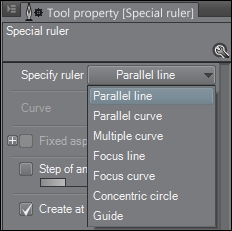
- Next, select Special ruler from the Sub Tool [Figure] palette.
- In the Tool property palette, choose Parallel line from the Specify ruler drop-down menu. This is shown here:
- Click inside the canvas and hold with the left mouse button. While still holding, drag the mouse cursor across the canvas at an angle. Release the mouse button to set the ruler.
- Select your preferred pen tool.
- Ensure that the Snap to Special Ruler option in the toolbar above the canvas is active. This will make the selected pen follow the parallel line ruler. Refer to the following screenshot for the location of this option:

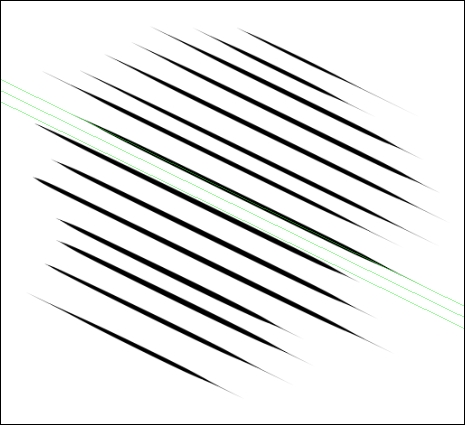
- Using your preferred pen tool, draw a group of parallel lines, as shown in this screenshot (note that the very thin lines are the ruler lines):
- Turn off or discard any Paper color layers or any fill layers behind the parallel lines, leaving only the lines and a transparent background.
- Select the Operation tool and then the Object subtool.
- Click on the ruler that was created in step 4. Once it is selected, go to Edit | Clear (on the PC, right-click and select Clear from the window that appears) to get rid of the ruler.
- Go to Edit | Register Image as Material.
- Name the material using a descriptive title.
- Double-check the Material image preview to make sure that the space around the lines is transparent (it will have the same gray color as the rest of the Material property window).
- Beneath the Material image, check the box marked Use for brush tip shape.
- Choose the Brush folder under Image material to save the new material in.
- Add some tags to the Search tag box. Check out the following screenshot for suggestions:
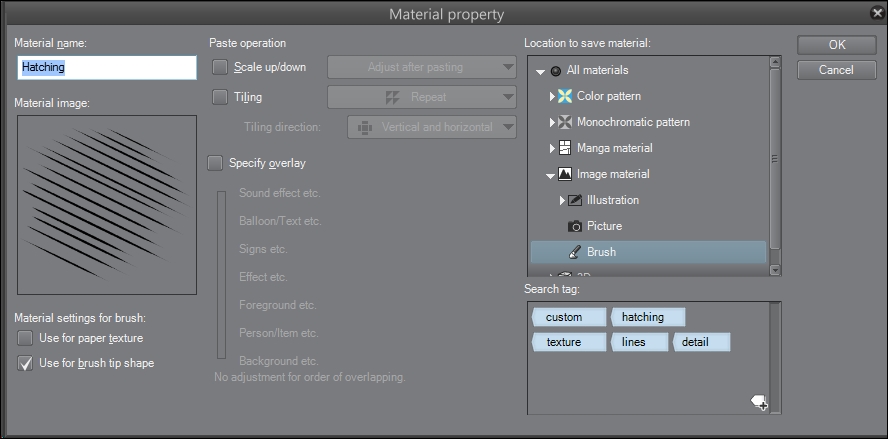
- Click on OK in the Material property window.
- Select the Decoration tool from the Manga Studio 5 toolbox.
- Choose the Hatching category of decoration tools. Then select the Cross-hatching x1 tool.
- Click on the Create copy of currently selected sub tool icon in the bottom-right portion of the Sub Tool [Decoration] palette.
- Give the new brush tool a descriptive title.
- In the Tool property palette, click on the wrench icon in the bottom-right corner to open the Sub Tool Detail palette.
- Click on the Brush tip option.
- Delete the existing brush tip material by selecting it and then clicking on the delete icon under the Material box. The icon looks like a trash can.
- Click on the Add brush tip shape icon directly to the left of the delete icon.
- Search for and select the material created in steps 1-15 of this recipe. Click on OK.
- Click on the icon next to the slider to the right of the Direction settings to open Set to change parameter by pen pressure or velocity of tablet. Deselect the checkbox next to Random, and click on the radio button next to Direction of line to activate this option.
- Test out your new brush!
This brush is pretty simple, especially since we can build it on an existing cross-hatching brush that comes with Manga Studio 5.
Of course, we have to make the art for our brush tip and save it as a material. After that, it's simply a matter of duplicating the prepackaged brush and customizing the duplicate. In the case of this tool, we want a look more like hand-done hatching, with the lines all going in the same direction as we use the brush, instead of the random direction that the default brush gives. Turning off the Random option under Direction gives us that look, and making the direction follow our line makes the brush easier to use in an illustration.
The following drawing was shaded using a combination of gray fill (the skin), screentones (the bulk of the hair), and the brush we just created:
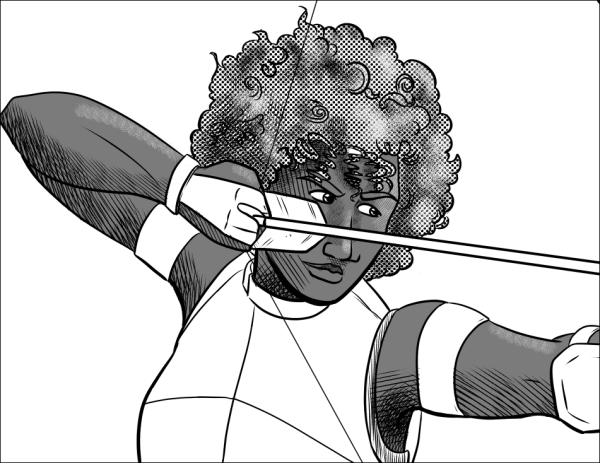
New layers were created over the gray fill and the screentone layers. On the new layers, the cross-hatching brush was then used in the direction of the shaded surface to add the shading. Change the brush tip size to larger or smaller depending on the area that you are shading.
Since we created the brush tip on a gray image, the brush is capable of being tinted too. Simply select the desired color and get to work!