
A Layer Mask is a feature that allows us to hide parts of a layer without erasing them for good. This allows us to fine-tune a drawing or a part of a drawing without losing what we've already done. Layer masks can be adjusted over and over, so we can hide part of a drawing and then bring it back later if we decide that we want it visible again.
Think of a Layer Mask like a Halloween mask. If we put a mask on, our face is still there but it can't be seen.
I find this feature to be very handy if I want to see different versions of a drawing, say, a character with a different hairstyle. The applications are pretty limitless, and it's much less nerve-wracking than completely erasing something that you may want to bring back in the future!
You will need a file open, with at least one layer with content (a sketch, an ink drawing, a photo, and so on) inside of it.
Follow these steps to add a Layer Mask:
- Select the layer to add the mask to by clicking on it in the Layer palette (if the Layer palette is not visible, go to Window | Layer to open it).
- Click on the Create layer mask icon at the bottom of the Layer palette. It is shown circled in white in the following screenshot:
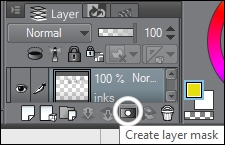
- A new thumbnail will appear to the right of the layer thumbnail. This is the Layer Mask. A black outline will be seen around it when it is active. The selected layer, as shown in this screenshot, has an active Layer Mask:
