
Most organizations put some time aside each week, month, or quarter to carry out essential patching and maintenance on their servers to help avoid outages or unauthorized entry. Inevitably, those servers will need to be rebooted at the end of each maintenance cycle before coming back into production. To reduce unnecessary alert noise from monitored servers during these maintenance windows, OpsMgr has a handy feature called Maintenance Mode that you can enable.
When Maintenance Mode is enabled on an agent, all monitoring is disabled for a specified amount of time, thus alleviating noisy alerts related to patching and reboots. The agent will then automatically bring itself out of Maintenance Mode once the specified time is reached.
The Maintenance Mode feature isn't just exclusive to agents and it can actually be enabled against any monitored object that OpsMgr knows about. As an example, you might have a Hyper-V host or physical switch with a faulty network interface that keeps firing false-positive alerts into OpsMgr. You want to stop monitoring the interface until it has been replaced but you don't want to stop monitoring the entire host or switch. All you need to do is enable Maintenance Mode on that specific interface and you won't receive any more alerts until you're ready to bring it back online again.
Working with Maintenance Mode is pretty simple and here's how you can manually enable it using the console:
- From the Monitoring workspace, open the Windows Computers state view, right-click on the name of a computer, select Maintenance Mode from the menu, and click on the Start Maintenance Mode… option as shown in Figure 11.11.
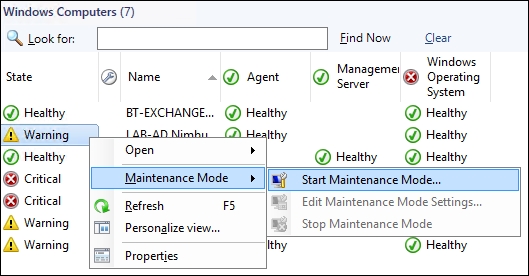
Figure 11.11: Starting Maintenance Mode on a monitored object
- At the Maintenance Mode Settings dialog box, first choose whether or not you want to put the selected object on its own or the selected object and all its contained objects under maintenance. Choose a category and type a comment before then selecting the duration in minutes or a specific end date and time for your maintenance window as shown in Figure 11.12. Click on OK to save the settings and enable Maintenance Mode.

Figure 11.12: Configuring maintenance mode settings
- When Maintenance Mode has been enabled on an object, similar to Figure 11.13, you'll see it goes into a Not monitored state and a wrench icon appears alongside its name. The Details pane will also contain information about the Maintenance Mode start and end times.

Figure 11.13: Viewing an object in maintenance mode
Tip
If you'd prefer to use PowerShell to enable Maintenance Mode on your monitored objects, then you can use the Start-SCOMMaintenanceMode cmdlet. You can find some syntax examples and more information on this from the following link - https://technet.microsoft.com/en-us/library/hh918505(v=sc.30).aspx
While manually enabling Maintenance Mode is a fairly straight-forward process, it's not really much use to you if you have automatic patching and reboot cycles on your servers that kick in late at night while you're at home or on vacation! It makes sense so, that you have an option to schedule the Maintenance Mode feature in OpsMgr to kick in whenever your organizations agreed maintenance windows are in place.
If you're using OpsMgr 2012 R2, then you won't find an option within the console to create and manage Maintenance Mode schedules. Although this is something that you'd think would be standard in any enterprise monitoring solution, for some strange reason, Microsoft decided to leave it out. Instead, you'll have to use a combination of custom OpsMgr groups, PowerShell, and Windows Task Scheduler to meet your requirements.
Far from this being an over-complicated scenario to achieve, two well-known community contributors (Pete Zerger and Matthew Long) have provided a complete PowerShell script that can target a group of objects in OpsMgr and place its members into maintenance mode for a given period of time. All you have to do is to create a scheduled task using Windows Task Scheduler that will execute the script at times that correspond to your maintenance windows.
This is one of my favorite solutions for scheduling Maintenance Mode in OpsMgr 2012 R2 and you can download the script directly from the following link - http://tinyurl.com/opsmgrmmschedule
Tip
Cameron Fuller has written a post - http://tinyurl.com/opsmgrmmremove - where he demonstrates a single line of PowerShell to remove all objects from Maintenance Mode. This can be useful when the amount of time allocated to your maintenance windows changes and you need to bring everything back under monitoring sooner rather than later.
If you've deployed OpsMgr 2016 then Microsoft has thankfully given us an option to manage scheduled Maintenance Mode plans either through the console or with some new PowerShell cmdlets.
Follow these steps to create a new maintenance schedule with the OpsMgr 2016 console:
- Open the Administration workspace, right-click on Maintenance Schedules and select Create Maintenance Schedule from the resulting menu as shown in Figure 11.14.
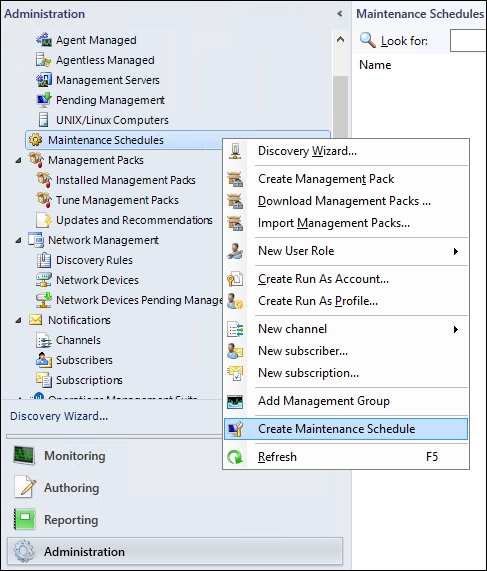
Figure 11.14: Creating a maintenance schedule in OpsMgr 2016
- At the Create Maintenance Schedule wizard, select an option for the Apply to section, and then click on the Add/Remove objects button.
- The Object Search dialog box will populate the Computer class into the Search for menu by default and you can change this class to help you search for another monitored object or just leave it as-is. Search for and add the object(s) you wish to include in the maintenance schedule and click on OK to close the dialog box. Click on the Next button to move on.
- Configure your required maintenance schedule similar to Figure 11.15, then hit Next to continue.

Figure 11.15: Configuring a schedule for your maintenance plan
- At the Schedule Details window, type a name, select a category and add a comment before clicking Finish to close the wizard, and create the new schedule.
- You should now see the new schedule listed in the Maintenance Schedules section of the Administration workspace as shown in Figure 11.16.
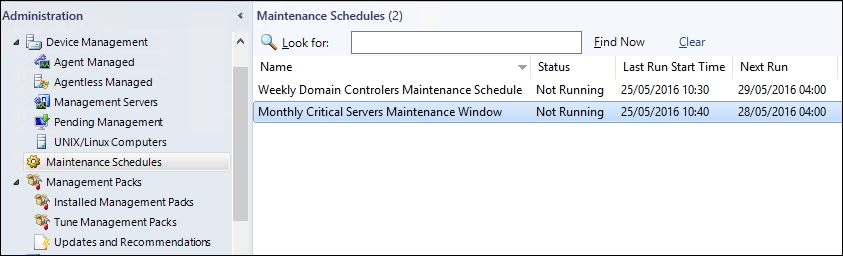
Figure 11.16: Configuring a schedule for your maintenance plan
- You can disable, edit or delete schedules by using the relevant actions from the Tasks pane on the right.
Tip
To create a new maintenance mode schedule with PowerShell, you can use the New-SCOMMaintenanceSchedule cmdlet (http://tinyurl.com/opsmgrnewmmschedule). If you need to manage an existing schedule, then use Edit-SCOMMaintenanceSchedule (http://tinyurl.com/opsmgreditmmschedule)