
The final role that we need to install is the OpsMgr Gateway server. This role enables OpsMgr agent communication across different security boundaries – such as DMZ and untrusted Active Directory domains. The Gateway server can also be used to compress agent traffic across slow WAN links inside a Management Group domain.
In our example for this book, the Gateway server is a member of an untrusted Active Directory domain and we will need to utilize a public key infrastructure (PKI) for certificate-based authentication back into the OpsMgr Management Group.
Here's what we need before we begin:
- A certificate authority (CA) configured in the same domain as the OpsMgr Management Group.
- The fully qualified domain name (FQDN) of the OpsMgr Management server that the Gateway server will connect to.
- The
Microsoft.EnterpriseManagement.GatewayApprovalTool.exeand its associated configuration file from the OpsMgr installation media. - The
MOMCertImport.exetool from the OpsMgr installation media.
Now let's get started with the installation. Follow these steps to deploy your first Gateway server:
- Logon to a Management server with an account that has administrative permissions and browse to the location where you have the OpsMgr installation media (we'll use
lab-om01.nimbuscorp.comhere but change this to whatever management server you want your new Gateway server to report into). - Copy both the
Microsoft.EnterpriseManagement.GatewayApprovalTool.exeandMicrosoft.EnterpriseManagement.GatewayApprovalTool.exe.configfiles from theSupportToolsAMD64folder on the OpsMgr installation media to the OpsMgr program filesServerfolder on your Management server. - Now open a command prompt with administrative permissions on the Management server and change directory to the
Serverfolder location that you've just copied these files to. - In this example, we will approve a new Gateway server with an FQDN of
lab-omgw01.unifiedcommunications.ieand configure it to report tolab-om01.nimbuscorp.com. From the command prompt, type the following to approve the new Gateway server:Microsoft.EnterpriseManagement.GatewayApprovalTool.exe /ManagementServerName=lab-om01.nimbuscorp.com /GatewayName=lab-omgw01.unifiedcommunications.ie /Action=Create - In Figure 2.26, we can see the Gateway approval process completed successfully and we are ready to install the Gateway server role onto our prospective server.

Figure 2.26: Successful Gateway server approval
- Now, logon to the server that you wish to install the Gateway server role to and browse to the location of the OpsMgr installation media.
- From the OpsMgr installation media, right-click on
setup.exeand choose Run as administrator to begin. - In the Optional Installations section of the splash screen (shown in Figure 2.27), click on the Gateway management server link to start the wizard.
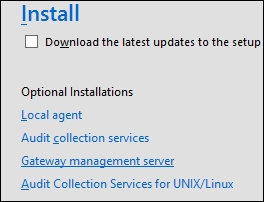
Figure 2.27: Gateway server installation link
- At the welcome screen for the Gateway server setup wizard, click on Next to continue, then click to agree the license terms and move on.
- Choose the folder location that you wish to install the Gateway server role to and then click on Next.
- In the Management Group Configuration dialog box, input the Management Group Name (don't forget that this is case-sensitive) and the FQDN of the Management Server that you want the Gateway server to report to (always check the FQDN of your servers from the System Properties view on the server itself). Figure 2.28 shows an example of how to complete this dialog box. Click on Next to continue.
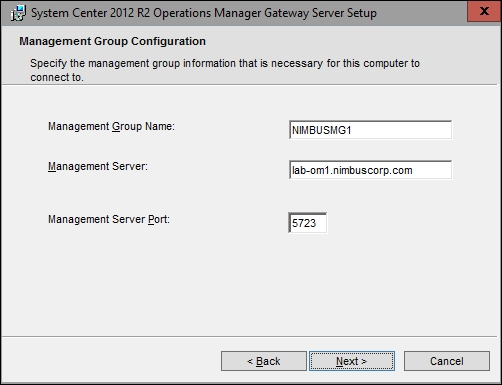
Figure 2.28: Management Group Configuration
- If this Gateway server will be responsible for pushing out agents to computers in the untrusted domain, then you will need to configure an administrative domain user account for the Gateway Action Account as shown in Figure 2.29. Click Next when you're ready to move on.

Figure 2.29: Configuring the Gateway Action Account
- Choose if you want to use Microsoft Update to automatically update your Gateway server, then at the Ready to Install dialog box, confirm your settings and hit the Install button.
- When the wizard completes successfully, click on the Finish button to close.
- Now, assuming you are deploying your Gateway server into an untrusted domain or DMZ scenario, you will need to walk through a process on your Gateway server of requesting a certificate from a Certificate Authority and installing that certificate into the 'Local Computer' store.
Tip
If you haven't carried out this task before or you aren't too comfortable working with certificates, then take a look at this blog series I wrote a while back for a complete walkthrough - http://tinyurl.com/scomprivcerts. Although this series was written originally on Windows Server 2008 R2, it's still valid for Windows Server 2012 R2 and higher.
- We'll take the certificate authentication process up again here at the point in the blog series where we need to use the
MOMCertImport.exeutility. - With the new certificate now imported into the
Local ComputerPersonalcertificate store, we now need to open up a command prompt with elevated permissions on the Gateway server and change directory toSupport ToolsAMD64on the OpsMgr installation media whereMOMCertImport.exeis located. - As shown in Figure 2.30, add the
/subjectnameswitch to the end of theMOMCertImport.exeutility and specify the full subject name of your imported certificate exactly as it is displayed in theLocal ComputerPersonalCertificatesstore. Your command should look something similar to the following example:MOMCertImport.exe /subjectname lab-gw01.unifiedcommunications.ie.
Figure 2.30: Importing the Gateway server certificate
- After a short while, you should then see your new Gateway server lighting up in the Administration | Device Management | Management servers section of the Operations console with a healthy status as shown in Figure 2.31.
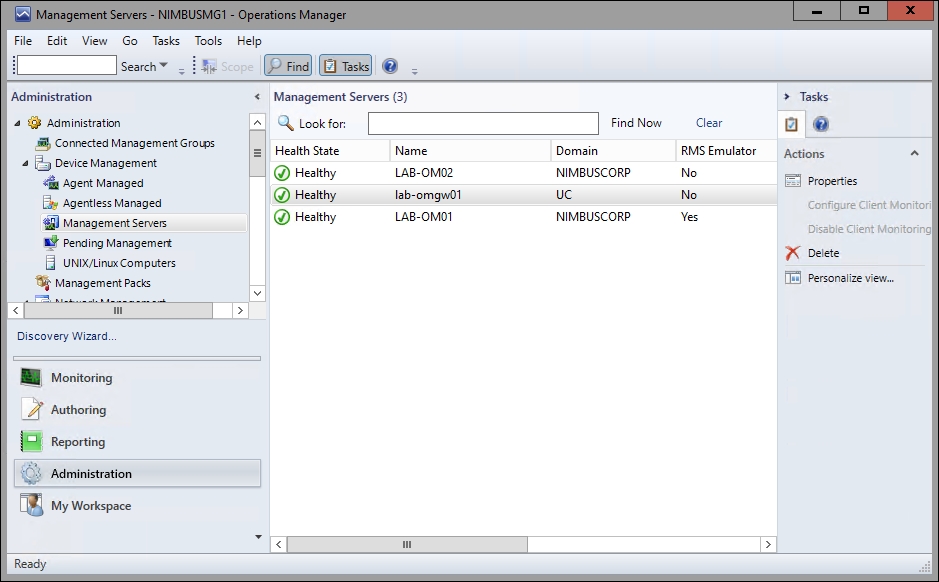
Figure 2.31: Successful untrusted domain Gateway server installation
- The last thing you need to do now is to enable the Server Proxy setting on the new Gateway server. You can do this by first browsing to the Management Servers view in the Administration workspace of the Operations console and double-clicking on the Gateway server object. From there, select the Security tab and then enable the Allow this server to act as a proxy and discover managed objects on other computers check box shown in Figure 2.32.
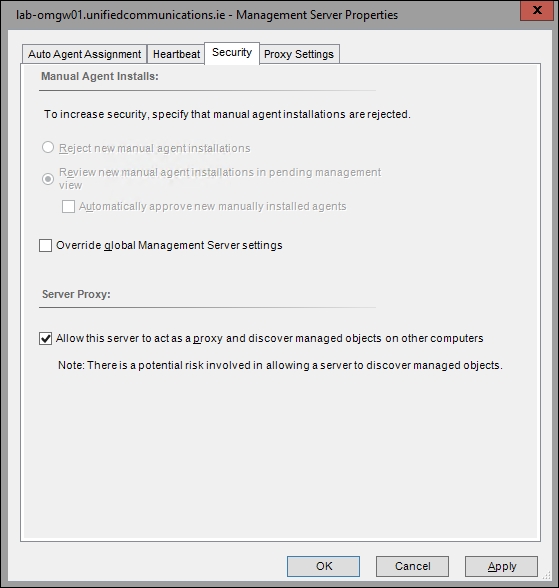
Figure 2.32: Enabling Server Proxy on the Gateway server