
Now you're ready to install your first OpsMgr Management server and at this point, you should have decided on the type of OpsMgr design that you wish to deploy along with having the service accounts, SQL and prerequisite software all in place.
If you haven't done so already, you can download a fully functional 180-day evaluation version of the OpsMgr software from here: http://tinyurl.com/sysctreval. This evaluation can be easily upgraded to a licensed version with a valid license key that can be obtained when you purchase System Center for your organization.
For the purpose of this book, we have created a fictional organization called Nimbus Corporation who is running an Active Directory domain named NimbusCorp.com.
They have a need to use OpsMgr to monitor an IT infrastructure made up of a mix of Microsoft Windows and UNIX/Linux computers spread across multiple domains and DMZ's. There's a number of network devices that need to be monitored and a business requirement to represent their IT service catalog through dashboard visualizations has become a top priority for senior management too.
For this deployment, we will use the 'Small Distributed Server' design as a starting foundation and we will customize the design by adding a secondary Management server for agent failover as well as a Gateway server to support untrusted domain monitoring.
Note
It is important to note that this fictional deployment has been created to ensure that everyone reading this book can use it to easily walk through the various tasks required for getting a basic OpsMgr deployment up and running. Depending on the complexity and IT policies of the organization you will be deploying into, your own production build of OpsMgr could look different to the examples in this book.
The following steps will walk you through installing the first Management server:
- From the OpsMgr installation media, right-click on
setup.exeand choose Run as administrator to begin. - When the splash screen opens, choose whether or not you wish to download the latest updates to the setup program, then click on Install.
- In the Select Features to Install dialog box, choose the Management server and Operations console options, as shown in Figure 2.11, then click Next to continue.
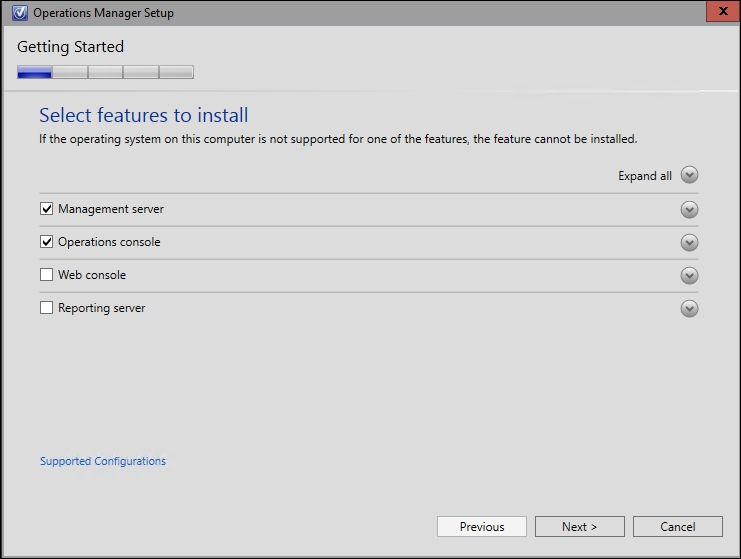
Figure 2.11: Choosing your OpsMgr features
- Choose a location (or leave the default as it is) for the OpsMgr installation files, then click on Next to move on.
- In the Prerequisites dialog box, the OpsMgr installation wizard runs a script to ensure that all prerequisite software for each selected feature has been installed. If something is missing, you will see a dialog box similar to Figure 2.12 informing you the prerequisites that are missing and also providing some instructions on how to obtain and install them. Please refer to Configuring the prerequisites section earlier in this chapter to help you quickly resolve these issues.
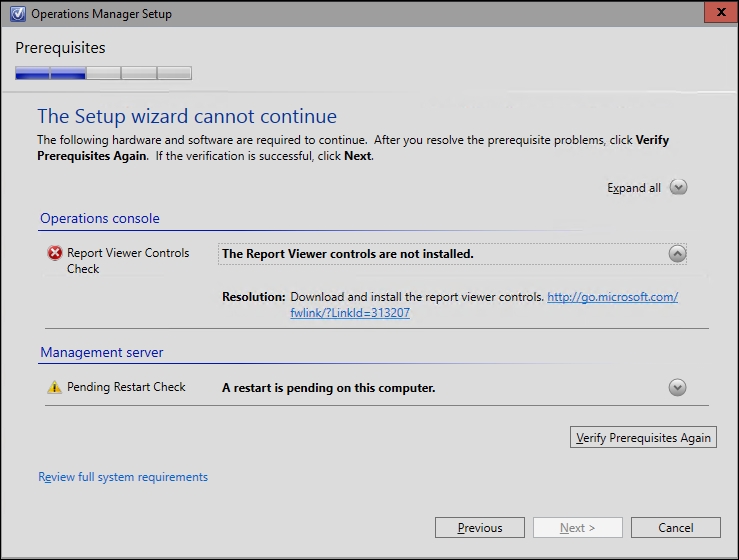
Figure 2.12: OpsMgr prerequisite check
- When the prerequisite check has passed, you then move on to the Configuration dialog box where you need to either specify that this will be the first Management server in a new management group, or if it will simply be an additional Management server in an existing management group. As this is our first Management server, we will choose that option and will enter a Management Group name of
NIMBUSMG1here.Tip
Be careful when selecting a new Management Group name here as it is case-sensitive, does not support the following special characters: ( ) ^ ~ : ; . ! ? " , ' ` @ # % / * + = $ | & [ ] <> {} and can't contain a leading or trailing space. We recommend keeping it short and simple in an alpha-numeric format where possible. Also, this name cannot be changed later without reinstalling the entire management group so choose wisely!
- Accept the license terms and click on Next to continue.
- Configure the location, size and SQL port of your Operational database in this next dialog box - making sure that you specify it in the
server nameinstance nameformat as shown in Figure 2.13. It's recommended to leave the name of this database as its default OperationsManager.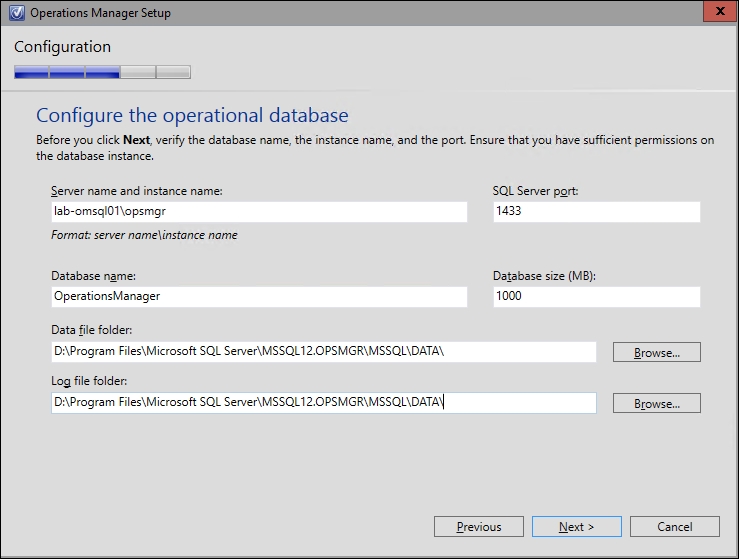
Figure 2.13: Configuring the Operational database
- Configure the data warehouse database using the same methods from the previous step and ensure that you have used the OpsMgr Sizing Helper Tool to size the database appropriately. Click on Next when you're ready to move on.
- The Configure Operations Manager Accounts dialog box is often the point where a lot of first-time OpsMgr installations fail or are configured incorrectly. Unless you are deploying a 'Single Server' design whereby your SQL is installed on the same server as OpsMgr, then you must configure your service accounts as shown in Figure 2.14 (pay particular attention here to how we've configured System Center Configuration service and System Center Data Access service account with the Domain Account option).
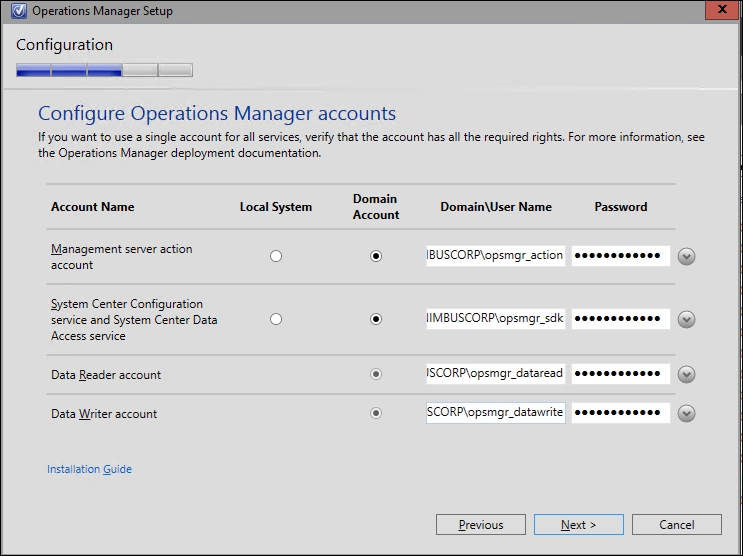
Figure 2.14: Configuring the service accounts
Tip
A common blocker for moving on at this point of the installation is if your System Center Configuration service and System Center Data Access service account has not been granted Local Administrator rights on the server. To avoid this, ensure you have added the security group that contains your OpsMgr service accounts to the Administrators group on the local server.
- Click through to the Microsoft Update dialog box and choose whether or not you'd like to use Microsoft Update to deliver automatic OpsMgr updates (we'll choose the No option here as we will deploy OpsMgr updates manually at a later stage), then click on Next to continue.
- Finally, review everything that you have entered at the Installation Summary dialog box and then hit Install to begin the OpsMgr installation.
- When the installation process is finished, you should see the Setup is Complete dialog box as shown in Figure 2.15. No need to worry about the Management server warning text, this is simply stating that you need to update the license key and we'll perform this action in the next step. Also, uncheck the Start the Operations console when the wizard closes option as we need to give OpsMgr a few minutes to automatically close some alerts in the console that would have been generated as a part of the normal installation process. Click on the Close button to exit the wizard.
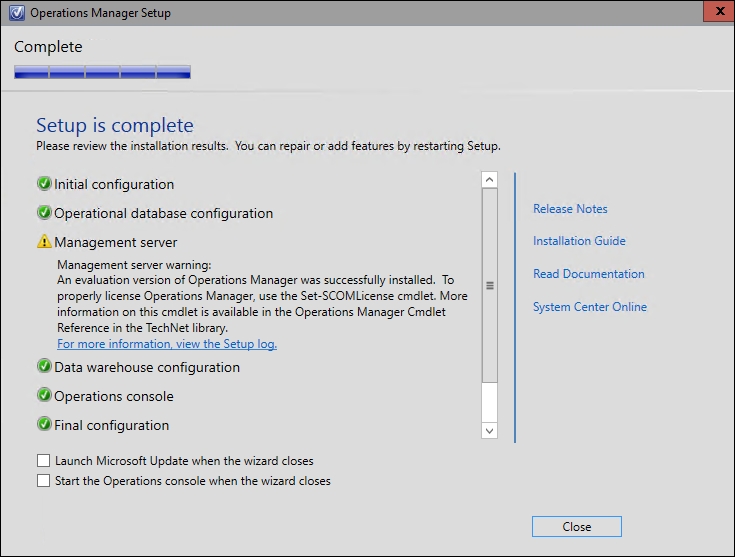
Figure 2.15: Successful installation
- When the wizard closes, similar to Figure 2.16, you will notice two new entries in your Start Menu – one for opening the Operational Console and the other for opening the Operations Manager PowerShell module. We'll use this module to update the OpsMgr license key.
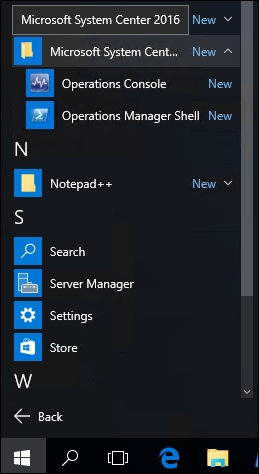
Figure 2.16: New OpsMgr shortcuts
- Launch the Operations Manager Shell, and type the following (replacing the
XXXXcharacters with your own license key):Set-SCOMLicense -ProductID XXXXX-XXXXX-XXXXX-XXXXX-XXXXX
- Choose Y to accept the new license change and then hit Enter.
- Restart the server to update the new license key information and when it comes back online, open the Operations Manager Shell again and type the following command to confirm the license has been applied:
Get-SCOMManagementGroup | ft skuforlicense, version, timeofexpiration –a
- If the license has been applied successfully, the SkuForLicense entry should change to Retail (as opposed to Eval) and this then completes your first management server deployment.
Tip
After the first Management server has been installed and using the SQL Management Studio, open up the instance that hosts the new OpsMgr databases, right-click on each database and check the domain account that has been assigned as the database owner. This owner will be defined as the account that you used to install your first OpsMgr Management server and if you have any strict password reset policies applied (or if this account is a temporary account that will soon be disabled once OpsMgr has been deployed), then it's recommended to change the owner of the databases to an appropriate user account.