
When you've deployed your Windows agents, you'll want to know how to manage them and in this section we will discuss the agent management options available to you from within the Administration workspace of the console.
From the Device Management | Agent Managed view shown in Figure 4.20, when you click on an agent, you can see that the Actions pane on the right presents you with five actions to help you manage the agent.
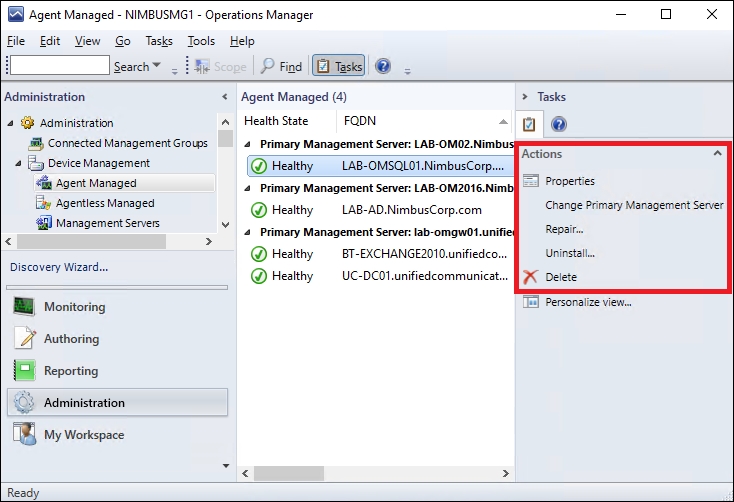
Figure 4.20: Viewing the actions for managing agents
These five agent management actions are explained as follows:
When you click on the Properties agent management action you are presented with two tabs – Heartbeat and Security.
The Heartbeat tab is where you see the heartbeat interval that has been configured for all agents by the Agent: Heartbeat global setting found in the Settings area of the Administration workspace. As you can see from Figure 4.21, this option is grayed out but you can change the heartbeat setting for an individual agent by clicking on the Override global agent settings option.

Figure 4.21: Managing the agent heartbeat setting
Clicking on the Security tab of the Agent Properties dialog box will enable you to configure the Agent Proxy setting.
The Allow this agent to act as a proxy and discover managed objects on other computers setting shown in Figure 4.22 enables the agent to send information to the management server on behalf of unmanaged systems.
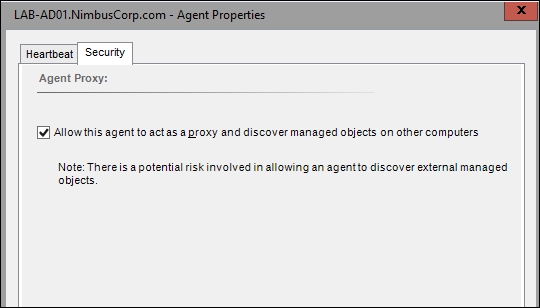
Figure 4.22: Configuring the Agent Proxy setting
While the note in this dialog box states this setting could potentially be a security risk, nearly every management pack guide that you read specifies that this setting needs to be enabled. We will discuss this setting in more detail in Chapter 5, Working with Management Packs.
Clicking this agent management setting gives you the option to change the primary management server that the agent reports to. The primary management server is responsible for notifying the agent of any configuration changes and from time to time, you might need to change this setting for scenarios, such as load balancing agents or even adding new management servers.
In Figure 4.23, you can see that we have two management servers and a gateway server to choose from for our agents and we can also get a handy overview of the number of agents currently reporting to each one.

Figure 4.23: Choosing a management server for your agents
This option does exactly what is says on the tin—an action to repair the agent installation. When choosing this option, you will need to provide an account with Local Administrator permissions on the agent that is being repaired so as to ensure the process can complete successfully.
Another pretty self-explanatory agent management action, the Uninstall option will remove the OpsMgr agent from any computers you run this against. When the agent is uninstalled, its reference in the OpsMgr database is also removed.
It goes without saying that the agent needs to be online and contactable for it to be uninstalled with this action and if the computer is unavailable, this action will fail. You will need to provide credentials for an account with Local Administrator permissions on the agent to carry out this action.
In the scenario, where a computer with the OpsMgr agent is uncontactable and never to be powered on again, the Uninstall action is useless. This is where the Delete action comes in handy and when you run this against an agent, you will be prompted to confirm that you are happy to delete the monitoring agent for the selected computers. Confirming this will forcibly remove the agent reference from the OpsMgr database.
Another way of accessing the agent management actions is to right-click on an agent to open up the context menu. From there, you can select the Open option and then pivot to a specific view type as shown in Figure 4.24. These view types were explained in detail in the Working with Views section of Chapter 3, Exploring the Consoles.

Figure 4.24: Accessing different view types from the agent managed context menu