
In Chapter 5, Working with Management Packs we discussed the different types of tasks available in OpsMgr and with the help of some customized console tasks, you will simplify your alert tuning process, quickly identify the root cause of problems and implement resolutions with ease.
Three custom tasks that I always deploy with OpsMgr are—Google It!, Run Remote Desktop, and Run PuTTY. Using these tasks (shown in Figure 8.30), I can lookup information about an alert on the Internet and then pivot to remotely log on to the computer or device to manage it and resolve the issue if required.
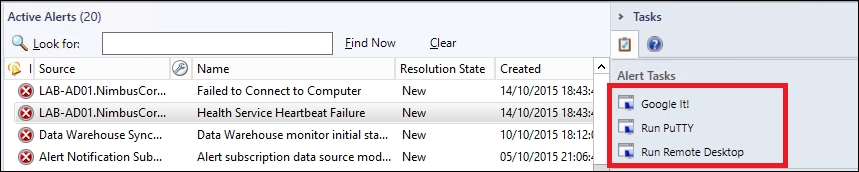
Figure 8.30: Custom console tasks for alert tuning
In the following sections, we'll walk you through creating these three custom console tasks and we'll save the tasks into a new unsealed management pack for easy management.
This task gives us the ability to click on an alert from the console and then open a Google search with the display name of the alert appended into the search. Using this task, you can quickly get more information about an alert from the Internet when you find that the built-in knowledge from the monitor or rule isn't as comprehensive as it should be.
Follow these steps to get your first custom task deployed:
- From the Authoring workspace, expand Management Pack Objects, right-click on Tasks, and then click on Create a New Task as shown in Figure 8.31.

Figure 8.31: Creating a new custom task
- When the Create Task Wizard launches, as shown in Figure 8.32, choose the Alert command line option from the Console Tasks section and select a management pack to store the new custom task into (you can use the New button here to create a new unsealed management pack if required). Click on Next to continue.
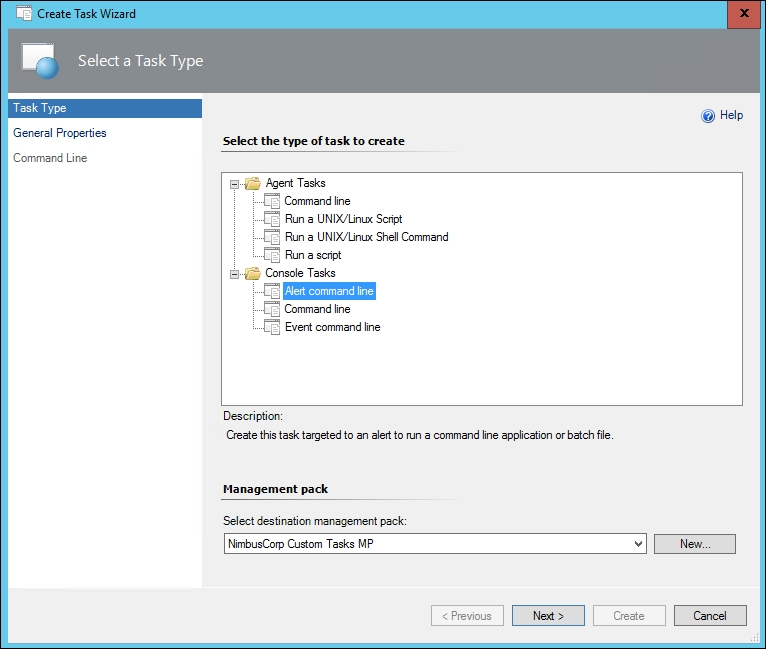
Figure 8.32: Choosing a console task
Note
It's important to understand at this point that when you're creating any Console Task, these tasks will only be presented to the Operations console (the Web console can't see them) and the computer that you run the console from must have the ability to run the task from a command line.
A couple of other things to be mindful of are proxy settings and user account permissions. If you're running a task that needs to open an Internet or remote desktop session, then the user account you're using to launch the task must have the relevant permissions in the first place to connect to the Internet or run a remote desktop or PuTTY instance.
- In the General Properties dialog box shown in Figure 8.33, type a name for the task and add a description about what it will do. Click on Next to move on.

Figure 8.33: Naming your new task
- From the Command Line dialog box, copy the full path to the executable of your favorite web browser (we'll use Internet Explorer here) into the Application field and then copy
http://www.google.com/#hl=com&source=hp&q=$Name$into the Parameters field as shown in Figure 8.34.
Figure 8.34: Specifying the path and parameters for your custom task
- Verify that you've added the application and parameter values exactly as shown in the image (if you get either of these wrong, the task won't run), leave the Working Directory field blank and uncheck the Display output when this task is run option. When you're ready, click on Create to create your first custom task and close the wizard.
When you've configured this task, you can use it to create a remote desktop protocol (RDP) connection directly from the computer you launch the task from to the Windows computer that's firing alerts into the console.
Here's what you need to do to get it configured:
- From the Authoring workspace, expand Management Pack Objects, right-click on Tasks and then click on Create a New Task.
- When the Create Task wizard launches, choose the Alert command line option again and select the same management pack you used earlier to store the other custom task. Click on Next to move on.
- In the General Properties dialog box, type a name for the task (we'll use
Run Remote Desktopfor the name) and add a description. Click on Next to move on. - From the Command Line dialog box, type the full path to the RDP executable, located at
%windir%system32mstsc.exeon Windows computers into the Application field. - Now copy
/v: $NetbiosComputerName$into the Parameters field, make sure that you type this exactly as shown in Figure 8.35.
Figure 8.35: Specifying the path and parameters for your custom task
- Leave the Working Directory field blank, clear the checkbox for Display output when this task is run and hit the Create button to close the wizard.
This is the final custom task that we'll create here and when you have this configured, it will give operators the ability to launch a PuTTY session to help manage UNIX/Linux computers, network devices, SAN's and other devices remotely. PuTTY is an open source terminal emulator and you will need to first download the Windows installer (not the stand-alone executable) from the following website: http://tinyurl.com/puttydownload.
When using custom console tasks, OpsMgr needs to have a consistent location for the application path and as such, for this task to work properly, it's imperative that you use the Windows installer version of PuTTY to deploy it as a fixed path application on the computer you've deployed your OpsMgr console to.
When you've downloaded and deployed the PuTTY installer, follow these steps to get the custom task created:
- From the Authoring workspace, expand Management Pack Objects, right-click on Tasks and then click on Create a New Task.
- Similar to the previous tasks, choose the Alert command line option and select the same management pack you used earlier to store the other task to and then click on Next to continue.
- In the General Properties dialog box, type a name for the task and add a description. Click on Next to move on.
- From the Command Line dialog box, type the full path to the PuTTY executable, located at
C:Program Files (x86)PuTTYputty.exeinto the Application field. - Now copy
$NetbiosComputerName$into the Parameters field and make sure that you type this exactly as shown in Figure 8.36.
Figure 8.36: Configuring the PuTTY custom task
- Leave the Working Directory field blank, clear the checkbox for Display output when this task is run and hit the Create button to close the wizard.
Now that you've learnt how to create custom console tasks, you can experiment with creating additional tasks that might be more specific to your own IT environment. In the next section, we'll put the three tasks we've just created to good use when we perform some alert tuning using distributed applications.