
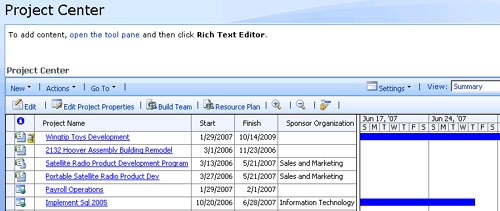
As you navigate from page to page throughout Project Web Access to examine project, task, resource, and assignment information, you work with a number of different views, tables, and fields. For example, on the Quick Launch task bar, click Projects, and the Project Center view appears (see Figure 24-4). In this view is a table and probably also a Gantt chart, showing the portfolio of your enterprise projects.
The pages have certain controls to help you manage the information you want to see. Many pages give you choices for different views so that you can scrutinize different aspects of the information.
Certain commonly used pages—such as the Project Center and Resource Center—contain tables. There are certain techniques for working with those tables. Plus, those tables are made up of fields that you can also manipulate.
The home page is the first Project Web Access page you see when you log on. By default, it includes a list of reminders, for example, issues or risks that require your attention. The home page also lists the Web workspaces for each of the enterprise projects. The project server administrator sets up your home page to include the content most appropriate for your organization.
All pages throughout Project Web Access have certain standard controls, as follows:
Welcome button. In the upper-right corner of every page is a button that says Welcome with your user name. Click this button to see a menu that includes My Settings, Sign In As Different User, Sign Out, and Personalize This Page.
Help button. Next to the Welcome button is the Help button. If you ever need assistance while using Project Web Access, click the Help button. The Project Server Help window appears. A Help topic pertaining to the current page appears, but you can find other Help topics by typing a phrase or question in the Search For box or by clicking the Help button in the Help window and then browsing through the Contents.
Home. The Home tab is visible on every page. Click this tab to quickly move from an inside page on the Project Web Access site to the home page.
Most pages, such as the My Tasks page or the Project Center, have additional standard controls, as follows:
Settings. Click the Settings menu on the right side of the menu bar. On most pages, this menu includes View Options. This opens a pane that provides methods for you to control what you’re seeing in the table, for example, a type of filter or a date range. On other pages, the Settings menus might also include commands to Filter, Group, and Search. Clicking one of these commands also opens a pane providing the necessary controls.
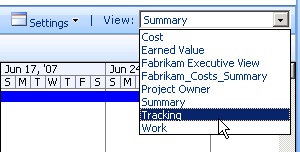
Select a view. Click the arrow in the View box to see a list of views. Views are different versions or layouts of content related to the current page. Some pages have just a single view, whereas others might have seven or eight views.
Several pages throughout Project Web Access include a grid, or table, that lists information such as projects or resources (see Figure 24-5).
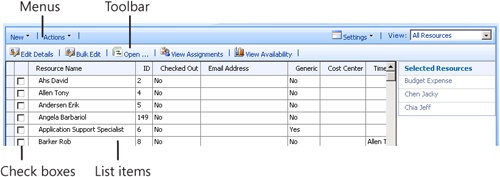
Figure 24-5. You use tables throughout Project Web Access to view and edit project-related information.
The following elements are present in most tables:
List items. The main feature of a table is the list of items. In most cases, you can click an item to drill down, for example, to edit task details or review project details.
Check boxes. Some tables include check boxes next to each listed item. Selecting the check box marks the item for further action, typically with a menu item. Items that are selected can be viewed to the right of the table.
Menus. Two or three menus are typically above a table, for example, New, Actions, and Go To. Click the menu name to view the drop-down menu of commands.
Toolbar. There are several buttons on a toolbar directly above the table. Typically, these buttons are for frequently used commands that are also available on a menu. For example, the Project Center page includes buttons for Edit Project Properties, Build Plan, and Scroll To Task.
Print the table. You can print the Project Center, Project Details, and Resource Center pages, among many others. Click Actions, Print Grid. A printable version of the table appears. Use the Print command in your Web browser to print the table.
Export the table to Excel. You can export tables to Microsoft Office Excel. On the page with the table, click Actions, Export Grid To Excel. The contents of the table appears in an Office Excel spreadsheet. Save the spreadsheet.
You can have either read-write or read-only access for the table fields in the view. Work with your project server administrator to make sure you have access to the fields you need in the views you use most often.
Certain types of custom fields might have been created and added to your views by the portfolio manager or project server administrator. Some of these custom fields can contain a value list from which users can choose an appropriate option. If such a custom field is part of a view that you are modifying, and if you have read-write permission, click in the field. A drop-down list shows all the choices. Click a choice, and that value now appears in the field. This makes it easy for you to enter the correct form of information while maintaining project data integrity.
In many project and resource views, you can rearrange the order or information by sorting, grouping, or filtering information by criteria you choose.
Sorting places information in alphabetical or numerical order, in either ascending or descending order. To sort items in a view by a particular field on a table, follow these steps:
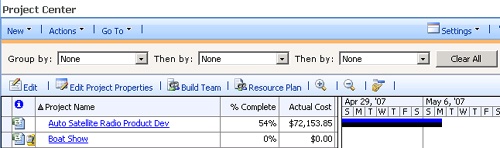
Grouping places information in categories relevant to the field you’re grouping by. To group items by a particular field in a view, follow these steps:
In the view containing the table with fields you want to group, click Settings, Group.
In the group pane that appears below the menu bar, click the arrow in the Group By box to see your grouping choices in the drop-down list (see Figure 24-6).
Click the field you want to group by.
The task list changes to reflect your grouping.
If you want a subgroup within the group, click the second field in the Then By box.
When you want to return to the original nongrouped order, click None in the Group By box.
Filtering removes information you don’t want to view so that you see only the information that meets the conditions of the field(s) you are concerned with. To filter items by using a built-in filter in a view, follow these steps:
Display the view in which you want to filter information.
Click Settings, Filter.
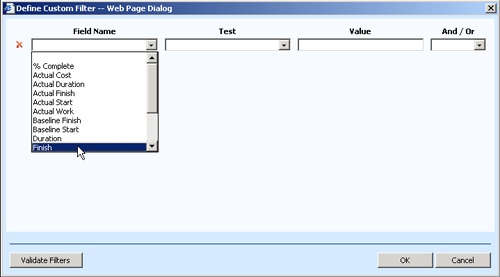
In the filter pane that appears below the menu bar, click Custom Filter.
In the Define Custom Filter dialog box, click the field you want to filter by in the Field Name box, for example, % Complete or Finish (see Figure 24-7).
In the Test field, enter the test criteria, for example, Equals or Is Greater Than.
In the Value field, enter the value for the field and then click OK.
The task list changes immediately to show only those tasks that meet your filter criteria.
To see all tasks again, click All Projects in the Filter box.
You can also select the AutoFilter check box to add the AutoFilter arrows to each column in the table. Click one of the arrows and then select a value by which to filter the list. To see all tasks again, click the AutoFilter arrow and then click (All).
To search for an assignment on your current page, click Settings, Search. Controls for search criteria appear in a pane.
To close the Filter, Group, or Search pane, click the X (close) button in the upper-left corner of the pane.